Ryobi PCL1308B Operation Manual 1 - Page 5
Assembly, Operation
 |
View all Ryobi PCL1308B manuals
Add to My Manuals
Save this manual to your list of manuals |
Page 5 highlights
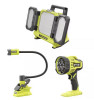
ASSEMBLY WARNING: Do not use this product if it is not completely assembled or if any parts appear to be missing or damaged. Use of a product that is not properly and completely assembled or with damaged or missing parts could result in serious personal injury. WARNING: Do not attempt to modify this product or create accessories or attachments not recommended for use with this product. Any such alteration or modification is misuse and could result in a hazardous condition leading to possible serious personal injury. If any parts are damaged or missing, please call 1-800-525-2579 for assistance. OPERATION WARNING: Do not direct the light beam at persons or animals and do not stare into the light beam yourself (not even from a distance). Staring into the light beam may result in serious injury or vision loss. WARNING: Do not allow familiarity with products to make you careless. Remember that a careless fraction of a second is sufficient to inflict serious injury. WARNING: Do not use any attachments or accessories not recommended by the manufacturer of this product. The use of attachments or accessories not recommended can result in serious personal injury. NOTICE: Operate in a well ventilated area. Do not block vents. Keep them clear to allow proper ventilation. APPLICATIONS You may use this product for the purpose listed below: To illuminate distant objects and areas requiring additional light INSTALLING/REMOVING BATTERY PACK See Figure 1, page 7. Insert the battery pack as shown. Make sure the latches on each side of the battery pack snap into place and the battery pack is secured in the product before beginning operation. Depress the latches to remove the battery pack. If the light flashes during operation, try recharging and reinstalling the battery pack. For complete charging instructions, see the operator's manuals for your battery pack and charger. WARNING: Battery products are always in operating condition. Therefore, remove the battery pack when the product is not in use or when carrying at your side. INSTALLING/REMOVING BELT HOOK (NOT INCLUDED) See Figure 2, page 7. The belt hook is interchangeable. It may be installed on either side of the base. Align hole in belt hook with hole in tool's base. Install screw to secure belt hook in place. To uninstall, remove screw and then belt hook. TURNING THE SPOTLIGHT ON AND OFF See Figure 3, page 7. The spotlight has four settings: high, medium, low, and off. High: Press and release the switch trigger once. Medium: Press and release the switch trigger twice. Low: Press and release the switch trigger three times. Off: Press and release the switch trigger a fourth time. OVER TEMPERATURE PROTECTION If overheating occurs, the light will attempt to cool itself by dimming. If dimming does not cool the light sufficiently, it will shut off. As soon as the unit reaches normal operating temperature, it can be turned on again. If it shuts off, allow approximately 10 minutes of cool-down time before attempting to resume operation. 5 - English
-
 1
1 -
 2
2 -
 3
3 -
 4
4 -
 5
5 -
 6
6 -
 7
7 -
 8
8 -
 9
9 -
 10
10 -
 11
11 -
12
-
13
-
14
-
15
-
16
-
17
-
18
-
19
-
20
 |
 |
