Ryobi RY142300 User Manual 2 - Page 1
Ryobi RY142300 Manual
 |
View all Ryobi RY142300 manuals
Add to My Manuals
Save this manual to your list of manuals |
Page 1 highlights
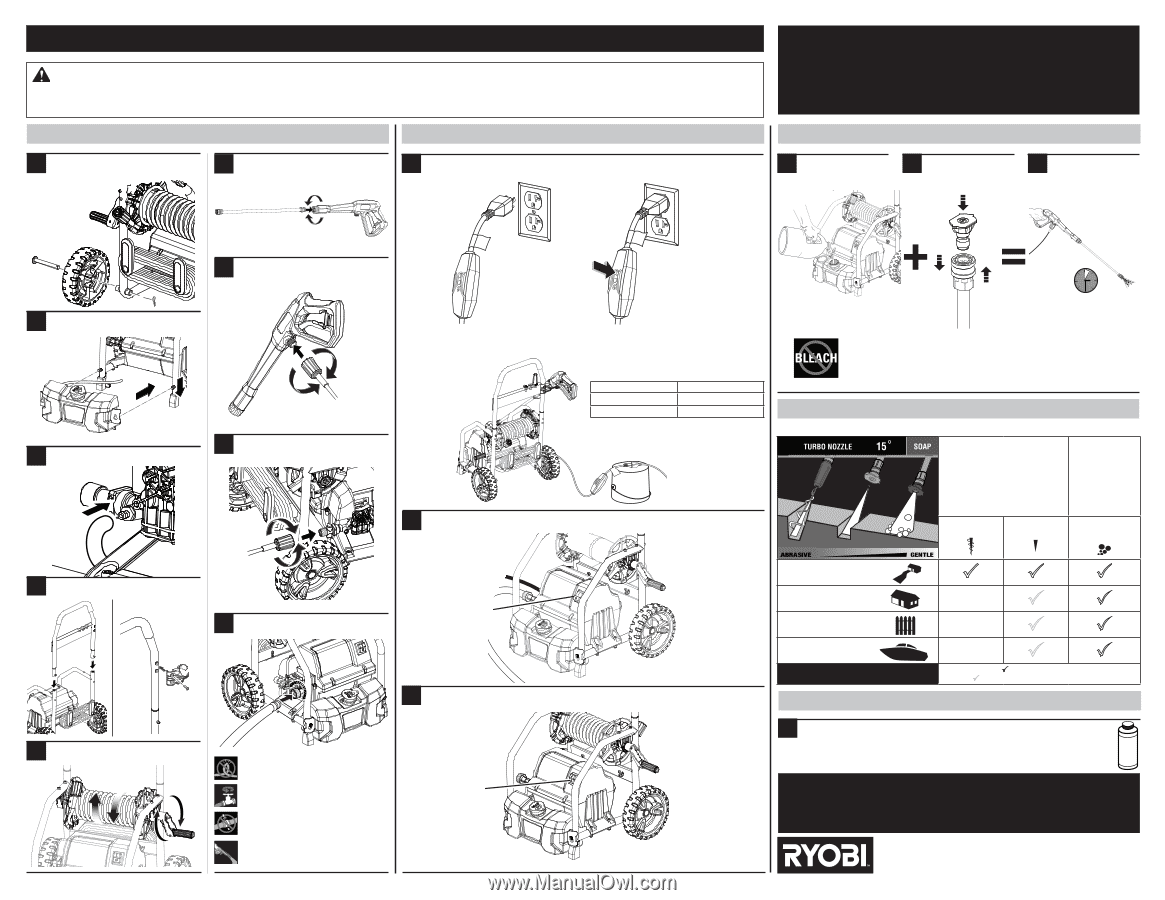
RY141900 QUICK REFERENCE GUIDE WARNING: This Quick Reference Guide is not a substitute for reading the operator's manual. To reduce the risk of injury or death, user must read and understand operator's manual before using this product. All page references refer to the operator's manual. Your pressure washer has been performance tested to ensure high quality standards are met. There may be residual water in the pump. FIRST TIME ASSEMBLY STARTING THE UNIT USING DETERGENT 1 Install the wheels (see page 9). 6 Install the spray wand (see page 9). 1 Connect the pressure washer to the power supply. Press the reset button on the plug to make sure the unit is ready for operation (see page 11). 1 Pour pressure washer detergent in soap tank (see page 13). 2 Install blue or black soap nozzle (see page 12). 3 Squeeze trigger and wait approx. 5 seconds for detergent (see page 13). 7 Connect the high pressure hose to the trigger handle (see page 9). DETERGENT 5 S 2 Attach the soap tank (see page 9). 3 Connect injection hose to fitting on pump (see page 9). 8 Connect the high pressure hose to the pump (see page 9). This pressure washer is not recommended for use with an extension cord. If using an extension cord, arrange a drip loop to avoid the possibility of the tool plug getting wet (see pages 2 and 7). USE ONLY THIS SIZE EXTENSION CORD WHEN USING THIS PRODUCT: Cord Length 25 ft. Wire Size (A.W.G.) 12 50 ft. Not Allowed NOTE: A.W.G. = American Wire Gauge Use of soap nozzle will activate detergent injector at a 20:1 dilution ratio. WARNING! Never use bleach or solvent-based detergent. • Will damage your pump • Will void your warranty • Will damage plants/shrubs NOZZLE SELECTION GUIDE Use the chart below to determine the correct nozzle for your job. 2 Press switch ON to start the motor (see page 11). HIGH PRESSURE (NO SOAP WHEN USING THESE NOZZLES) Turbo Nozzle 15º LOW PRESSURE (FOR SOAP OR GENTLE RINSE) Blue or Black Soap Nozzle 4 Install the handle and spray wand storage bracket (see page 9). 9 Connect your garden hose to the pressure washer (see page 10). SWITCH ON 5 Remove high pressure hose from reel (see page 9). 3 When finished, press switch OFF to stop the motor (see page 11). Completely uncoil garden hose or remove completely from reel to prevent kinks. Turn water faucet on fully. Make sure there are no leaks. With no nozzle installed, squeeze the trigger to relieve air pressure. Hold the trigger until a steady stream of water appears. SWITCH OFF Concrete, Brick, Masonry Siding, Gutters, House Fencing, Deck, Patio Lawn Equipment, Boat, RV Recommended Nozzle Use With Caution for Certain Applications BEFORE STORING THE UNIT 1 Always add Pump Protector to the unit after each use and before storing. This will significantly improve pump life. (See page 14.) Pump protector is available from your local retailer. For further assistance, call customer service at 1-800-860-4050. To add, follow the instructions provided by the Pump Protector manufacturer. PUMP PROTECTOR Make the most of your purchase! Go to www.ryobitools.com and register your new tool online. For questions about operating or maintaining your product, please call, 1-800-860-4050. 991000318 6-13-17 (REV:03)
-
 1
1
 |
 |