Ryobi RY40250 Operation Manual 4 - Page 2
Curved Shaft, Straight Shaft - trimmer
 |
View all Ryobi RY40250 manuals
Add to My Manuals
Save this manual to your list of manuals |
Page 2 highlights
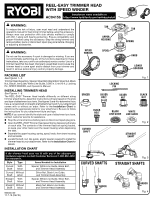
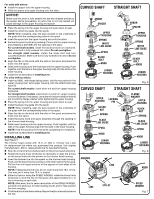
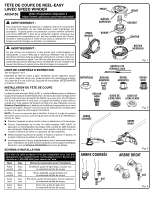
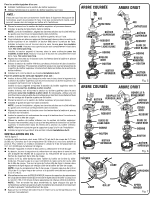
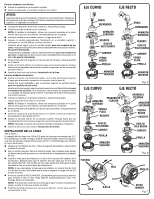
For units with arbors: Install the spacer onto the upper housing. Slide the spacer and upper housing onto the arbor. NOTICE: Make sure the arbor is fully seated into the hex-shaped pocket on the spacer before proceeding. An arbor that is not fully seated will cause damage to the upper housing and spacer. Place the spring into the upper housing and push down to seat. Install the white line guide into the spool. NOTE: When installing, align the keys located on the underside of the guide with the corresponding holes in the spool. Insert the spool into the upper housing and onto the arbor. Secure the spool in place by pressing it firmly into the upper housing and installing a bolt (M8) into the opening in the arbor. For curved shaft models, install the black bolt and turn clockwise. Make sure bolt is fully screwed into arbor. Do not overtighten. For straight shaft models, install the silver bolt and turn counterclockwise. Make sure bolt is fully screwed into arbor. Do not overtighten. Align the ribs on the knob with the slots in the spool and place the knob onto the spool. Slide lower housing over the knob and onto the upper housing. Push together until the tabs in the upper housing snap into the slots in the lower housing. Install line as described in Installing Line. For units without arbors: Insert nut (M8), with flange facing down, into the hex pocket in the upper housing then twist upper housing onto the attachment (see figure 6). For curved shaft models, insert silver nut and turn upper housing clockwise. For straight shaft models, insert black nut and turn upper housing counterclockwise. If necessary, use a wrench (not provided) or locking pin to hold the flange washer while tightening the upper housing. Place the spring into the upper housing and push down to seat. Install the black line guide into the spool. NOTE: When installing, align the keys located on the underside of the guide with the corresponding holes in the spool. Align the ribs on the knob with the slots in the spool and place the knob onto the spool. Insert the bump knob and spool assembly through the opening in the trimmer head housing. Slide lower housing onto the upper housing. Push together until the tabs in the upper housing snap into the slots in the lower housing. NOTE: Hold the spool by the knob while completing the installation. Install line as described in Installing Line. INSTALLING LINE See Figure 7. The trimmer head comes with 16 ft. of .095 in. trimmer line. Look for replacement line where you purchased this product. Use original manufacturer's .095 in. replacement line for best performance. Stop the unit and remove battery pack or disconnect spark plug wire. Rotate the bump knob clockwise as necessary to align the arrows on the bump knob with the arrows on the trimmer head housing. Insert the trimmer line into the eyelet on the trimmer head housing. Push until the end of the line comes out the other side of the housing. Pull the line until equal amounts of line appear on both sides of the housing. NOTE: If replacing trimmer line, do not insert more than 18 ft. of line. Line may jam if more than 18 ft. is loaded. Either by hand or using the SPEED WINDER, rotate the bump knob clockwise to wind the line on the spool until approximately 6 in. of line is showing on each side. NOTE: After every five to seven revolutions of the SPEED WINDER, pull both line ends taut for best loading results and to help prevent line from tangling. Push the bump knob down while pulling on line(s) to manually advance the line. CURVED SHAFT STRAIGHT SHAFT ARBOR SPACER UPPER HOUSING SPRING WHITE LINE GUIDE SPOOL BLACK BOLT KNOB LOWER HOUSING ARBOR SPACER UPPER HOUSING SPRING WHITE LINE GUIDE SPOOL SILVER BOLT KNOB LOWER HOUSING Fig. 5 CURVED SHAFT STRAIGHT SHAFT UPPER HOUSING LOCKING PIN SILVER NUT SPRING BLACK LINE GUIDE SPOOL FLANGE WASHER UPPER HOUSING BLACK NUT SPRING BLACK LINE GUIDE SPOOL KNOB LOWER HOUSING KNOB LOWER HOUSING Fig. 6 ARROWS LINE KNOB LINE EYELET SPEED WINDER Fig. 7
-
 1
1 -
 2
2 -
 3
3 -
 4
4 -
 5
5 -
 6
6
 |
 |
