Ryobi RY40502A User Manual - Page 11
Assembly
 |
View all Ryobi RY40502A manuals
Add to My Manuals
Save this manual to your list of manuals |
Page 11 highlights
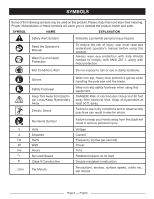
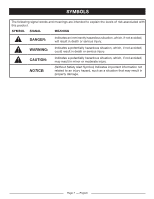
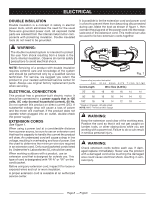
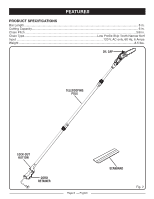
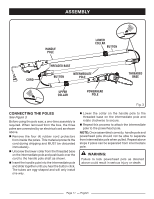
ASSEMBLY HANDLE POLE LOWER COLLAR BUTTON CORD THREADED BASE BUTTON INTERMEDIATE POLE THREADED BASE UPPER COLLAR POWERHEAD POLE Fig. 3 CONNECTING THE POLES See Figure 3. Before using the pole saw, a one-time assembly is required. When removed from the box, the three poles are connected by an electrical cord as shown above. n Remove the four (4) rubber cord protectors from inside the poles. This material protects the cord during shipping and MUST be discarded immediately. n Unscrew the lower collar from the threaded base on the intermediate pole and push back over the cord to the handle pole shaft as shown. n Insert the handle pole into the intermediate pole and slide together until you hear the button click. The tubes are egg-shaped and will only install one way. n Lower the collar on the handle pole to the threaded base on the intermediate pole and rotate clockwise to secure. n Repeat this process to attach the intermediate pole to the powerhead pole. NOTE: Once assembled correctly, handle pole and powerhead pole should not be able to separate from intermediate pole when pulled. Repeat above steps if poles can be separated from intermediate pole. WARNING: Failure to lock powerhead pole as directed above could result in serious injury or death. Page 11 - English
-
 1
1 -
2
-
3
-
4
-
5
-
 6
6 -
 7
7 -
 8
8 -
 9
9 -
 10
10 -
 11
11 -
 12
12 -
 13
13 -
 14
14 -
 15
15 -
 16
16 -
17
-
18
-
19
-
20
-
21
-
22
-
23
-
24
-
25
-
26
-
27
-
28
-
29
-
30
-
31
-
32
-
33
-
34
-
35
-
36
-
37
-
38
-
39
-
40
-
41
-
42
-
43
-
44
-
45
-
46
-
47
-
48
-
49
-
50
-
51
-
52
-
53
-
54
-
55
-
56
-
57
-
58
-
59
-
60
 |
 |
