Ryobi RY40610A User Manual 4 - Page 4
Operation, Assembly - parts
 |
View all Ryobi RY40610A manuals
Add to My Manuals
Save this manual to your list of manuals |
Page 4 highlights
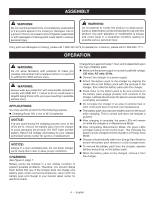
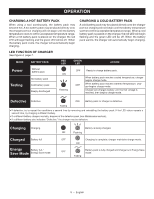
ASSEMBLY WARNING: Do not use this product if it is not completely assembled or if any parts appear to be missing or damaged. Use of a product that is not properly and completely assembled or with damaged or missing parts could result in serious personal injury. WARNING: Do not attempt to modify this product or create accessories or attachments not recommended for use with this product. Any such alteration or modification is misuse and could result in a hazardous condition leading to possible serious personal injury. If any parts are damaged or missing, please call 1-800-525-2579 for assistance. In Mexico, please call 01-800-843-1111. OPERATION WARNING: Do not allow familiarity with products to make you careless. Remember that a careless fraction of a second is sufficient to inflict serious injury. WARNING: Always wear eye protection with side shields marked to comply with ANSI Z87.1. Failure to do so could result in objects being thrown into your eyes resulting in possible serious injury. APPLICATIONS You may use this product for the following purpose: Charging Ryobi 18V Li-ion or Ni-Cd batteries NOTICE: If at any point during the charging process none of the LEDs are lit, remove the battery pack from the charger to avoid damaging the product. DO NOT insert another battery. Return the charger and battery to your nearest authorized service center for service or replacement. NOTICE: Charge in a well-ventilated area. Do not block charger vents. Keep them clear to allow proper ventilation. CHARGING See Figure 2, page 7. Battery packs are shipped in a low charge condition to prevent possible problems. Therefore, you should charge them before first use. If the charger does not charge your battery pack under normal circumstances, return both the battery pack and charger to your nearest repair center for electrical check. Charge time is approximately 1 hour, and is dependent upon the type of battery pack. Make sure the power supply is normal household voltage, 120 volts, AC only, 60 Hz. Connect the charger to a power supply. Attach the battery pack to the charger by aligning the raised ribs on the battery pack with the grooves in the charger, then slide the battery pack onto the charger. Press down on the battery pack to be sure contacts on the battery pack engage properly with contacts in the charger. Latches should snap into place to ensure charger is correctly connected. Do not place the charger in an area of extreme heat or cold. It will work best at normal room temperature. The battery pack may become slightly warm to the touch while charging. This is normal and does not indicate a problem. After charging is complete, the green LEDs will remain on while the charger is in Maintenance Mode. After completing Maintenance Mode, the green LEDs will begin fading on/off continuously. This indicates the battery is fully charged and the charger is in Energy Save Mode. Charger will periodically wake from Energy Save Mode to ensure the battery pack remains in a fully charged state. To remove the battery pack from the charger, depress latches and pull up on the battery pack. When the battery pack is fully charged, remove it from the charger. 4 - English
-
 1
1 -
 2
2 -
 3
3 -
 4
4 -
 5
5 -
 6
6 -
 7
7 -
 8
8 -
 9
9 -
 10
10 -
11
-
12
-
13
-
14
-
15
-
16
-
17
-
18
-
19
-
20
 |
 |
