Ryobi RY43160A User Manual - Page 13
Connecting To Power Supply, Starting And Stopping, Adjusting Telescoping Pole
 |
View all Ryobi RY43160A manuals
Add to My Manuals
Save this manual to your list of manuals |
Page 13 highlights
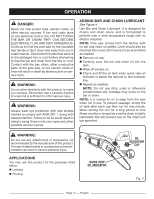
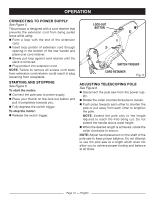
OPERATION CONNECTING TO POWER SUPPLY See Figure 5. This product is designed with a cord retainer that prevents the extension cord from being pulled loose while using. n Form a loop with the end of the extension cord. n Insert loop portion of extension cord through opening in the bottom of the rear handle and place over cord retainer. n Slowly pull loop against cord retainer until the slack is removed. n Plug product into extension cord. NOTE: Failure to remove all excess cord slack from extension cord retainer could result in plug loosening from receptacle. STARTING AND STOPPING See Figure 5. To start the motor: n Connect the pole saw to power supply. n Place your thumb on the lock-out button and pull it completely towards you. n Fully depress the switch trigger. To stop the motor: n Release the switch trigger. LOCK-OUT BUTTON SWITCH TRIGGER CORD RETAINER Fig. 5 ADJUSTING TELESCOPING POLE See Figure 6. n Disconnect the pole saw from the power supply. n Rotate the collar counterclockwise to loosen. n Push poles towards each other to shorten the pole or pull away from each other to lengthen the pole. NOTE: Extend the pole only to the length required to reach the limb being cut. Do not extend the handle above waist height. n When the desired length is achieved, rotate the collar clockwise to secure. NOTE: Adjust hand placement on the shaft of the pole saw to keep proper balance. Do not attempt to use the pole saw at a length which does not allow you to achieve proper footing and balance at all times. Page 13 - English
-
 1
1 -
2
-
3
-
4
-
5
-
6
-
7
-
 8
8 -
 9
9 -
 10
10 -
 11
11 -
 12
12 -
 13
13 -
 14
14 -
 15
15 -
 16
16 -
 17
17 -
 18
18 -
19
-
20
-
21
-
22
-
23
-
24
-
25
-
26
-
27
-
28
-
29
-
30
-
31
-
32
-
33
-
34
-
35
-
36
-
37
-
38
-
39
-
40
-
41
-
42
-
43
-
44
-
45
-
46
-
47
-
48
-
49
-
50
-
51
-
52
-
53
-
54
-
55
-
56
-
57
-
58
-
59
-
60
 |
 |
