Samsung 153S User Manual (ENGLISH) - Page 28
Removing the base, Attaching a base
 |
View all Samsung 153S manuals
Add to My Manuals
Save this manual to your list of manuals |
Page 28 highlights
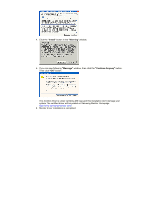
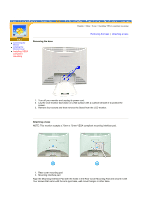
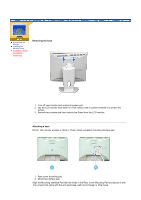
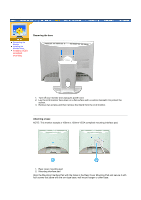
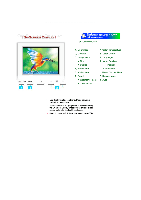
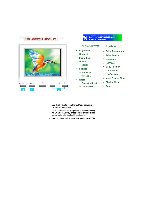
SyncMaster 153V/173V/152V/172V/193V/192V Connecting the Monitor Installing the Monitor Driver Installing VESA compliant mounting Removing the base English > Main > Setup > Installing VESA compliant mounting Removing the base | Attaching a base 1. Turn off your monitor and unplug its power cord. 2. Lay the LCD monitor face-down on a flat surface with a cushion beneath it to protect the screen. 3. Remove four screws and then remove the Stand from the LCD monitor. Attaching a base NOTE: This monitor accepts a 75mm x 75mm VESA-compliant mounting interface pad. 1. Rear cover mounting pad 2. Mounting interface pad Align the Mounting Interface Pad with the holes in the Rear Cover Mounting Pad and secure it with four screws that came with the arm-type base, wall mount hanger or other base.
-
 1
1 -
2
-
3
-
4
-
5
-
6
-
7
-
8
-
9
-
10
-
11
-
12
-
13
-
14
-
15
-
16
-
17
-
18
-
19
-
20
-
21
-
22
-
 23
23 -
 24
24 -
 25
25 -
 26
26 -
 27
27 -
 28
28 -
 29
29 -
 30
30 -
 31
31 -
 32
32 -
 33
33 -
34
-
35
-
36
-
37
-
38
-
39
-
40
-
41
-
42
-
43
-
44
-
45
-
46
-
47
-
48
-
49
-
50
-
51
-
52
-
53
-
54
-
55
-
56
-
57
-
58
-
59
-
60
-
61
-
62
-
63
-
64
-
65
-
66
-
67
-
68
-
69
-
70
-
71
-
72
-
73
-
74
-
75
-
76
-
77
-
78
-
79
-
80
-
81
-
82
 |
 |
