Samsung 2263DX Quick Guide (ENGLISH) - Page 4
MENU button [MENU, button, Adjust buttons, SOURCE button / Enter button, AUTO button, Power button - camera
 |
UPC - 729507803692
View all Samsung 2263DX manuals
Add to My Manuals
Save this manual to your list of manuals |
Page 4 highlights
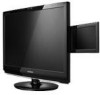
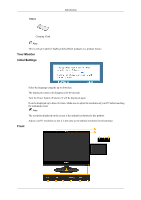
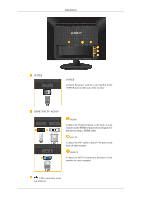
Introduction MENU button [MENU/ ] Opens the on-screen menu and exits from the menu. Also use to exit the OSD menu or return to the previous menu. Customized Key You can customize key assignment for the Custom button according to your preferences. Note You can configure the Customized key for a required function via Setup > Customized Key. Volume button When OSD is not on the screen, push the button to adjust volume. >> Click here to see an animation clip Adjust buttons [ ] Adjust items in the menu. SOURCE button / Enter button [ ] Push the 'SOURCE/ ', then selects the video signal while the OSD is off. (When the SOURCE/ button is pressed to change the input mode, a message appears in the upper left of the screen displaying the current mode -- analog or digital input signal.) / Activates a highlighted menu item. Note If you select the digital mode, you must connect your monitor to the graphic card's DVI port using the DVI cable. >> Click here to see an animation clip AUTO button Use this button for auto adjustment. (Available in Analog mode only) >> Click here to see an animation clip Power button [ ] / Power indicator Use this button for turning the monitor on and off. / This light glows blue during normal operation, and blinking blue once as the monitor saves your adjustments. Camera Using this camera, you can view and send video for video chatting. Mic Using this microphone, you can view and send audio for video chatting. Speaker You can hear sound by connecting the soundcard of your PC to the monitor.
-
 1
1 -
 2
2 -
 3
3 -
 4
4 -
 5
5 -
 6
6 -
 7
7 -
 8
8 -
 9
9 -
 10
10 -
11
-
12
-
13
-
14
-
15
-
16
-
17
-
18
-
19
-
20
-
21
-
22
-
23
-
24
 |
 |