Samsung ASAML210SK2 User Manual - Page 69
PictBridge, Playback
 |
UPC - 718122530236
View all Samsung ASAML210SK2 manuals
Add to My Manuals
Save this manual to your list of manuals |
Page 69 highlights
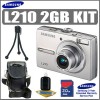
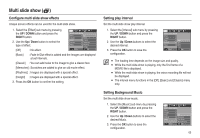
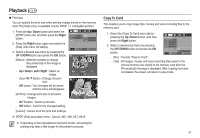
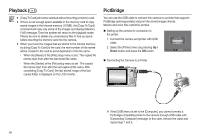
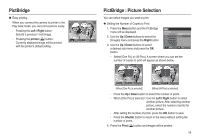
Playback () x [CopyTo Card] will not be selected without inserting a memory card. x If there is not enough space available in the memory card to copy saved images in the internal memory (10 MB), the [Copy To Card] command will copy only some of the images and display [Memory Full!] message. Then the system will return to the playback mode. Please be sure to delete any unnecessary files to free up space before inserting the memory card into the camera. x When you move the images that are stored in the internal memory by doing [Copy To Card] to the card, the next number of file names will be created in the card to avoid duplication of the file name. - When the [Reset] of the [File] setup menu is set : The copied file names start from after the last stored file name. - When the [Series] of the [File] setup menu is set : The copied file names start from after the last captured file name. After completing [Copy To Card], the last stored image of the last copied folder is displayed on the LCD monitor. PictBridge You can use the USB cable to connect this camera to a printer that supports PictBridge (sold separately) and print the stored images directly. Movies and voice files cannot be printed. „ Setting up the camera for connection to the printer 1. Connect the camera and printer with USB cable. 2. Select the [Printer] menu by pressing Up / Down button and press the OK button. Select USB Computer Printer Confirm „ Connecting the Camera to a Printer K If the [USB] menu is set to the [Computer], you cannot connect a Pictbridge compatible printer to the camera through USB cable with [Connecting Computer] message. In this case, remove the cable and repeat step 1 and 2. 68
-
 1
1 -
2
-
3
-
4
-
5
-
6
-
7
-
8
-
9
-
10
-
11
-
12
-
13
-
14
-
15
-
16
-
17
-
18
-
19
-
20
-
21
-
22
-
23
-
24
-
25
-
26
-
27
-
28
-
29
-
30
-
31
-
32
-
33
-
34
-
35
-
36
-
37
-
38
-
39
-
40
-
41
-
42
-
43
-
44
-
45
-
46
-
47
-
48
-
49
-
50
-
51
-
52
-
53
-
54
-
55
-
56
-
57
-
58
-
59
-
60
-
61
-
62
-
63
-
 64
64 -
 65
65 -
 66
66 -
 67
67 -
 68
68 -
 69
69 -
 70
70 -
 71
71 -
 72
72 -
 73
73 -
 74
74 -
75
-
76
-
77
-
78
-
79
-
80
-
81
-
82
-
83
-
84
-
85
-
86
-
87
-
88
-
89
-
90
-
91
-
92
-
93
-
94
-
95
-
96
-
97
-
98
-
99
-
100
-
101
-
102
-
103
-
104
 |
 |