Samsung BD-E5400 User Manual Ver.1.0 (English) - Page 10
Audio Settings, Network Settings - picture
 |
View all Samsung BD-E5400 manuals
Add to My Manuals
Save this manual to your list of manuals |
Page 10 highlights
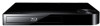
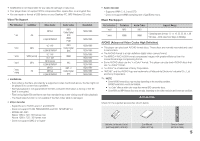
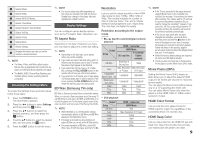
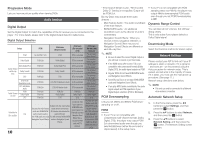
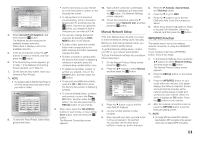
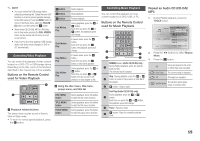
Progressive Mode Lets you improve picture quality when viewing DVDs. Audio Settings Digital Output Set the Digital Output to match the capabilities of the AV receiver you've connected to the player : For more details, please refer to the Digital Output Selection table below. Digital Output Selection Setup PCM Bitstream (Unprocessed) Bitstream (Re-encoded DTS) Bitstream (Re-encoded Dolby D) PCM Up to PCM 7.1ch PCM DTS re-encoded Re-encoded Dolby Digital * Dolby Digital PCM 2ch Dolby Digital DTS re-encoded Re-encoded Dolby Digital * Dolby Digital Plus Audio Stream on Blu-ray Disc Dolby TrueHD DTS PCM 2ch PCM 2ch PCM 2ch Dolby Digital Plus Dolby TrueHD DTS DTS re-encoded DTS re-encoded DTS re-encoded Re-encoded Dolby Digital * Re-encoded Dolby Digital * Re-encoded Dolby Digital * DTS-HD Hi Resolution Audio PCM 2ch DTS-HD Hi Resolution Audio DTS re-encoded Re-encoded Dolby Digital * DTS-HD Master Audio PCM 2ch DTS-HD Master Audio DTS re-encoded Re-encoded Dolby Digital * Audio Stream on DVD PCM Dolby Digital DTS PCM 2ch PCM 2ch PCM 2ch PCM 2ch Dolby Digital DTS PCM 2ch Dolby Digital DTS PCM 2ch Dolby Digital DTS Definition for Blu-ray Disc Any Outputs only the main feature Decodes the main feature audio stream so that your audio and BONUSVIEW AV receiver can decode the audio stream together audio bitstream. into PCM audio and adds You will not hear BONUSVIEW Navigation Sound Effects. audio or Navigation Sound Effects. Decodes the main feature audio and BONUSVIEW audio stream together into PCM audio and adds Navigation Sound Effects, then reencodes the PCM audio into DTS bitstream. Decodes the main feature audio and BONUSVIEW audio stream together into PCM audio and adds Navigation Sound Effects, then re-encodes the PCM audio into Dolby Digital bitstream or PCM. 10 * If the Source Stream is 2ch, "Re-encoded Dolby D" Setting is not applied. Output will be PCM 2ch. Blu-ray Discs may include three audio streams : -- Main Feature Audio : The audio soundtrack of the main feature. -- BONUSVIEW audio : An additional soundtrack such as the director or actor's commentary. -- Navigation Sound Effects : When you choose a menu navigation selection, a Navigation Sound Effect may sound. Navigation Sound Effects are different on each Blu-ray Disc. ✎✎ NOTE `` Be sure to select the correct Digital Output or you will hear no sound or just loud noise. `` If the HDMI device (AV receiver, TV) is not compatible with compressed formats (Dolby Digital, DTS), the audio signal outputs as PCM. `` Regular DVDs do not have BONUSVIEW audio and Navigation Sound Effects. `` Some Blu-ray Discs do not have BONUSVIEW audio and Navigation Sound Effects. `` If you play MPEG audio soundtracks, the audio signal outputs as PCM regardless of your Digital Output selections (PCM or Bitstream). PCM Downsampling Lets you set 48kHz and 96kHz PCM downsampling on or off. HDMI • If your TV is not compatible with compressed multi-channel formats (Dolby Digital, DTS), the player may output PCM 2ch downmixed audio even though you selected Bitstream (either Re-encoded or Unprocessed) in the setup menu. • If your TV is not compatible with PCM sampling rates over 48kHz, the player may output 48kHz downsampled PCM audio even though you set PCM Downsampling to Off. Dynamic Range Control You can listen at low volumes, but still hear dialog clearly. This is only active if your player detects a Dolby Digital signal. Downmixing Mode Select the Downmix method for stereo output. Network Settings Please contact your ISP to find out if your IP address is static or dynamic. If it is dynamic - and most are - we recommend using the Auto procedure for network setup. This is easiest and will work in the majority of cases. If it is static, you must use the manual set up procedure. (See page 11.) Network setup directions start below. ✎✎ NOTE `` This unit can only be connected to a Network via a wireless connection. Automatic Network Setup 1. In the Home menu, press the ◄► buttons to select Settings, and then press the v button. 2. Press the ▲▼ buttons to select Network, and then press the v button. 3. Press the ▲▼ buttons to select Network Setting, and then press the v button. The Network Setting screen appears.
-
 1
1 -
2
-
3
-
4
-
 5
5 -
 6
6 -
 7
7 -
 8
8 -
 9
9 -
 10
10 -
 11
11 -
 12
12 -
 13
13 -
 14
14 -
 15
15 -
16
-
17
-
18
-
19
-
20
-
21
 |
 |