Samsung BX2250 User Manual (user Manual) (ver.1.0) (English) - Page 36
Product Operating Buttons
 |
View all Samsung BX2250 manuals
Add to My Manuals
Save this manual to your list of manuals |
Page 36 highlights
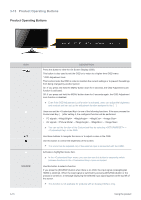
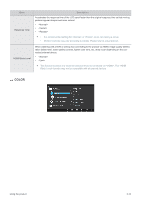
3-13 Product Operating Buttons Product Operating Buttons ICON ▲/▼ SOURCE 3-13 DESCRIPTION Press this button to view the On Screen Display (OSD). This button is also used to exit the OSD or to return to a higher-level OSD menu * OSD Adjustment Lock This function locks the OSD in order to maintain the current settings or to prevent the settings from being changed by another person On: If you press and hold the MENU button down for 5 seconds, the OSD Adjustment Lock function is activated. Off: If you press and hold the MENU button down for 5 seconds again, the OSD Adjustment Lock function is disabled. Even if the OSD Adjustment Lock function is activated, users can adjust the brightness and contrast and can set up the adjustment function assigned to the [ ]. Users can set the to one of the following functions. If the user presses the Customized Key [ ] after setting it, the configured function will be performed • PC signals : - - - • AV signals : - - - You can set the function of the Customized Key by selecting -> in the OSD. Use these buttons to navigate the menu or to adjust a value in the OSD. Use this button to control the brightness of the screen. The sound can be adjusted only if the external input is connected with the HDMI. Activates a highlighted menu item. In the menu, you can also use this button to sequently switch between functions in the menu as desired. Use this button to select a function If you press the [SOURCE] button when there is no OSD, the input signal (Analog/Digital/ HDMI) is switched. When the input signal is switched by pressing [SOURCE] button or the product is turned on, a message displaying the selected input signal appears at the top left of the screen. This function is not available for products with an Analog interface only. Using the product
-
 1
1 -
2
-
3
-
4
-
5
-
6
-
7
-
8
-
9
-
10
-
11
-
12
-
13
-
14
-
15
-
16
-
17
-
18
-
19
-
20
-
21
-
22
-
23
-
24
-
25
-
26
-
27
-
28
-
29
-
30
-
 31
31 -
 32
32 -
 33
33 -
 34
34 -
 35
35 -
 36
36 -
 37
37 -
 38
38 -
 39
39 -
 40
40 -
 41
41 -
42
-
43
-
44
-
45
-
46
-
47
-
48
-
49
-
50
-
51
-
52
-
53
-
54
-
55
-
56
-
57
-
58
-
59
-
60
-
61
-
62
-
63
-
64
-
65
-
66
-
67
-
68
-
69
-
70
-
71
-
72
-
73
-
74
-
75
-
76
-
77
 |
 |
