Samsung DIGIMAX S700 User Manual - Page 4
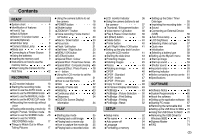
Contents
 |
View all Samsung DIGIMAX S700 manuals
Add to My Manuals
Save this manual to your list of manuals |
Page 4 highlights
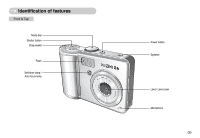
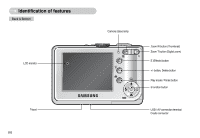
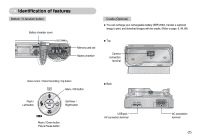
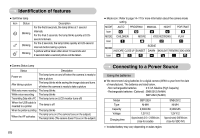
Contents READY ●System chart 4 ●Identification of features 5 ■Front & Top 5 ■Back & Bottom 6 ■Bottom / 5-function button 7 ■Cradle(Optional) 7 ■Self-timer lamp 8 ■Camera Status Lamp 8 ■Mode icon 8 ●Connecting to a Power Source 8 ■Using the batteries 8 ●Inserting the memory card 9 ●Instructions on how to use the memory card 10 ●When Using the Camera for the First Time 12 RECORDING ●LCD monitor indicator 13 ●Starting the recording mode 14 ■How to use the AUTO mode 14 ■How to use the PROGRAM mode 14 ■How to use the MANUAL mode 14 ■How to use the MOVIE CLIP mode 15 ■Recording the movie clip without voice 15 ■Pausing while recording a movie clip 15 ■Night / Portrait / Children mode 16 ■How to use the SCENE mode 16 ■How to use the VOICE RECORDING mode 17 ●Things to Watch Out for When Taking Pictures 17 ●Using the camera buttons to set the camera 18 ■POWER button 18 ■Shutter button 18 ■ZOOM W / T button 18 ■Voice recording / Voice memo / UP button 20 ■Macro / Down button 20 ■Focus lock 21 ■Flash / Left button 21 ■Self-timer / Right button 23 ■MENU / OK button 24 ■E (Effect) button 24 ■Special Effect : Colour 25 ■Special Effect : Preset focus frames 25 ■Special Effect : Composite shooting 26 ■Special Effect : Photo Frame 28 ■+ / - button 28 ●Using the LCD monitor to set the camera settings 31 ■How to use the menu 31 ■Size 32 ■Quality / Frame rate 32 ■Metering 33 ■Continuous shot 33 ■Sharpness 34 ■OSD (On Screen Display) information 34 PLAY ●Starting play mode 35 ■Playing back a still image 35 ■Playing back a movie clip 35 ■How to capture the movie clip 35 ■Playing back a recorded voice 36 ●LCD monitor Indicator 36 ●Using the camera buttons to set the camera 37 ■Thumbnail / Enlargement button 37 ■Voice memo / Up button 38 ■Play & Pause / Down button 39 ■E (Effect) button 39 ■Delete button 40 ■Printer button 40 ■Left / Right / Menu / OK button 41 ●Setting up the play back function using the LCD monitor 41 ■Starting the slide show 43 ■Protecting images 44 ■Deleting images 45 ■Resize 45 ■Rotating an image 46 ■DPOF 46 ■DPOF : Standard 47 ■DPOF : Index 47 ■DPOF : Print size 48 ■Copy To Card 48 ■On Screen Display information 49 ■PictBridge 49 ■PictBridge : Picture Selection 50 ■PictBridge : Print Setting 50 ■PictBridge : Printing 51 ■PictBridge : Reset 52 SETUP ●Setup menu 52 ■File name 53 ■Auto power off 54 ■Language 54 ■Formatting a memory 55 ■Setting up the Date / Time / Date type 55 ■Imprinting the recording date 55 ■Sound 56 ■Connecting an External Device (USB) 56 ■Auto Focus lamp 56 ■LCD brightness 56 ■Selecting Video out type 57 ■Quick view 57 ■Initialisation 58 ■Selecting a battery type 58 ●Setting up the Mycam menu 58 ■Start up image 58 ■Start up sound 59 ■Shutter sound 59 ●Important notes 59 ●Warning indicator 61 ●Before contacting a service centre 61 ●Specifications 63 SOFTWARE ●Software Notes 65 ●System Requirements 65 ●About the software 65 ●Setting up the application software 66 ●Starting PC mode 67 ●Removing the removable disk 69 ●Setting up the USB Driver for MAC 70 ●Using the USB Driver for MAC 70 ●Removing the USB Driver for Windows 98SE 71 ●Digimax Master 71 ●FAQ 74 《3》
-
 1
1 -
 2
2 -
 3
3 -
 4
4 -
 5
5 -
 6
6 -
 7
7 -
 8
8 -
 9
9 -
 10
10 -
11
-
12
-
13
-
14
-
15
-
16
-
17
-
18
-
19
-
20
-
21
-
22
-
23
-
24
-
25
-
26
-
27
-
28
-
29
-
30
-
31
-
32
-
33
-
34
-
35
-
36
-
37
-
38
-
39
-
40
-
41
-
42
-
43
-
44
-
45
-
46
-
47
-
48
-
49
-
50
-
51
-
52
-
53
-
54
-
55
-
56
-
57
-
58
-
59
-
60
-
61
-
62
-
63
-
64
-
65
-
66
-
67
-
68
-
69
-
70
-
71
-
72
-
73
-
74
-
75
-
76
-
77
-
78
 |
 |
