Samsung HLP6163W Quick Guide (ENGLISH) - Page 1
Samsung HLP6163W - 61" Rear Projection TV Manual
 |
UPC - 036725243798
View all Samsung HLP6163W manuals
Add to My Manuals
Save this manual to your list of manuals |
Page 1 highlights
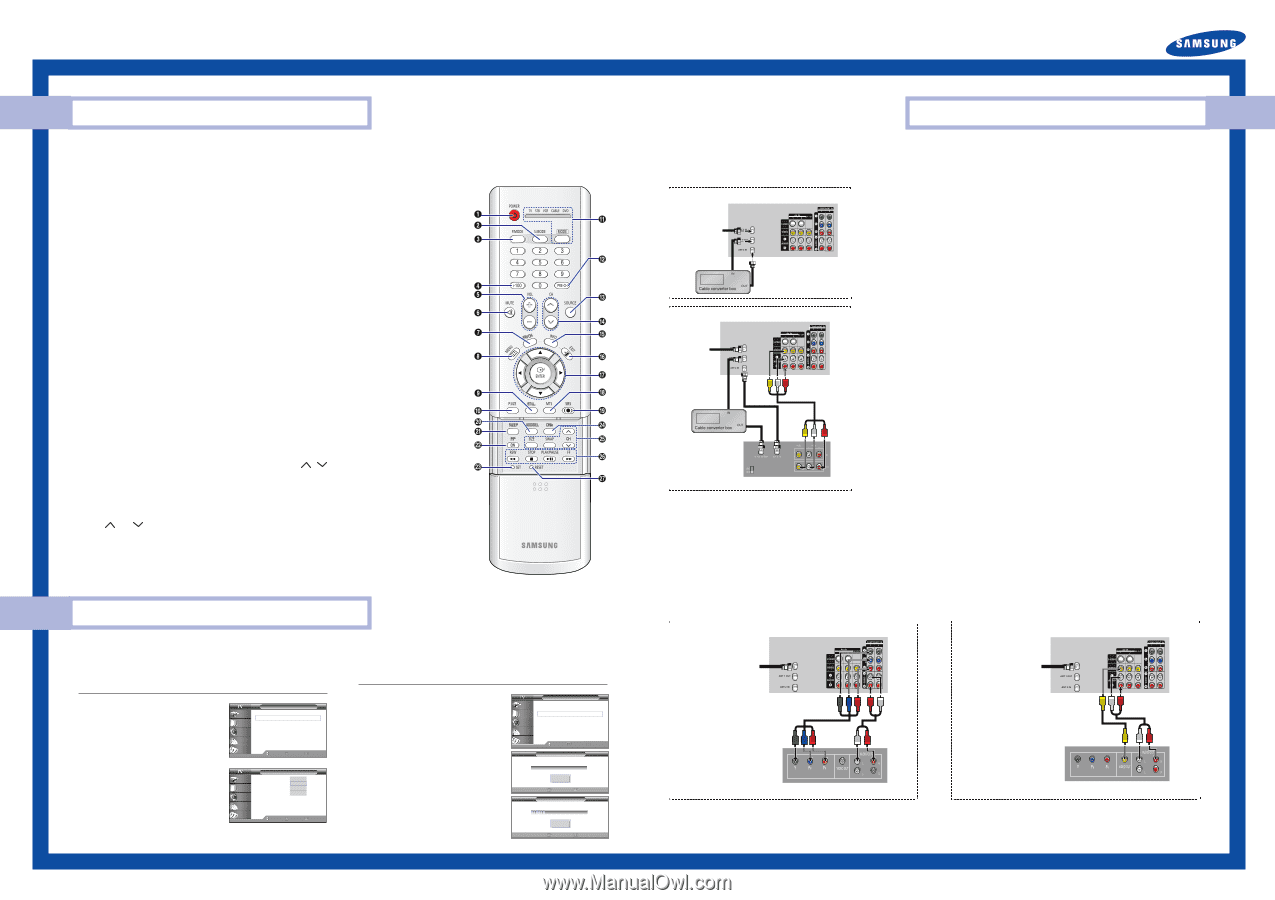
Quick Guide Your New Wide TV (DLP) Remote Control You can use the remote control up to about 23 feet from the TV. When using the remote control, always point it directly at the TV. You can also use your remote control to operate your Set-Top box, VCR, Cable box or DVD player. 1. POWER Turns the TV on and off. 2. S.MODE Adjust the TV sound by selecting one of the preset factory settings (or select your personal, customized sound settings.) 3. P.MODE Adjust the TV picture by selecting one of the preset factory settings (or select your personal, customized picture settings.) 4. +100 Press to select cable channels over 100 on TV. 5. VOL +, VOL Press to increase or decrease the volume. 6. MUTE Press to mute the TV sound. 7. FAV.CH (Favorite Channel) Press to switch between your favorite channels. 8. MENU Displays the main on-screen menu. 9. STILL Press to stop the action during a particular scene. Press again to resume normal video. 10. P.SIZE Press to change the picture size. 11. MODE Selects a target device to be controlled by the Samsung remote control (i.e., TV, STB, VCR, CABLE, or DVD). 12. PRE-CH Tunes to the previous channel. 13. SOURCE Press to display all of the available video sources (i.e., TV, Set-Top box, VCR, DVD, DTV, PC). 14. CH , CH Press to change channels. 15. INFO Press to display information on the TV screen. 16. EXIT Press to exit the menu. 17 ENTER Press to select highlight up, down, left, or right. While using the on-screen menus, press the ENTER to activate (or change) a particular item. 18. MTS (Multichannel Television Stereo) Press to choose Stereo, Mono or SAP (Separate Audio Program). 19. SRS Activates TruSurround. 20. ADD/DEL Press to add or erase channels in the TV's memory. Use the ADD/DEL button to memorize and erase the fine tuning after fine tuning channels. 21. SLEEP Press to select a preset time interval for automatic shutoff. 22. PIP (Picture In Picture) Activates PIP. 23. SET Used during set up of this remote control, so that it will work compatibly with other devices (Set-Top box, VCR, Cable box, DVD, etc.) 24. DNIe (Digital Natural Image engine) Activates DNIe. 25. PIP Controls SIZE; Press to select the size of PIP window. SWAP; Press to exchange the video signal that is currently displayed on the main screen with the signal in the PIP window. CH / ; Press to display the available channels in sequence. (These buttons change channels in the PIP window only.) 26. VCR/DVD Controls Controls VCR or DVD functions: Rewind, Stop, Play/Pause, Fast Forward. 27. RESET If your remote control is not functioning properly, take out the batteries and press the reset button for about 2~3 seconds. Re-insert the batteries and try using the remote control again. Operation Selecting the Video Signal Source Before your TV can begin memorizing the available channels, you must specify the type of signal source that is connected to the TV (i.e., an antenna or a cable system). Press the MENU button. Press the ... or † button to select "Channel", then press the ENTER button. Press the ... or † button to select "Air/CATV", then press the ENTER button. If you are connected to an antenna, press the ... or † button to select "Air". If you connected cable, press the ... or † button to select the type of cable system: "STD", "HRC" or "IRC". Press the EXIT button to exit. Input Picture Sound Channel Setup Channel Antenna : Ant.1 Air/CATV : Air Auto Program Add/Delete Favorite Channels Name Fine Tune M More Move Enter Return Input Picture Sound Channel Setup Channel Antenna : Ainrt.1 Air/CATV : SATiDr Auto Program HRC Add/Delete IRC Favorite Channels Name Fine Tune M More Move Enter Return Storing Channels in Memory (Automatic Method) First, select the correct signal source ("Air", "STD", "HRC" or "IRC") as described before. Press the MENU button. Press the ... or † button to select "Channel", then press the ENTER button. Press the ... or † button to select "Auto Program", then press the ENTER button. Press the ENTER button to start the auto program. The TV begins memorizing all of the available stations. Press the ENTER button at any time to interrupt the memorization process. Press the EXIT button to exit. Input Picture Sound Channel Setup Channel Antenna : Ant.1 Air/CATV : Air Auto Program Add/Delete Favorite Channels Name Fine Tune M More Move Enter Return Auto Program Start Enter Return Auto Program Stop Enter Air 11 Return Connections Connecting Cable TV and VCR You can connect different cable systems to your TV, including cable without a cable box, and cable with a cable box that descrambles some or all channels. From Cable TV Rear Panel Connecting a Cable Converter Box This connection allows you to watch cable and premium channels. You should keep your TV selected to "ANT 1 IN" so that you can use the TV features. When viewing premium channels, select "ANT 2 IN" and tune the TV to channel 3 or 4 (whichever channel is vacant in your area), then use the converter box to change channels. You will need two coaxial cables. NOTES • When you use a converter box with your TV, there may be features that you can not program using the remote control, such as programming your favorite channels and blocking channels. • The output from "ANT 1 OUT" is available when select "Ant.2" in the "Antenna" channel menu. From Cable TV Rear Panel Connecting a Cable Converter Box and a VCR This connection allows you to watch and record basic and premium cable channels, as well as watch videotapes. You should keep your TV selected to "ANT 1 IN" so that you can use the TV's features. When viewing premium channels or recording with the VCR, select "ANT 2 IN" (whichever channel is vacant in your area), then use the converter box to change channels. Caution: If you want to record one channel while watching another channel, a splitter (not included) must be added between the cable and "ANT 1 IN". One output of the splitter goes to "ANT 1 OUT" and the second output is connected to IN on the cable converter box. If you have a mono VCR, connect L/Mono to VCR Audio OUT using only one audio cable. If you have a S-VHS VCR, use the S-Video connections and remove the video cable. Do not connect the video cable and the S-Video cable to video1 simultaneously. When you use a converter box with your TV there may be features that you can not program using the remote control, such as programming your favorite channels and blocking channels. Second VCR Connecting a DVD Player The rear panel jacks on your TV make it easy to connect a DVD player to your TV. Connecting to Y, PB, PR Connect a set of audio cables between the COMPONENT (1 or 2) audio (L,R) in jacks on the TV and the AUDIO OUT jacks on the DVD player. To enable Component video viewing, connect a set of video cables between the COMPONENT (1 or 2) VIDEO (Y, PB, PR) in jacks on the TV and VIDEO (Y/PB/PR or Y/CB/CR) OUT jacks on the DVD player. TV Rear Panel Connecting to Audio and Video Jacks Connect a set of audio cables between the Audio in (1 or 2) jacks on the TV and the AUDIO OUT jacks on the DVD player. Connect a video cable between the VIDEO IN (1 or 2) jack on the TV and the VIDEO OUT jack on the DVD player. TV Rear Panel Incoming Cable or Antenna Incoming Cable or Antenna DVD Player NOTE : For an explanation of Component video, see your DVD player's owner's manual. DVD Player
-
 1
1 -
 2
2
 |
 |