Samsung HMX-U20RN User Manual (user Manual) (ver.1.0) (English) - Page 81
Dubbing Videos, Recording (dubbing) Images On A Vcr Or Dvd/hdd Recorder
 |
UPC - 036725303348
View all Samsung HMX-U20RN manuals
Add to My Manuals
Save this manual to your list of manuals |
Page 81 highlights
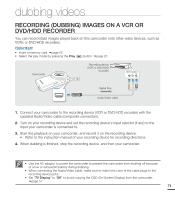
dubbing videos RECORDING (DUBBING) IMAGES ON A VCR OR DVD/HDD RECORDER You can record (dub) images played back on this camcorder onto other video devices, such as VCRs or DVD/HDD recorders. PRECHECK! • Insert a memory card. page 25 • Select the play mode by pressing the Play ( ) button. page 20 Camcorder Recording device (VCR or DVD/HDD recorder) Signal flow Audio/Video cable 1. Connect your camcorder to the recording device (VCR or DVD/HDD recorder) with the supplied Audio/Video cable (composite connection). 2. Turn on your recording device and set the recording device's input selector (if any) to the Input your camcorder is connected to. 3. Start the playback on your camcorder, and record it on the recording device. • Refer to the instruction manual of your recording device for recording directions. 4. When dubbing is finished, stop the recording device, and then your camcorder. • Use the AC adaptor to power the camcorder to prevent the camcorder from shutting off because of a low or exhausted battery during dubbing. • When connecting the Audio/Video cable, make sure to match the color of the cable plugs to the recording device jacks. • Set "TV Display" to "Off" to avoid copying the OSD (On-Screen-Display) from the camcorder. page 57 71
-
 1
1 -
2
-
3
-
4
-
5
-
6
-
7
-
8
-
9
-
10
-
11
-
12
-
13
-
14
-
15
-
16
-
17
-
18
-
19
-
20
-
21
-
22
-
23
-
24
-
25
-
26
-
27
-
28
-
29
-
30
-
31
-
32
-
33
-
34
-
35
-
36
-
37
-
38
-
39
-
40
-
41
-
42
-
43
-
44
-
45
-
46
-
47
-
48
-
49
-
50
-
51
-
52
-
53
-
54
-
55
-
56
-
57
-
58
-
59
-
60
-
61
-
62
-
63
-
64
-
65
-
66
-
67
-
68
-
69
-
70
-
71
-
72
-
73
-
74
-
75
-
 76
76 -
 77
77 -
 78
78 -
 79
79 -
 80
80 -
 81
81 -
 82
82 -
 83
83 -
 84
84 -
 85
85 -
 86
86 -
87
-
88
-
89
-
90
-
91
-
92
-
93
-
94
 |
 |
