Samsung HT-Q40 Quick Guide (easy Manual) (ver.1.0) (English) - Page 28
Setting the Test Tone, Setting the DRC (Dynamic Range Compression), Dynamic Range Compression
 |
View all Samsung HT-Q40 manuals
Add to My Manuals
Save this manual to your list of manuals |
Page 28 highlights
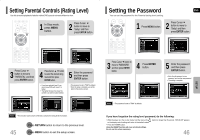
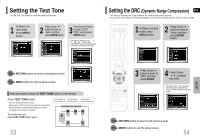
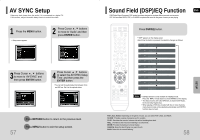
Setting the Test Tone Use the Test Tone feature to check the speaker connections. In Stop or no 1 disc mode, press MENU button. MOVE ENTER EXIT 2 Press Cursor button to move to 'Audio' and then press ENTER button. 3 Press Cursor button to move to 'TEST TONE' and then press ENTER button. • The test tone will be sent to L ➝ C ➝ R ➝ SR ➝ SL ➝ SW in order. If the ENTER button is pressed again at this time, the test tone will stop. MOVE ENTER EXIT MOVE ENTER RETURN EXIT Press RETURN button to return to the previous level. Press MENU button to exit the setup screen. STOP EXIT Alternate method: press the TEST TONE button on the remote. Press TEST TONE button. • Test tone will be produced as follows: When playing a DVD or CD, this will work only in Stop mode. • Use this function to check that each speaker is correctly connected and that there is no problem. To end the test tone, press TEST TONE button again. L: Front Speaker (L) C: Center Speaker SW: Subwoofer R: Front Speaker (R) SL: Rear Speaker (L) SR: Rear Speaker (R) Multi-Channel Pro Logic Mode Start 53 Setting the DRC (Dynamic Range Compression) ENG This feature balances the range between the loudest and quietist sounds. You can use this function to enjoy Dolby Digital sound when watching movies at low volume at night. 1 In Stop or no disc mode, press MENU button. 2 Press Cursor button to move to 'Audio' and then press ENTER button. SETUP MOVE ENTER EXIT MOVE ENTER EXIT 3 Press Cursor button to move to 'DRC' and then press ENTER 4 Press Cursor , to adjust the 'DRC'. • When the Cursor button is pressed, the effect is greater, and when the Cursor button is pressed, the effect is smaller. MOVE ENTER RETURN EXIT CHANGE RETURN EXIT Press RETURN button to return to the previous level. Press MENU button to exit the setup screen. 54
-
 1
1 -
2
-
3
-
4
-
5
-
6
-
7
-
8
-
9
-
10
-
11
-
12
-
13
-
14
-
15
-
16
-
17
-
18
-
19
-
20
-
21
-
22
-
 23
23 -
 24
24 -
 25
25 -
 26
26 -
 27
27 -
 28
28 -
 29
29 -
 30
30 -
 31
31 -
 32
32 -
 33
33 -
34
-
35
-
36
-
37
-
38
 |
 |
