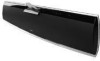
Samsung HT X810 User Manual (ENGLISH) - Page 2
connecting the video out to your tv, connecting audio from external components, listening to radio - manual
 |
UPC - 036725616820
View all Samsung HT X810 manuals
Add to My Manuals
Save this manual to your list of manuals |
Page 2 highlights
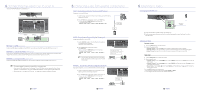
4 connecting the video out to your tv Choose one of the three methods for connecting to a TV. HDMI OUT HDMI OUT METHOD1 METHOD2 METHOD3 (supplied) METHOD 1 : HDMI (BEST QUALITY) Connect the HDMI cable (not supplied) from the HDMI OUT jack on the back of the DVD Player to the HDMI IN jack on your TV. METHOD 2 : Component Video (BETTER QUALITY) If your television is equipped with Component Video inputs, connect a Component video cable(not supplied) from the Component Video Output (Pr, Pb and Y) jacks on the back of the DVD Player to the Component Video Input jacks on your TV. METHOD 3 : Composite Video (GOOD QUALITY) Connect the supplied Video cable from the VIDEO OUT jack on the back of the DVD Player to the VIDEO IN jack on your TV. M This product operates in Interlace scan mode (480i) for component output. If you use an HDMI cable to connect a Samsung TV to the DVD Player, you can operate the Home Theater using the TV's remote control. This is only available with SAMSUNG TVs that support Anynet+(HDMI-CEC). Please check the logo (If your TV has an logo, then it supports the Anynet+ function.) 4 - English 5 connecting audio from external components AUX1 : Connecting an External Component/MP3 player Components such as an MP3 Player. 1. Connect AUX IN 1 (Audio) on the Home Theater to the Audio Out of the external component/MP3 player. 2. Press the AUX button on the remote control to select AUX1 input. • You can also use the FUNCTION button on the main unit. The mode switches as follows : DVD/CD ¨ D.IN ¨ AUX 1 ¨ AUX 2 ¨ USB ¨ BT AUDIO ¨ FM. Audio Cable (not supplied) Audio OUT AUX2 : Connecting an External Analog Component Analog signal components such as a VCR. 1. Connect AUX IN 2 (Audio) on the Home Theater to the Audio Out of the external analog component. • Be sure to match connector colors. 2. Press the AUX button on the remote control to select AUX 2 input. • You can also use the FUNCTION button on the main unit. The mode switches as follows : DVD/CD ¨ D.IN ¨ AUX 1 ¨ AUX 2 ¨ USB ¨ BT AUDIO ¨ FM. HDMI OUT Audio Cable (not supplied) If the external analog component has only one Audio Out, connect either left or right. M You can connect the Video Output jack of your VCR to the TV, and connect the Audio Output jacks of the VCR to this product. External Analog Component OPTICAL : Connecting an External Digital Component Digital signal components such as a Cable Box/Satellite receiver (Set-Top Box). 1. Connect the Digital Input (OPTICAL) on the Home Theater to the Digital Output of the external digital component. 2. Press the AUX button on the remote control to select DIGITAL IN. • You can also use the FUNCTION button on the main unit. The mode switches as follows : DVD/CD ¨ D.IN ¨ AUX 1 ¨ AUX 2 ¨ USB ¨ BT AUDIO ¨ FM. HDMI OUT Optical Cable (not supplied) 5 - English External Digital Component 6 listening to radio Connecting the FM Antenna HDMI OUT FM Antenna (supplied) 1. Connect the FM antenna supplied to the FM 75Ω COAXIAL Jack. 2. Slowly move the antenna wire around until you find a location where reception is good, then fasten it to a wall or other rigid surface. Listening to Radio Remote Control 1. Press the TUNER button to select the FM band. 2. Tune in to the desired station. • Automatic Tuning 1 : When the #,$ button is pressed, a preset broadcast station is selected. • Automatic Tuning 2 : Press and hold the ,,. button to automatically search for active broadcasting stations. • Manual Tuning : Briefly press the ,,. button to increase or decrease the frequency incrementally. Main Unit 1. Press the FUNCTION button to select the FM band. 2. Select a broadcast station. • Automatic Tuning 1 : Press the STOP () button to select PRESET and then press the #,$ button to select the preset station. • Automatic Tuning 2 : Press the STOP () button to select MANUAL and then press and hold the #,$ button to automatically search the band. • Manual Tuning : Press the STOP () button to select MANUAL and then briefly press the #,$ button to tune in to a lower or higher frequency. Press the MO/ST button to listen in Mono/Stereo. • Each time the button is pressed, the sound switches between STEREO and MONO. • In a poor reception area, select MONO for a clear, interference-free broadcast. 6 - English
-
 1
1 -
 2
2
 |
 |
