Samsung LN-R1550P Quick Guide (easy Manual) (ver.1.0) (English) - Page 17
Setting the Blue Screen Mode, Selecting the Source, Editing the Input Source Name, PC Display - resolution
 |
View all Samsung LN-R1550P manuals
Add to My Manuals
Save this manual to your list of manuals |
Page 17 highlights
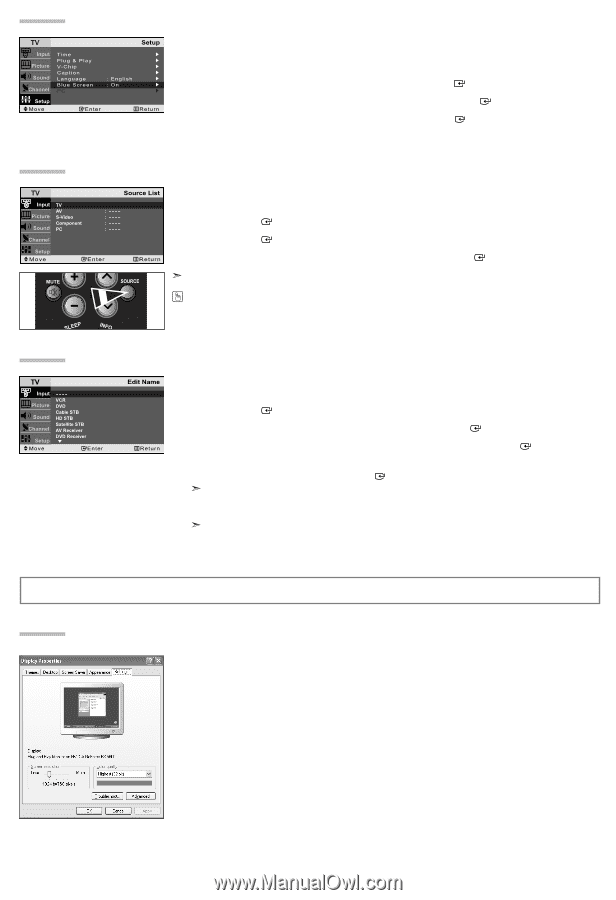
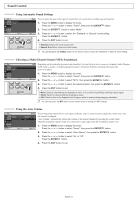
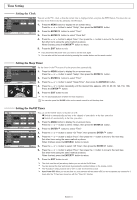
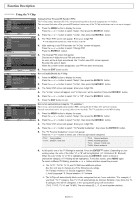
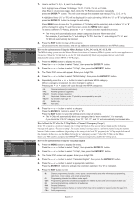
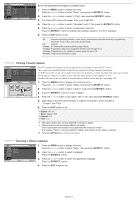
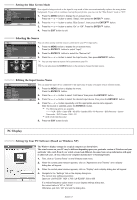
Setting the Blue Screen Mode If no signal is being received or the signal is very weak, a blue screen automatically replaces the noisy picture background. If you wish to continue viewing the poor picture, you must set the "Blue Screen" mode to "Off". 1. Press the MENU button to display the on-screen menu. Press the or button to select "Setup", then press the ENTER button. 2. Press the or button to select "Blue Screen", then press the ENTER button. 3. Press the or button to select "On" or "Off". Press the ENTER button. 4. Press the EXIT button to exit. Selecting the Source You can select among external sources connected to your TV's input jacks. 1. Press the MENU button to display the on-screen menu. Press the ENTER button to select "Input". 2. Press the ENTER button to select the "Source List". 3. Press the or button to select the Input source, then press ENTER You can only select a source if it is connected to your TV. You can also press the SOURCE button on the remote to choose the Input source. button. Editing the Input Source Name You can name the input device connected to the input jacks to make your input source selection easier. 1. Press the MENU button to display the menu. Press the ENTER button. 2. Press the or button to select "Edit Name" then press the ENTER button. 3. Press the or button to select the desired input device, then press the ENTER button. 4. Press the or button repeatedly until the appropriate source name appears. After the source is selected, press the ENTER button. The following options are available: - - - - - VCR - DVD - Cable STB - HD STB - Satellite STB - AV Receiver - DVD Receiver - Game Camcorder - DVD Combo - DHR - PC DHR: DVD HDD Recorder 5. Press the EXIT button to exit. PC Display Setting Up Your PC Software (Based on Windows XP) The Windows display-settings for a typical computer are shown below. The actual screens on your PC may be different depending upon your particular version of Windows and your particular video card. Even if your actual screens look different, the same, basic set-up information will apply in almost all cases. (If not, contact your computer manufacturer or Samsung Dealer.) 1. First, click on "Control Panel" on the Windows start menu. 2. When the control panel window appears, click on "Appearance and Themes" and a display dialog-box will appear. 3. When the control panel window appears, click on "Display" and a display dialog-box will appear. 4. Navigate to the "Settings" tab on the display dialog-box. The correct size setting (resolution): Optimum- LN-R1550P: 1024 x 768 / LN-R2050P: 800 x 600 If a vertical-frequency option exists on your display settings dialog box, the correct value is "60" or "60 Hz". Otherwise, just click "OK" and exit the dialog box. English-15
-
 1
1 -
2
-
3
-
4
-
5
-
6
-
7
-
8
-
9
-
10
-
11
-
 12
12 -
 13
13 -
 14
14 -
 15
15 -
 16
16 -
 17
17 -
 18
18 -
 19
19 -
 20
20 -
 21
21 -
 22
22 -
23
-
24
-
25
-
26
-
27
-
28
-
29
-
30
-
31
-
32
-
33
-
34
-
35
-
36
-
37
-
38
-
39
-
40
-
41
-
42
-
43
-
44
-
45
-
46
-
47
-
48
-
49
-
50
-
51
-
52
-
53
-
54
-
55
-
56
 |
 |