Samsung LN-S4692D User Manual (ENGLISH) - Page 61
Installing the Wall Mount Kit (LN-S4692D), English-59
 |
UPC - 036725246928
View all Samsung LN-S4692D manuals
Add to My Manuals
Save this manual to your list of manuals |
Page 61 highlights
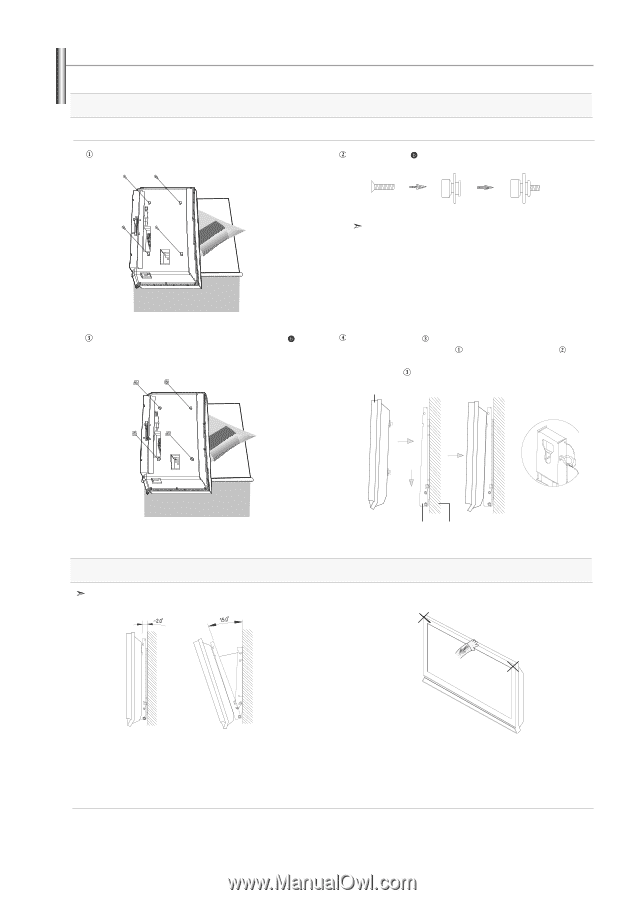
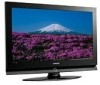
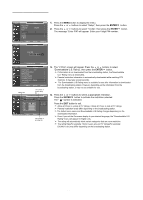
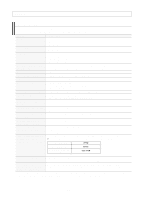
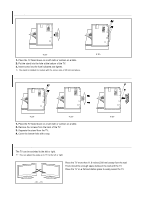
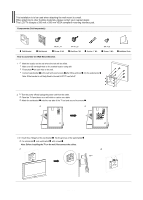
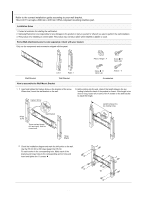
Installing the Wall Mount Kit (LN-S4692D) Fixing the TV panel to the wall attachment panel bracket The shape of the product may vary depending on the model. (The assemblies of the plastic hanger and the screw are the same) 2 Remove the 4 screws on the back of the product. Insert the screw into the plastic hanger. (See the figure below) • Mount the product on the wall bracket and make sure it is properly fixed to the left and right plastic hangers. • Be careful when installing the product on the bracket as fingers can be caught in the holes. • Make sure the wall bracket is securely fixed to the wall, or the product may not stay in place after installation. Tighten the 4 screws in step 2 (plastic hanger + screw ) to the rear holes of the product. Remove safety pin ( ) and insert the 4 product holders into the corresponding bracket holes ( ). Then place the product ( ) so that it is firmly fixed to the bracket. Make sure to reinsert and tighten the safety pin ( ) to securely hold the product to the bracket. LCD TV How to Adjust Mounting Angle Adjust the bracket angle to -2° before installing it on the wall. Wall Bracket Wall 1. Fix the product to the wall bracket. 2. Hold the product at the top in the center and pull it forward (direction of the arrow) to adjust the angle. (See the figure to the right) 3. You can adjust the bracket angle between -2° and 15°. Make sure to use the top center, and not the left or the right side of the product to adjust the angle. English-59
-
 1
1 -
2
-
3
-
4
-
5
-
6
-
7
-
8
-
9
-
10
-
11
-
12
-
13
-
14
-
15
-
16
-
17
-
18
-
19
-
20
-
21
-
22
-
23
-
24
-
25
-
26
-
27
-
28
-
29
-
30
-
31
-
32
-
33
-
34
-
35
-
36
-
37
-
38
-
39
-
40
-
41
-
42
-
43
-
44
-
45
-
46
-
47
-
48
-
49
-
50
-
51
-
52
-
53
-
54
-
55
-
 56
56 -
 57
57 -
 58
58 -
 59
59 -
 60
60 -
 61
61 -
 62
62 -
 63
63 -
 64
64 -
 65
65 -
 66
66 -
67
-
68
-
69
-
70
-
71
-
72
-
73
-
74
-
75
-
76
-
77
-
78
-
79
-
80
-
81
-
82
-
83
-
84
-
85
-
86
-
87
-
88
-
89
-
90
-
91
-
92
-
93
-
94
-
95
-
96
-
97
-
98
-
99
-
100
-
101
-
102
-
103
-
104
-
105
-
106
-
107
-
108
-
109
-
110
-
111
-
112
-
113
-
114
-
115
-
116
-
117
-
118
-
119
-
120
-
121
-
122
-
123
-
124
-
125
-
126
-
127
-
128
-
129
-
130
-
131
-
132
-
133
-
134
-
135
-
136
-
137
-
138
-
139
-
140
-
141
-
142
-
143
-
144
-
145
-
146
-
147
-
148
-
149
-
150
-
151
-
152
-
153
-
154
-
155
-
156
-
157
-
158
-
159
-
160
-
161
-
162
-
163
-
164
-
165
-
166
-
167
-
168
-
169
-
170
-
171
-
172
-
173
-
174
-
175
-
176
-
177
-
178
-
179
-
180
-
181
-
182
-
183
 |
 |