Samsung LN19C450 User Manual - Page 14
Auto Adjustment, Screen, Advanced Settings
 |
View all Samsung LN19C450 manuals
Add to My Manuals
Save this manual to your list of manuals |
Page 14 highlights
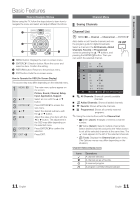
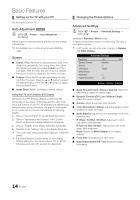
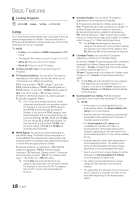
Basic Features ¦¦ Setting up the TV with your PC Set the input source to PC. Auto Adjustment t OO MENUm →Picture → Auto Adjustment → ENTERE Adjust frequency values/positions and fine tune the settings automatically. ✎✎Not available when connecting through HDMI/DVI cable. Screen ■■ Coarse / Fine: Removes or reduces picture noise. If the noise is not removed by Fine-tuning alone, then adjust the frequency as best as possible (Coarse) and Finetune again. After the noise has been reduced, readjust the picture so that it is aligned to the center of screen. ■■ Position: Adjust the PC's screen positioning if it does not fit the TV screen. Press the ▲ or ▼ button to adjust the Vertical-Position. Press the ◄ or ► button to adjust the Horizontal-Position. ■■ Image Reset: Resets the image to default settings. Using Your TV as a Computer (PC) Display Setting Up Your PC Software (Based on Windows XP) Depending on the version of Windows and the video card, the actual screens on your PC will probably look different, but the same basic set-up information will apply in most cases. (If not, contact your computer manufacturer or Samsung Dealer.) 1. Click on "Control Panel" on the Windows start menu. 2. Click on "Appearance and Themes" in the "Control Panel" window and a display dialog-box will appear. 3. Click on "Display" and a display dialog box will appear. 4. Navigate to the "Settings" tab on the display dialog-box. yy The correct size setting (resolution) [Optimum: 1360x768 pixels] yy If a vertical-frequency option exists on your display settings dialog box, the correct value is '60' or '60 Hz'. Otherwise, just click 'OK' and exit the dialog box. ¦¦ Changing the Picture Options Advanced Settings OO MENUm → Picture → Advanced Settings → ENTERE (available in Standard / Movie mode) Compared to previous models, new Samsung TVs have a more precise picture. ✎✎In PC mode, you can only make changes to Gamma and White Balance. Advanced Settings Black Tone : Off ► Dynamic Contrast : Medium Gamma : 0 Color Space : Native White Balance Flesh Tone : 0 Edge Enhancement : On U Move E Enter R Return ■■ Black Tone (Off / Dark / Darker / Darkest): Select the black level to adjust the screen depth. ■■ Dynamic Contrast (Off / Low / Medium / High): Adjust the screen contrast. ■■ Gamma: Adjust the primary color intensity. ■■ Color Space (Auto / Native): Adjust the range of colors available to create the image. ■■ White Balance: Adjust the color temperature for a more natural picture. R-Offset / G-Offset / B-Offset: Adjust each color's (red, green, blue) darkness. R-Gain / G-Gain / B-Gain : Adjust each color's (red, green, blue) brightness. Reset: Resets the White Balance to it's default settings. ■■ Flesh Tone: Emphasize pink "flesh tone". ■■ Edge Enhancement (Off / On): Emphasize object boundaries. 14 English
-
 1
1 -
2
-
3
-
4
-
5
-
6
-
7
-
8
-
 9
9 -
 10
10 -
 11
11 -
 12
12 -
 13
13 -
 14
14 -
 15
15 -
 16
16 -
 17
17 -
 18
18 -
 19
19 -
20
-
21
-
22
-
23
-
24
-
25
-
26
-
27
-
28
-
29
-
30
-
31
-
32
-
33
-
34
-
35
-
36
-
37
 |
 |