Samsung MM-D470D User Manual (user Manual) (ver.1.0) (English) - Page 12
Rear Panel, Where to Install Your Micro-Compact System - all in one micro system
 |
View all Samsung MM-D470D manuals
Add to My Manuals
Save this manual to your list of manuals |
Page 12 highlights
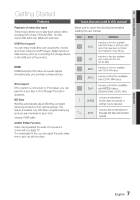
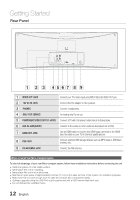
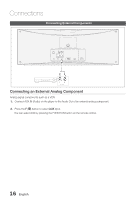
Getting Started Rear Panel PHONES ONLY FOR SERVICE 1 2 3 4567 8 9 1 VIDEO OUT JACK Connect your TV's Video Input jack (VIDEO IN) to the VIDEO OUT jack. 2 14V DC IN JACK Connect the DC adapter to this product. 3 PHONES Connect headphones. 4 ONLY FOR SERVICE For testing only. Do not use. 5 COMPONENT VIDEO OUTPUT JACKS Connect a TV with Component video inputs to these jacks. 6 AUX IN JACK(AUDIO) Connect to the audio out of an external device(such as a VCR). 7 HDMI OUT JACK Use an HDMI calbe to connect this HDMI output terminal to the HDMI input termianl on your TV for the best quality picture. 8 USB JACK Connect external USB storage devices such as MP3 players, USB flash memory, etc. 9 FM ANTENNA JACK Connect the FM antenna. Where to Install Your Micro-Compact System To take full advantage of your new Micro-compact system, follow these installation instructions before connecting the unit. Install the system on a flat, stable surface. Never place this unit on carpeting. Never place this unit in an outdoor area. Maintain an open space of approximately 6 inches (15 cm) on the sides and rear of the system, for ventilation purposes. Make sure that you have enough room to open the compact disc compartment easily. Software upgrades using the USB Port must be performed with a USB memory flash stick only. Do not obstruct the ventilation holes. 12 English
-
 1
1 -
2
-
3
-
4
-
5
-
6
-
 7
7 -
 8
8 -
 9
9 -
 10
10 -
 11
11 -
 12
12 -
 13
13 -
 14
14 -
 15
15 -
 16
16 -
 17
17 -
18
-
19
-
20
-
21
-
22
-
23
-
24
-
25
-
26
-
27
-
28
-
29
-
30
-
31
-
32
-
33
-
34
-
35
-
36
-
37
-
38
-
39
-
40
-
41
 |
 |
