Samsung NA30N7755TS/AA Installation Guide - Page 18
Step 5. Electrical connections., Step 6. Assemble the cooktop burners. - reviews
 |
View all Samsung NA30N7755TS/AA manuals
Add to My Manuals
Save this manual to your list of manuals |
Page 18 highlights
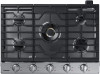
Installation instructions Step 5. Electrical connections. WARNING • Disconnect all electrical power of the main circuit breaker or fuse box before installing. • BEFORE OPERATING OR TESTING, follow the grounding requirements on pages 14 in this manual. Improper connection of the grounding plug can result in a rick of electric shock. • All gas cooktops come with a power cord. The power cord is connected to the bottom of the cooktop. Please review "Electrical requirements" on pages 13. • The electrical system, including the power cord, is preinstalled and prewired at the factory. Altering any part of this system may result in a short or overload. 1. Plug in the power cord. Make sure the outlet meets local or national electrical codes as referenced on pages 13. 2. Check the gas supply line to make sure it did not get damaged and it stayed connected during positioning. Step 6. Assemble the cooktop burners. CAUTION • Do not operate the cooktop burners without all burner parts in place. • Be careful not to push in any cooktop controls while removing the cooktop burner. A slight electrical shock might result which could cause you to knock over hot cookware. • Do not remove the top or touch the electrode of any burner while another burner is turned on. Electrical shock might result. 1. Position cooktop burner heads on top of the cooktop burner manifolds as shown on the right. The electrodes will fit into the slot in the bottom of the heads. Make sure the cooktop burner heads are flat and parallel with the cooktop. 2. Place the matching size caps on top of each cooktop burner head. Dual Burner head 1. As shown, insert the marked area of burner head into the matching area of burner cup so that they line up. Installation instructions 18 English Install_NA30N6555TG_DG68-01091A-02_EN+MES+CFR.indb 18 10/24/2018 4:29:20 PM
-
 1
1 -
2
-
3
-
4
-
5
-
6
-
7
-
8
-
9
-
10
-
11
-
12
-
 13
13 -
 14
14 -
 15
15 -
 16
16 -
 17
17 -
 18
18 -
 19
19 -
 20
20 -
 21
21 -
 22
22 -
 23
23 -
24
-
25
-
26
-
27
-
28
-
29
-
30
-
31
-
32
-
33
-
34
-
35
-
36
-
37
-
38
-
39
-
40
-
41
-
42
-
43
-
44
-
45
-
46
-
47
-
48
-
49
-
50
-
51
-
52
-
53
-
54
-
55
-
56
-
57
-
58
-
59
-
60
-
61
-
62
-
63
-
64
-
65
-
66
-
67
-
68
-
69
-
70
-
71
-
72
-
73
-
74
-
75
-
76
-
77
-
78
-
79
-
80
-
81
-
82
-
83
-
84
 |
 |
