Samsung NC190-1 User Manual - Page 30
Using the Screen Adjustment Menu (OSD: On Screen Display)
 |
View all Samsung NC190-1 manuals
Add to My Manuals
Save this manual to your list of manuals |
Page 30 highlights
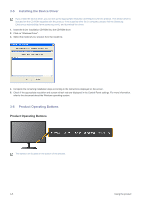
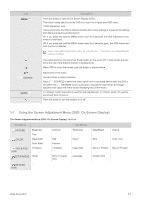
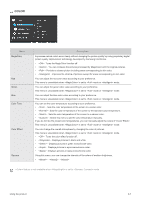
Icon MENU/ ▲/▼ /SOURCE AUTO / Description Press this button to view the On Screen Display (OSD). This button is also used to exit the OSD or to return to a higher-level OSD menu * OSD Adjustment Lock This function locks the OSD in order to maintain the current settings or to prevent the settings from being changed by another person On: If you press and hold the MENU button down for 5 seconds, the OSD Adjustment Lock function is activated. Off: If you press and hold the MENU button down for 5 seconds again, the OSD Adjustment Lock function is disabled. Even if the OSD Adjustment Lock is on, , and can be modified. This button performs the role of the Power button for the server PC in Client mode and performs the role of the direction buttons in Analog mode. When OSD is not on the screen, push the button to adjust volume. Adjust items in the menu. Use this button to select a function Press [ /SOURCE] to select the video signal from a connected device while the OSD is off. (When the [ /SOURCE] button is pressed to change the input mode, a message appears in the upper left of the screen displaying the current mode). In mode, this button is used for auto adjustments. In mode, it is used to disconnect from the server. Press this button to turn the product on or off 3-7 Using the Screen Adjustment Menu (OSD: On Screen Display) The Screen Adjustment Menu (OSD: On Screen Display) Structure Top Menus PICTURE Brightness Fine COLOR MagicColor Color Effect SIZE & POSI- H-Position TION SETUP&RESE Reset T INFORMA- - TION Contrast Sub Menus Sharpness Red Gamma V-Position Green Image Size Menu Transparency Language MagicBright Coarse Blue Color Tone Menu H-Position Menu V-Position Display Time Using the product 3-7
-
 1
1 -
2
-
3
-
4
-
5
-
6
-
7
-
8
-
9
-
10
-
11
-
12
-
13
-
14
-
15
-
16
-
17
-
18
-
19
-
20
-
21
-
22
-
23
-
24
-
 25
25 -
 26
26 -
 27
27 -
 28
28 -
 29
29 -
 30
30 -
 31
31 -
 32
32 -
 33
33 -
 34
34 -
 35
35 -
36
-
37
-
38
-
39
-
40
-
41
-
42
-
43
-
44
-
45
-
46
-
47
-
48
-
49
-
50
-
51
-
52
-
53
-
54
-
55
-
56
-
57
-
58
-
59
-
60
-
61
-
62
-
63
-
64
-
65
 |
 |
