Samsung NC220 User Manual - Page 34
Product Operating Buttons, Description
 |
View all Samsung NC220 manuals
Add to My Manuals
Save this manual to your list of manuals |
Page 34 highlights
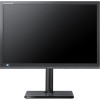
3-7 Product Operating Buttons Product Operating Buttons Icon MENU ▲/▼ AUTO (Power LED) Description Press this button to view the On Screen Display (OSD). This button is also used to exit the OSD or to return to a higher-level OSD menu * Key Lock This function locks the buttons on the front of the product to prevent the current settings from being changed by others. Lock: Press and hold the MENU button for 5 seconds. The key lock mode will be enabled. Unlock: Press and hold the MENU button for 5 seconds when the key lock is enabled. The key lock mode will be disabled. When the key lock mode is enabled, all the buttons on the front of the product are disabled. Press the button at least 2sec to connect to the host PC in Client mode. In order to turn the host PC off, press the button more than 2 sec, being connected to the host PC. Use these buttons to navigate the menu or to adjust a value in the OSD. When OSD is not on the screen, push the button to adjust volume. Use this button to select a function Press [ ] to select the video signal from a connected device while the OSD is off. (When the [ ] button is pressed to change the input mode, a message appears in the upper left of the screen displaying the current mode). In mode, this button is used for auto adjustments. In mode, it is used to disconnect from the server. Press this button to turn the product on or off This LED is turned on when the product works normally. For more information on the power-saving function, refer to the power saving function in More Information. When not using the product for a long time, unplugging the power cord is recommended to minimize power consumption. Using the product 3-7
-
 1
1 -
2
-
3
-
4
-
5
-
6
-
7
-
8
-
9
-
10
-
11
-
12
-
13
-
14
-
15
-
16
-
17
-
18
-
19
-
20
-
21
-
22
-
23
-
24
-
25
-
26
-
27
-
28
-
 29
29 -
 30
30 -
 31
31 -
 32
32 -
 33
33 -
 34
34 -
 35
35 -
 36
36 -
 37
37 -
 38
38 -
 39
39 -
40
-
41
-
42
-
43
-
44
-
45
-
46
-
47
-
48
-
49
-
50
-
51
-
52
-
53
-
54
-
55
-
56
-
57
-
58
-
59
-
60
-
61
-
62
-
63
-
64
-
65
-
66
-
67
-
68
-
69
-
70
-
71
 |
 |
