Samsung NX58R9311SS/AA Installation Guide - Page 22
Step 4. Install the anti-tip device, Step 5. Plug in and place, risk of electric shock. - reviews
 |
View all Samsung NX58R9311SS/AA manuals
Add to My Manuals
Save this manual to your list of manuals |
Page 22 highlights
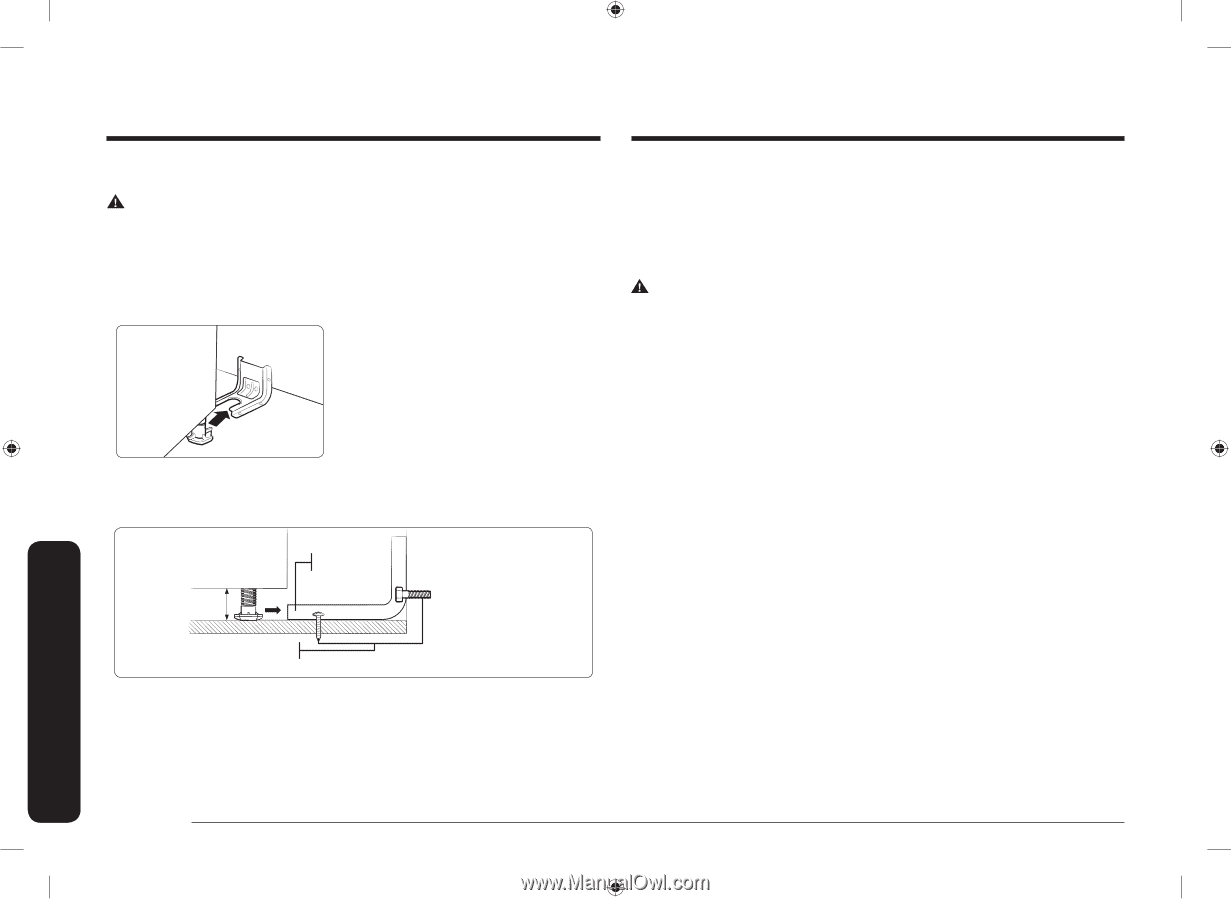
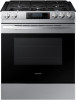
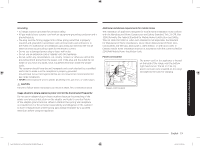
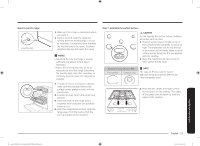
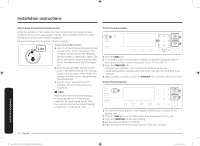
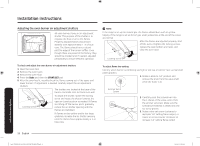
Installation instructions Step 4. Install the anti-tip device WARNING To reduce the risk of tipping, the appliance must be secured by properly installing the anti-tip device packed with the appliance. • All ranges can tip, resulting in personal injury. • Tipping ranges can cause burns from spills, personal injury, and/or death. • To prevent accidental tipping, install and check the anti-tip bracket following the instructions and template supplied with the bracket. An anti-tip bracket and screws, installation instructions, and template are shipped with every range (PN DG94-00870B). The instructions include information necessary to complete the installation of the anti-tip bracket. Read and follow the instructions on the sheet and use the template for anti-tip bracket installation. If not properly installed, the range could be tipped by you or a child standing, sitting, or leaning on an open oven door. *approximately 5/8" (16 mm) Screw must enter wood or concrete Anti-Tip bracket *NOTE: To install the Anti-Tip bracket, release the leveling leg. A minimum clearance of 5/8" (16 mm) is required between the range bottom and the kitchen floor. To check if the bracket is installed and engaged properly, remove storage drawer and look underneath the range to see that the leveling leg is engaged in the bracket. Carefully tip the range forward. The bracket should stop the range within 4 inches (10.2 cm) of tipping. If it does not, the bracket must be reinstalled. If the range is pulled from the wall for any reason, always repeat this procedure to verify the range is properly secured by the anti-tip bracket. Never completely remove the leveling legs or the range will not be secured to the anti-tip device properly. Step 5. Plug in and place WARNING BEFORE OPERATING OR TESTING, follow the grounding requirements on pages 18-19 in this manual. Improper connection of the grounding plug can result in a risk of electric shock. • All gas ranges come with a power cord. The power cord is connected to the rear of the range. Please review "Electrical requirements" on pages 18-19. • The electrical system, including the power cord, is preinstalled and prewired at the factory. Altering any part of this system may result in a short or overload. 1. Plug in the power cord. Make sure the outlet meets local or national electrical codes as referenced on pages 18-19. 2. Slide the range into place. 3. Check the gas supply line to make sure it did not get damaged and it stayed connected during positioning. 4. Check to make sure the back leg of the range has slid into the anti-tip bracket. Carefully tip the range forward to ensure that the anti-tip bracket engages the back brace and prevents tip-over. Installation instructions 22 English Install_NX58R9311SS_AA_DG68-00906B-00_EN+MES+CFR.indb 22 2019-06-03 2:18:19
-
 1
1 -
2
-
3
-
4
-
5
-
6
-
7
-
8
-
9
-
10
-
11
-
12
-
13
-
14
-
15
-
16
-
 17
17 -
 18
18 -
 19
19 -
 20
20 -
 21
21 -
 22
22 -
 23
23 -
 24
24 -
 25
25 -
 26
26 -
 27
27 -
28
-
29
-
30
-
31
-
32
-
33
-
34
-
35
-
36
-
37
-
38
-
39
-
40
-
41
-
42
-
43
-
44
-
45
-
46
-
47
-
48
-
49
-
50
-
51
-
52
-
53
-
54
-
55
-
56
-
57
-
58
-
59
-
60
-
61
-
62
-
63
-
64
-
65
-
66
-
67
-
68
-
69
-
70
-
71
-
72
-
73
-
74
-
75
-
76
-
77
-
78
-
79
-
80
-
81
-
82
-
83
-
84
 |
 |