Samsung PN51D490A1DXZA User Manual - Page 8
How to Navigate Menus, Connecting to an Antenna or Cable Connection - no picture
 |
View all Samsung PN51D490A1DXZA manuals
Add to My Manuals
Save this manual to your list of manuals |
Page 8 highlights
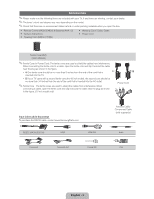
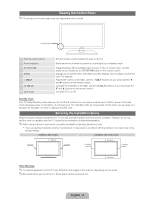
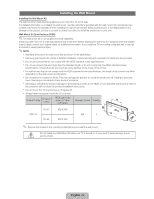
How to Navigate Menus Before using the TV, follow the steps below to learn how to navigate the menu and select and adjust different functions. MENU button: Displays the main on-screen menu. ENTER / Direction button: Move the cursor and select an item. Confirm the setting. RETURN button: Returns to the previous menu. EXIT button: Exits the on-screen menu. How to Operate the OSD (On Screen Display) The access steps may differ depending on the selected menu. 1 MENU 2 / 3 ENTER 4 / 5 / 6 ENTER 7 EXIT The main menu options appear on the screen: Picture, Sound, Channel, System, Support. Select an icon or option with the or button. Press ENTER to access the sub-menus. Select the desired submenu with the or button. Adjust the value of an item with the or button. The adjustment in the OSD may differ depending on the selected menu. Press ENTER to confirm the selection. Press EXIT. ✎ For the best cable connections to this product, be sure to use cables no thicker than 0.55 inches (14mm). Maximum thickness - 0.55 inches (14mm) Connecting to an Antenna or Cable Connection Connecting the power cord and an antenna or cable connection ✎ The PDP device may interfere with an amateur radio or AM radio. ✎ Using two-way radio mobile and portable units or amateur radio or AM radio near your TV may cause the TV to malfunction. VHF/UHF Antenna Cable ANT OUT or Power Input
-
 1
1 -
2
-
 3
3 -
 4
4 -
 5
5 -
 6
6 -
 7
7 -
 8
8 -
 9
9 -
 10
10 -
 11
11 -
 12
12 -
 13
13 -
14
-
15
-
16
-
17
-
18
-
19
-
20
-
21
-
22
-
23
-
24
-
25
-
26
-
27
-
28
-
29
-
30
-
31
-
32
-
33
-
34
-
35
-
36
-
37
-
38
-
39
-
40
-
41
-
42
-
43
-
44
-
45
-
46
-
47
-
48
-
49
-
50
-
51
-
52
-
53
-
54
-
55
-
56
-
57
-
58
-
59
-
60
-
61
-
62
-
63
-
64
-
65
-
66
-
67
-
68
-
69
-
70
-
71
-
72
-
73
-
74
-
75
-
76
-
77
-
78
-
79
-
80
-
81
-
82
-
83
-
84
-
85
-
86
-
87
-
88
-
89
-
90
-
91
-
92
-
93
-
94
-
95
-
96
-
97
-
98
-
99
-
100
-
101
-
102
-
103
-
104
-
105
-
106
-
107
-
108
-
109
-
110
-
111
-
112
-
113
-
114
-
115
-
116
-
117
-
118
-
119
-
120
-
121
-
122
-
123
-
124
-
125
-
126
-
127
-
128
-
129
-
130
-
131
-
132
-
133
-
134
-
135
-
136
-
137
-
138
-
139
-
140
-
141
-
142
-
143
-
144
-
145
-
146
-
147
-
148
-
149
-
150
-
151
-
152
-
153
-
154
-
155
-
156
-
157
-
158
-
159
-
160
-
161
-
162
-
163
-
164
-
165
-
166
-
167
-
168
-
169
-
170
-
171
-
172
-
173
-
174
-
175
-
176
-
177
-
178
-
179
-
180
-
181
-
182
-
183
-
184
-
185
-
186
-
187
-
188
-
189
-
190
-
191
-
192
-
193
-
194
-
195
-
196
-
197
-
198
-
199
-
200
-
201
-
202
-
203
-
204
-
205
-
206
-
207
-
208
-
209
-
210
-
211
-
212
-
213
-
214
-
215
-
216
-
217
-
218
-
219
-
220
-
221
-
222
-
223
-
224
-
225
-
226
-
227
-
228
-
229
-
230
-
231
-
232
-
233
-
234
-
235
-
236
-
237
-
238
-
239
-
240
-
241
-
242
-
243
 |
 |
