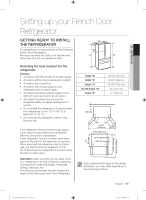
Samsung RF22KREDBSG User Manual - Page 11
Re-attaching The, Refrigerator Doors, Setting Up
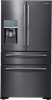 |
View all Samsung RF22KREDBSG manuals
Add to My Manuals
Save this manual to your list of manuals |
Page 11 highlights
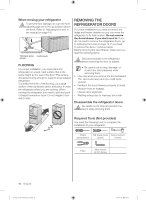
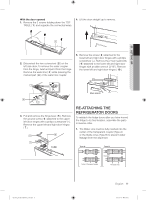
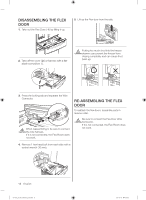
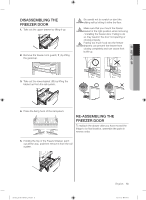
01 setting up With the door opened 1. Remove the 3 screws holding down the TOP TABLE ( 1 ) and separate the connected wires. 4. Lift the door straight up to remove. 1 2. Disconnect the two connectors ( 2 ) on the left side door. To remove the water coupler from the hinge, twist and pull it from the hinge. Remove the water line ( 3 ) while pressing the marked part ( 4 ) of the water line coupler. 2 5. Remove the screw ( 8 ) attached to the lower left and right door hinges with a philips screwdriver (+). Remove the 2 hex head bolts ( 9 ) attached to the lower left and right door hinges with an allen wrench (3/16"). Remove the lower left and right door hinges ( 10 ). 10 8 9 Allen wrench 3 4 3. Pull and remove the hinge lever ( 5 ). Remove the ground screw ( 6 ) attached to the upper left door hinges with a philips screwdriver (+). Remove the upper left and right door hinges ( 7 ). 5 6 7 RE-ATTACHING THE REFRIGERATOR DOORS To reattach the fridge doors after you have moved the fridge to its final location, assemble the parts in reverse order. 1. The Water Line must be fully inserted into the center of the transparent coupler (Type A) or the Guide Lines (Type B) to prevent water leakage from the dispenser. Type A Type B Dispenser Center of Transparent coupler The Guide Lines RF22KR_DA68-02897B-02_EN.indd 11 English 11 2017-05-23 5:17:42
-
 1
1 -
2
-
3
-
4
-
5
-
 6
6 -
 7
7 -
 8
8 -
 9
9 -
 10
10 -
 11
11 -
 12
12 -
 13
13 -
 14
14 -
 15
15 -
 16
16 -
17
-
18
-
19
-
20
-
21
-
22
-
23
-
24
-
25
-
26
-
27
-
28
-
29
-
30
-
31
-
32
-
33
-
34
-
35
-
36
-
37
-
38
-
39
-
40
-
41
-
42
-
43
-
44
-
45
-
46
-
47
-
48
-
49
-
50
-
51
-
52
-
53
-
54
-
55
-
56
-
57
-
58
-
59
-
60
-
61
-
62
-
63
-
64
-
65
-
66
-
67
-
68
-
69
-
70
-
71
-
72
-
73
-
74
-
75
-
76
-
77
-
78
-
79
-
80
-
81
-
82
-
83
-
84
-
85
-
86
-
87
-
88
-
89
-
90
-
91
-
92
-
93
-
94
-
95
-
96
-
97
-
98
-
99
-
100
-
101
-
102
-
103
-
104
-
105
-
106
-
107
-
108
-
109
-
110
-
111
-
112
 |
 |
