Samsung RF4287HARS User Manual (user Manual) (ver.0.1) (English) - Page 21
Instaling the water line, Connecting the water supply line to the refrigerator. - water filters
 |
UPC - 036725569713
View all Samsung RF4287HARS manuals
Add to My Manuals
Save this manual to your list of manuals |
Page 21 highlights
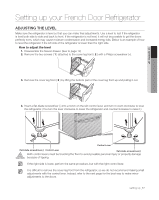
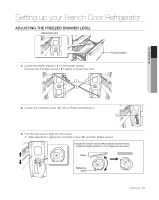
Setting up your French Door Refrigerator 01 setting up Installing the water line Connecting the water supply line to the refrigerator. There are several items that you need to purchase to complete this connection. You may find these items sold as a kit at your local hardware store. Use Copper Tubing Use Plastic Tubing • ¼" copper tubing • ¼" plastic tubing • ¼" compression nut (2pc) → Molded end(Bulb) • Ferrule (2pc) • ¼" compression nut (2pc) Plastic tubing (A) (Supplied) Refrigerator Compression nut (A) (1/4") (Supplied) Compression fitting (Supplied) Ferrule (Not supplied) Molded end(Bulb) Compression nut (B) (1/4") (Not supplied) Copper tubing or Plastic tubing (B) (Not supplied) (Not supplied) Household water supply line 1. Slip the compression nut ( A ) through the supplied plastic tubing ( A ). 2. Tighten the compression nut ( A ) onto the 1/4" compression fitting. - If you are using copper tubing, slip the compression nut ( B ) (not supplied) and ferrule (not supplied) on copper tubing (not supplied) as shown. - If you are using plastic tubing ( B ) , insert the molded end (Bulb) of the plastic tubing ( B ) into the compression fitting. Do not use without the molded end(Bulb) of the plastic tubing ( B ). caution 3. Tighten the compression nut ( B ) onto the compression fitting. Do not over-tighten the compression nut ( B ) . 4. Turn water on and check for any leakage. If you find water drops or leakage in the connection areas, turn off the main water supply. Check the connections and, if nescessary, tighten. 5. Flush 1 gallon of water through the filter before drinking or using the water from the refrigerator. (Flush approximately 6 minutes.) To flush, press a large glass or cup against the water dispenser lever. Fill the glass, empty it into the kitchen sink after it is filled, and then repeat. 6. After you turn on the refrigerator, let the ice maker make ice for 1 to 2 days. Over that period of time, throw out the first 1 or 2 buckets of ice the freezer makes to ensure all impurities have been removed from the water line. Only connect the water line to a drinkable water source. If you have to repair or disassemble the water line, cut off 1/4" of the plastic tubing to make sure you get a snug, leak-free connection. setting up _21
-
 1
1 -
2
-
3
-
4
-
5
-
6
-
7
-
8
-
9
-
10
-
11
-
12
-
13
-
14
-
15
-
 16
16 -
 17
17 -
 18
18 -
 19
19 -
 20
20 -
 21
21 -
 22
22 -
 23
23 -
 24
24 -
 25
25 -
 26
26 -
27
-
28
-
29
-
30
-
31
-
32
-
33
-
34
-
35
-
36
-
37
-
38
-
39
-
40
-
41
-
42
 |
 |
