Samsung RH22H9010SR Quick Guide Ver.0.4 (English, French, Spanish) - Page 1
Samsung RH22H9010SR Manual
 |
View all Samsung RH22H9010SR manuals
Add to My Manuals
Save this manual to your list of manuals |
Page 1 highlights
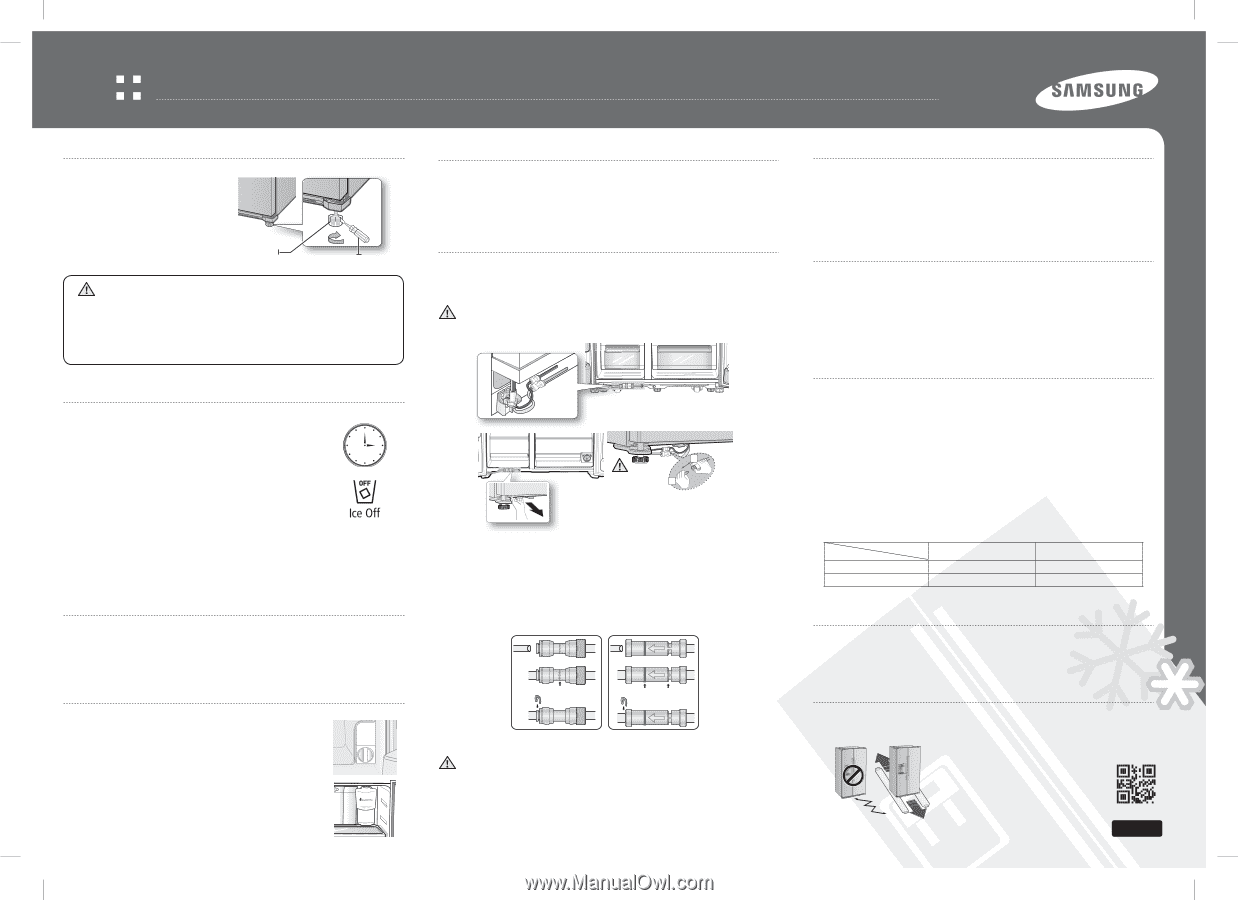
Before installation & calling service If you have further questions or your refrigerator has damaged accessories or parts, contact us at 1-800-SAMSUNG (726-7864). 1. Leveling & Door Alignment • For details, refer to "Leveling the Refrigerator" in the User Manual. • Insert a flat-blade screwdriver into a slot on the control lever. Turn it clockwise or counter- Leg clockwise to level the refrigerator. Screw Driver CAUTION When the refrigerator is empty, adjust the Leveling Leg Control by turning it clockwise or counterclockwise with a flat head screwdriver until the Leveling Legs contact to the floor. This will allow better balance of the Refrigerator when it is empty. (RH22H**, RH29H**) 2. Automatic Ice Maker does not work • Allow your refrigerator to operate and cool down for 24 hours (1 full day) before dispensing large quantities of ice. • To fill the ice bucket to maximum capacity, dispense a 12 9 3 6 few cubes 8 and 16 hours after installation. • If ICE OFF is lit, the ice maker will not make ice. • To activate the ice maker, press the ICE OFF button on the control panel so it is no longer lit. (This image may different depends on the model.) 3. Small ice cubes, ice cubes with bubbles, or slow water dispensing • If the water filter is clogged, the ice maker may produce small ice cubes or ice cubes with bubbles. • Replace the water filter cartridge with a new one. 4. Water filter replacement • For details, see "Changing the Water Filter" in the User Manual. • If you have trouble inserting the water filter because of high water pressure, shut off the water supply valve. • After installation or when replacing the water filter, dispense at least 1 gallon (2~3 minutes) of water to remove trapped air from the water line. Otherwise, water may drip from the dispenser after you dispense water. 5. Water is not cool enough • The first glass of water may not be cold enough because the water stored in the water tank has not cooled completely. Dispense several glasses of water until the water is cool to your liking. 6. Water dispenser dripping • • CAUTION If the water line is not inserted into the coupler properly, air could penetrate into the water line causing water to drip from the water dispenser. Insert the water line into the coupler completely and slide in the clip at the end of the coupler. < RS** > CAUTION 2 Make sure the color of the water lines match. 1 < RH** > 1. The Water Line must be fully inserted into the center of the transparent coupler (Type A) or to the Guide Lines (Type B) to prevent water leakage from the dispenser. 2. Insert the clip from the install pack and confirm that it holds the line firmly. Type A Type B Dispenser Center of Transparent coupler clip A (1/4") (6.35 mm) The Guide Lines clip A (1/4") (6.35 mm) • CAUTION • When reassemble the water line, connect it by same color and seat on the hook. Keep the clips out of the reach of children and make sure that children do not play with them or put them into their mouths. 7. Fridge or freezer Compartments are warm • Allow your refrigerator to operate and cool down for 24 hours (1 full day) to reach the temperature you set. • When you put room temperature or warmer food into your refrigerator, it may need an additional 24 hours to reach the set temperature. 8. Noise Clicks, Pops, Cracks, Snaps • You may hear these noises occasionally from inside the refrigerator. This is normal. These sounds occur when various items contract or expand while temperatures inside the fridge are changing, especially during defrosting. You may also hear these noises when electronic devices, including the ice maker, are operating. 9. Display • For details, see "Using the Control Panel" in the User Manual. • Filter indicator : The filter Indicator turns red If you dispense about 300 gallons of water or about 6 months has passed. Reset the indicator after replacing the filter by holding the "Energy Saver" or "Lighting" button for 3 seconds. The indicator will turn blue or off. • Ice off : Press the "Ice Off" button to turn the ice making function off. • Cooling Off (Show Room) mode : If the Display shows the "OFF or OF OF" code, it means that the Cooling Off function is activated and the refrigerator is not cooling. To cancel the Cooling Off mode, press the two buttons listed for your model in the table below simultaneously for 5 seconds. Model Button Cooling Off Filter Reset (3 sec) RS22H** / RSG257** Power Freeze + Freezer RH22H** / RH29H** Lighting + Freezer Energy Saver Lighting 10. Food stored in refrigerator is frozen • If food with too much moisture is stored near the cooling vents, it may get frozen. Be sure to keep moist food away from the cooling vents. 11. Moving the Refrigerator • When moving the refrigerator, pull or push it straight forwards or back. Do not wiggle it from side to side. DA68-01517H-04 ENGLISH DA68-01517H-04.indd 1 2014. 5. 9. 9:32
-
 1
1 -
 2
2
 |
 |