Samsung RS25H5121SR User Manual Ver.0.1 (English, French, Spanish) - Page 17
Completing The Set Up
 |
View all Samsung RS25H5121SR manuals
Add to My Manuals
Save this manual to your list of manuals |
Page 17 highlights
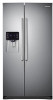
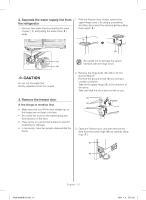
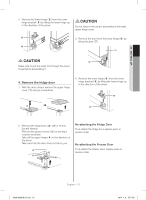
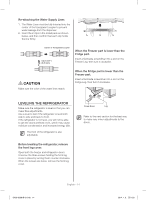
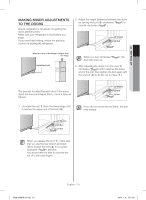
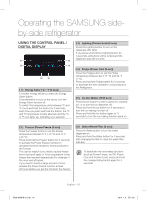
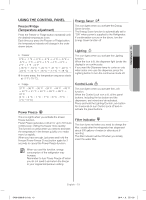
01 setting up 2. Tighten the compression nut ( B ) onto the compression fitting. Do not over-tighten the compression nut ( B ). 3. Turn the water on and check for any leaks inside the refrigerator, around the water filter, and in any connection areas. If you find water drops or leaks, turn off the main water supply. If the leaks are in the connection areas, check the connections and, if necessary, tighten. If there are leaks in the refrigerator, check the water filter and confirm it is in the locked position. Turn on the water supply and check for leaks again. 4. Plug in the refrigerator. 5. Flush 3 gallons of water through the filter before drinking or using the water from the refrigerator. (Flush approximately 6 minutes.) This will clean the water supply system and remove air from the lines. To flush, press the Water button, and then press a large glass or cup against the water dispenser lever. Fill the glass, empty it into the kitchen sink after it is filled, and then repeat. Additional flushing may be required in some households. 6. Open the refrigerator door and make sure there are no water leaks coming from the water filter. • After you turn on the refrigerator, let the ice maker make ice for 1 to 2 days. Over that period of time, throw out the first 1 or 2 buckets of ice the ice maker makes to ensure all impurities have been removed from the water line. • Only connect the water line to a drinkable water source. • If you have to repair or disassemble the water line, cut off 1/4" of the plastic tubing to make sure you get a snug, leak-free connection. • You can test the water line quickly using a paper cup. Under normal conditions, the water dispenser can fill a 5.75 oz. (170 cc) cup in about 10 seconds. COMPLETING THE SET UP Now that you have your new refrigerator installed in place, you are ready to set up and enjoy the features and functions of the appliance. By completing the following steps, your refrigerator should be fully operational. 1. Make sure your refrigerator is in an appropriate location with reasonable clearance between it and the wall. Refer to installation instructions in this manual. 2. Once the refrigerator is plugged in, make sure the interior light comes on when you open the doors. 3. Set the Temperature control to the coldest temperature and wait for an hour. The freezer will get slightly chilled and the motor will run smoothly. Reset the refrigerator and freezer to the temperatures you want. 4. After you plug the refrigerator in, it will take a few hours to reach the appropriate temperature. You can store food and drinks in the refrigerator after the temperature is sufficiently cool. If condensation or water drops appear on both sides of the fridge door's central part, turn the Energy Saver mode off after removing the condensation. (See the explanation of the Energy Saver button in "Using the Control Panel" on page 18.) Preventing Power Cord Damage To prevent power cord damage, fix any excess power cord to the top rear of the refrigerator as shown in the illustration below. DA68-02981B-01.indb 17 English - 17 2014. 1. 6. �� 1:50
-
 1
1 -
2
-
3
-
4
-
5
-
6
-
7
-
8
-
9
-
10
-
11
-
 12
12 -
 13
13 -
 14
14 -
 15
15 -
 16
16 -
 17
17 -
 18
18 -
 19
19 -
 20
20 -
 21
21 -
 22
22 -
23
-
24
-
25
-
26
-
27
-
28
-
29
-
30
-
31
-
32
-
33
-
34
-
35
-
36
-
37
-
38
-
39
-
40
-
41
-
42
-
43
-
44
-
45
-
46
-
47
-
48
-
49
-
50
-
51
-
52
-
53
-
54
-
55
-
56
-
57
-
58
-
59
-
60
-
61
-
62
-
63
-
64
-
65
-
66
-
67
-
68
-
69
-
70
-
71
-
72
-
73
-
74
-
75
-
76
-
77
-
78
-
79
-
80
-
81
-
82
-
83
-
84
-
85
-
86
-
87
-
88
-
89
-
90
-
91
-
92
-
93
-
94
-
95
-
96
 |
 |