Samsung RSG257AAWP/XAA User Manual (user Manual) (ver.0.9) (English) - Page 10
SETTING UP the refrigerator doors, Separating the Water Supply Line from the Refrigerator
 |
View all Samsung RSG257AAWP/XAA manuals
Add to My Manuals
Save this manual to your list of manuals |
Page 10 highlights
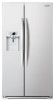
setting up your side-by-side refrigerator SETTING UP the refrigerator doors If your entrance won't allow the refrigerator to pass easily through it, you can remove the doors. Removing the Front Leg Cover First, open both the freezer and refrigerator doors, and then take off the front leg cover by turning the three screws counter-clockwise Separating the Water Supply Line from the Refrigerator 1. Remove two water lines(gray one is for ice and the other one is for water)by pressing the coupler 1 and pulling the water line 2 away. 1 Make sure the color of the water lines match. 2 Reattaching the Water Supply Line 1. The Water Line must be fully inserted to Line the marked line to prevent water leakage from the dispenser. Coupler 2. Insert the 2 clips in the install pack and check that each clip holds the line firmly. clip A (¼") Coupler Line Coupler clip A (¼") Coupler Do not cut the water line. Gently separate it from the coupler. 10_ setting up
-
 1
1 -
2
-
3
-
4
-
 5
5 -
 6
6 -
 7
7 -
 8
8 -
 9
9 -
 10
10 -
 11
11 -
 12
12 -
 13
13 -
 14
14 -
 15
15 -
16
-
17
-
18
-
19
-
20
-
21
-
22
-
23
-
24
-
25
-
26
-
27
-
28
-
29
-
30
-
31
-
32
 |
 |
