Samsung SGH E590 Service Manual - Page 22
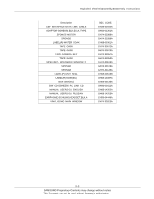
Check the SCREW SIZE.HANGER SCREW and M1.4,L5
 |
View all Samsung SGH E590 manuals
Add to My Manuals
Save this manual to your list of manuals |
Page 22 highlights
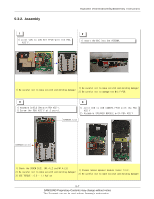
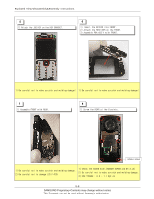
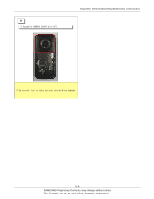
Exploded View/Disassembly&Assembly Instructions 5 1) Attach the JOG KEY on the KEY BRACKET. 6 1) Insert the KEYPAD into FRONT. 2) Attach the RECEIVER on the FRONT. 3) Assemble PBA ASS'Y with FRONT. 1) Be careful not to make scratch and molding damage! 1) Be careful not to make scratch and molding damage! 7 1) Assemble FRONT with REAR. 8 1) Screw the REAR at the 6 points. HANGER SCREW 1) Be careful not to make scratch and molding damage. 2) Be careful not to damage LCD F-PCB. 1) Check the SCREW SIZE.(HANGER SCREW and M1.4,L5) 2) Be careful not to make scratch and molding damage. 3) USE TORQUE : 0.9 ~ 1.1 Kgf.cm 5-8 SAMSUNG Proprietary-Contents may change without notice This Document can not be used without Samsung's authorization
-
 1
1 -
2
-
3
-
4
-
5
-
6
-
7
-
8
-
9
-
10
-
11
-
12
-
13
-
14
-
15
-
16
-
 17
17 -
 18
18 -
 19
19 -
 20
20 -
 21
21 -
 22
22 -
 23
23 -
 24
24 -
 25
25 -
 26
26 -
 27
27 -
28
-
29
-
30
-
31
-
32
-
33
-
34
-
35
-
36
-
37
-
38
-
39
-
40
-
41
-
42
-
43
-
44
-
45
-
46
-
47
-
48
-
49
-
50
-
51
-
52
-
53
-
54
-
55
-
56
-
57
-
58
-
59
-
60
-
61
-
62
-
63
-
64
-
65
-
66
-
67
-
68
-
69
-
70
-
71
-
72
-
73
 |
 |

SAMSUNG Proprietary-Contents may change without notice
Exploded View/Disassembly&Assembly Instructions
5-8
This Document can not be used without Samsung's authorization
1) Be careful not to make scratch and molding damage!
1) Be careful not to make scratch and molding damage!
1) Be careful not to make scratch and molding damage.
2) Be careful not to damage LCD F
-
PCB.
1) Check the SCREW SIZE.(HANGER SCREW and M1.4,L5)
2) Be careful not to make scratch and molding damage.
3) USE TORQUE : 0.9 ~ 1.1 Kgf.cm
5
1) Attach the JOG KEY on the KEY BRACKET.
6
7
8
1) Insert the KEYPAD into FRONT.
2) Attach the RECEIVER on the FRONT.
3) Assemble PBA ASS'Y with FRONT.
1) Assemble FRONT with REAR.
1) Screw the REAR at the 6 points.
HANGER SCREW