Samsung SL-X4250LX User Manual Ver.1.0 (English) - Page 308
Fax Settings, Secondary DNS Server
 |
View all Samsung SL-X4250LX manuals
Add to My Manuals
Save this manual to your list of manuals |
Page 308 highlights
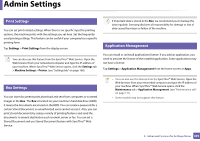
Admin Settings • If necessary, enter the location of the machine in the Location field. • If necessary, enter the information in the Administrator field for the person to contact when any problem occurs on the machine. • SNMP Configuration: Enter the Community Name, Access Permission, Authentication User Name, Authentication Password, Authentication Confirm Password, Privacy Password and Privacy Confirm Password in each field. Then tap Done. • Verify Connections: Tap the Test button to verify the Ethernet Card connection. When Connected appears after tap the Test button, press Next. If Not connected appears, make sure that the machine is connected to the network then verify the LAN connection again. • If a network connection problem persists, contact your network administrator. • If you installed an optional fax kit or finisher, press each Test button for verify connection of them. • Network Settings: Enter the IP address, Subnet Mask, Gateway, Host Name, Domain Name, Primary DNS Server and Secondary DNS Server in each field. Then tap Next. • If a new IP address is assigned automatically by a DHCP or BOOTP, press DHCP or BOOTP. • If you are not sure about your network environment, contact your network administrator. 16 Fax Settings You can set the default fax options. Set the most frequently used fax settings. Tap Settings > Fax Settings from the display screen. • If the optional fax is not installed, the fax icon will not appear on the display screen. • The fax options are different from country to country depending on the International Communications Regulatory. If some of the fax options explained in the instructions have been grayed-out, it means that the grayed-out option is not supported in your communication environment. • You can also use this feature from the SyncThru™ Web Service. Open the Web browser from your networked computer and type the IP address of your machine. When SyncThru™ Web Service opens, click Settings tab > Machine Settings > Fax (see "Settings tab" on page 168). 2. Advanced Features for Settings Menu 308
-
 1
1 -
2
-
3
-
4
-
5
-
6
-
7
-
8
-
9
-
10
-
11
-
12
-
13
-
14
-
15
-
16
-
17
-
18
-
19
-
20
-
21
-
22
-
23
-
24
-
25
-
26
-
27
-
28
-
29
-
30
-
31
-
32
-
33
-
34
-
35
-
36
-
37
-
38
-
39
-
40
-
41
-
42
-
43
-
44
-
45
-
46
-
47
-
48
-
49
-
50
-
51
-
52
-
53
-
54
-
55
-
56
-
57
-
58
-
59
-
60
-
61
-
62
-
63
-
64
-
65
-
66
-
67
-
68
-
69
-
70
-
71
-
72
-
73
-
74
-
75
-
76
-
77
-
78
-
79
-
80
-
81
-
82
-
83
-
84
-
85
-
86
-
87
-
88
-
89
-
90
-
91
-
92
-
93
-
94
-
95
-
96
-
97
-
98
-
99
-
100
-
101
-
102
-
103
-
104
-
105
-
106
-
107
-
108
-
109
-
110
-
111
-
112
-
113
-
114
-
115
-
116
-
117
-
118
-
119
-
120
-
121
-
122
-
123
-
124
-
125
-
126
-
127
-
128
-
129
-
130
-
131
-
132
-
133
-
134
-
135
-
136
-
137
-
138
-
139
-
140
-
141
-
142
-
143
-
144
-
145
-
146
-
147
-
148
-
149
-
150
-
151
-
152
-
153
-
154
-
155
-
156
-
157
-
158
-
159
-
160
-
161
-
162
-
163
-
164
-
165
-
166
-
167
-
168
-
169
-
170
-
171
-
172
-
173
-
174
-
175
-
176
-
177
-
178
-
179
-
180
-
181
-
182
-
183
-
184
-
185
-
186
-
187
-
188
-
189
-
190
-
191
-
192
-
193
-
194
-
195
-
196
-
197
-
198
-
199
-
200
-
201
-
202
-
203
-
204
-
205
-
206
-
207
-
208
-
209
-
210
-
211
-
212
-
213
-
214
-
215
-
216
-
217
-
218
-
219
-
220
-
221
-
222
-
223
-
224
-
225
-
226
-
227
-
228
-
229
-
230
-
231
-
232
-
233
-
234
-
235
-
236
-
237
-
238
-
239
-
240
-
241
-
242
-
243
-
244
-
245
-
246
-
247
-
248
-
249
-
250
-
251
-
252
-
253
-
254
-
255
-
256
-
257
-
258
-
259
-
260
-
261
-
262
-
263
-
264
-
265
-
266
-
267
-
268
-
269
-
270
-
271
-
272
-
273
-
274
-
275
-
276
-
277
-
278
-
279
-
280
-
281
-
282
-
283
-
284
-
285
-
286
-
287
-
288
-
289
-
290
-
291
-
292
-
293
-
294
-
295
-
296
-
297
-
298
-
299
-
300
-
301
-
302
-
 303
303 -
 304
304 -
 305
305 -
 306
306 -
 307
307 -
 308
308 -
 309
309 -
 310
310 -
 311
311 -
 312
312 -
 313
313 -
314
-
315
-
316
-
317
-
318
-
319
-
320
-
321
-
322
-
323
-
324
-
325
-
326
-
327
-
328
-
329
-
330
-
331
-
332
-
333
-
334
-
335
-
336
-
337
-
338
-
339
-
340
-
341
-
342
-
343
-
344
-
345
-
346
-
347
-
348
-
349
-
350
-
351
-
352
-
353
-
354
-
355
-
356
-
357
-
358
-
359
-
360
-
361
-
362
-
363
-
364
-
365
-
366
-
367
-
368
-
369
-
370
-
371
-
372
-
373
-
374
-
375
-
376
-
377
-
378
-
379
-
380
-
381
-
382
-
383
-
384
-
385
-
386
 |
 |