Samsung SL35 User Manual (ENGLISH) - Page 19
Starting the recording mode
 |
UPC - 044701012016
View all Samsung SL35 manuals
Add to My Manuals
Save this manual to your list of manuals |
Page 19 highlights
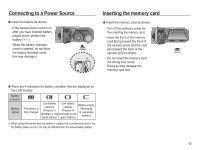
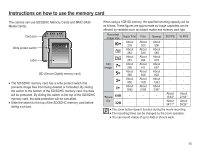
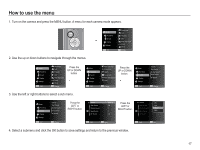
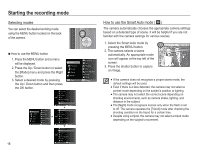
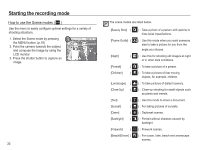
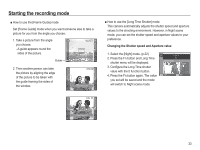
Starting the recording mode Selecting modes You can select the desired working mode using the MENU button located on the back of the camera. Ê How to use the MENU button 1. Press the MENU button and a menu will be displayed. 2. Press the Up / Down button to select the [Mode] menu and press the Right Mode Functions Sound Display button. Settings 3. Select a desired mode by pressing Exit the Up / Down button and then press the OK button. Smart Auto Auto Program DIS Photo Help Guide Scene Movie Exit Back 18 Mode Functions Sound Display Settings Exit Smart Auto Auto Program DIS Photo Help Guide Scene Movie Change Smart Auto Auto Program DIS Photo Help Guide Scene Movie Exit Back Smart Auto Auto Program DIS Photo Help Guide Scene Movie Exit Back Smart Auto Auto Program DIS Photo Help Guide Scene Movie Change How to use the Smart Auto mode ( ) The camera automatically chooses the appropriate camera settings based on a detected type of scene. It will be helpful if you are not familiar with the camera settings for various scenes. 1. Select the Smart Auto mode by pressing the MENU button. 2. The camera selects a scene automatically. An appropriate mode icon will appear at the top left of the screen. 3. Press the shutter button to capture an image. å If the camera does not recognize a proper scene mode, the default settings will be used. å Even if there is a face detected, the camera may not select a portrait mode depending on the subject's position or lighting. å The camera may not select the correct scene depending on shooting environments, such as camera shake, lighting, and distance to the subject. å The [Night] mode recognizes scenes only when the flash is set to off. The camera operates the [Tripod] mode after checking the shooting condition on the tripod for a certain time. å Despite using a tripod, the camera may not select a tripod mode depending on the subject's movement.
-
 1
1 -
2
-
3
-
4
-
5
-
6
-
7
-
8
-
9
-
10
-
11
-
12
-
13
-
 14
14 -
 15
15 -
 16
16 -
 17
17 -
 18
18 -
 19
19 -
 20
20 -
 21
21 -
 22
22 -
 23
23 -
 24
24 -
25
-
26
-
27
-
28
-
29
-
30
-
31
-
32
-
33
-
34
-
35
-
36
-
37
-
38
-
39
-
40
-
41
-
42
-
43
-
44
-
45
-
46
-
47
-
48
-
49
-
50
-
51
-
52
-
53
-
54
-
55
-
56
-
57
-
58
-
59
-
60
-
61
-
62
-
63
-
64
-
65
-
66
-
67
-
68
-
69
-
70
-
71
-
72
-
73
-
74
-
75
-
76
-
77
-
78
-
79
-
80
-
81
-
82
-
83
-
84
-
85
-
86
-
87
-
88
-
89
-
90
-
91
-
92
-
93
-
94
-
95
-
96
-
97
-
98
-
99
-
100
-
101
-
102
 |
 |
