Samsung SMX-F54BN User Manual (user Manual) (ver.1.0) (English) - Page 38
SETTING THE TIME ZONE AND DATE/TIMEFOR THE FIRST TIME, Zone: Home, Control Left/Right
 |
UPC - 036725303966
View all Samsung SMX-F54BN manuals
Add to My Manuals
Save this manual to your list of manuals |
Page 38 highlights
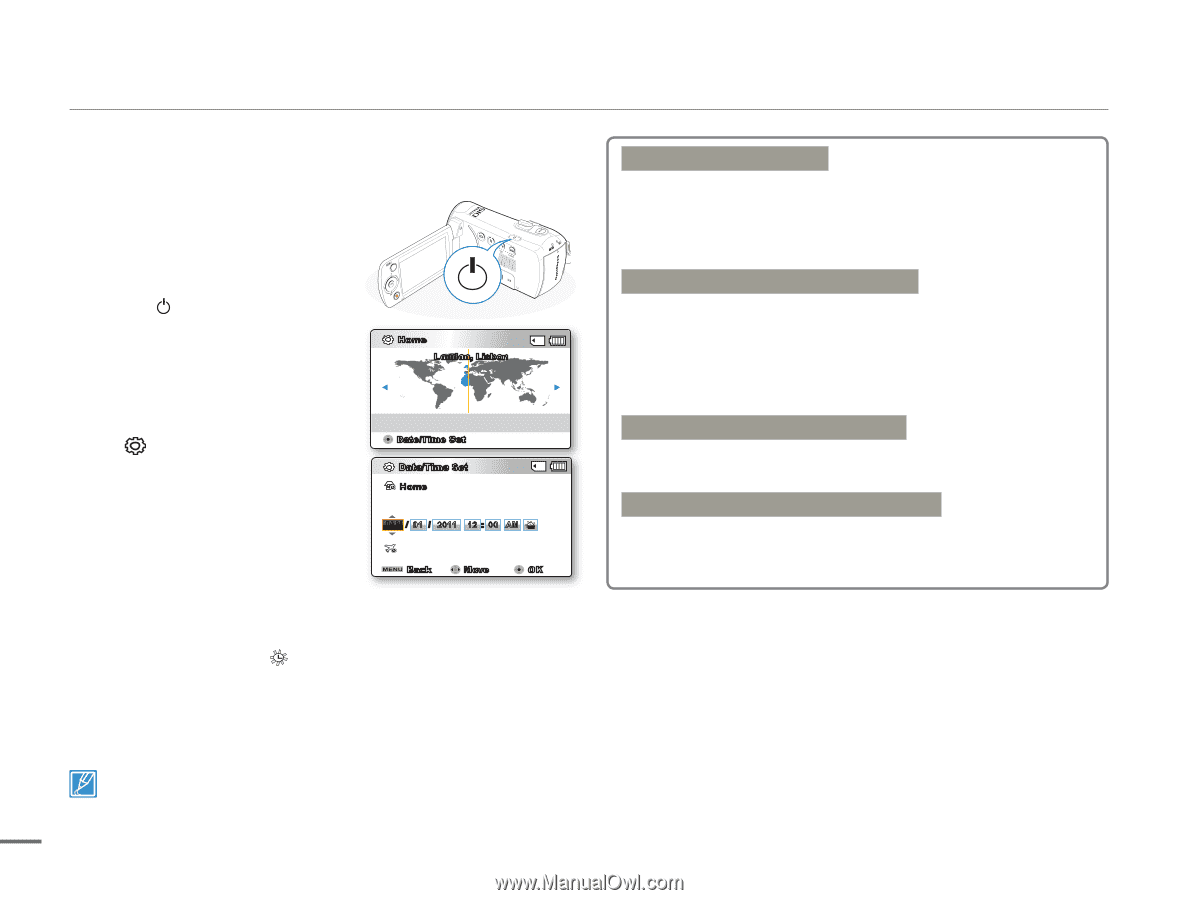
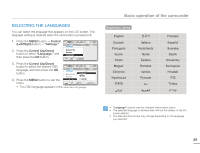
SETTING THE TIME ZONE AND DATE/TIME FOR THE FIRST TIME Set the date and time of your local area when you turn on this camcorder for the first time. 1. Open the LCD screen and press the Power ( ) button to turn on the camcorder. • The Time Zone ("Home") screen appears centered on London, Lisbon (Greenwich Mean Time). • You can also set the "Time Zone: Home" from the Settings ( ) menu. page 82 Home London, Lisbon Home:[GMT 00:00] JAN/01/2011 12:00 AM Date/Time Set 2. Select your geographical area with Control (Left/Right) button, then press the OK button. • The Date/Time Set screen appears. Date/Time Set Home Month Day Year Hour Min JAN / 01 / 2011 12 : 00 AM OFF Visit : JAN/01/2011 12:00 AM Back Move OK 3. Select the date and time information, and change the setting values by using the Control (Up/Down/Left/Right) button. • To set the daylight saving, press the Control (Left/Right) button to select the ( ) icon, and then press the Control (Up/Down) button to set Daylight Saving on/off. - Activating Daylight Saving forwards the time by 1 hour. 4. Make sure the clock is correctly set, and then press the OK button. • The year can be set up to 2037. • Set "Date/Time Display" to "On." page 84 28 • After setting, the date and time are automatically recorded on a special data area of the storage media. Basic operation of the camcorder Built-in rechargeable battery • Your camcorder includes a built-in rechargeable battery that retains the date and time settings even after the power is turned off. • Once this battery is depleted, the current date/time values are all reset to defaults, and you need to recharge the built-in rechargeable battery. The date/time must be set again. Charging the built-in rechargeable battery • The built-in battery is always recharged while your camcorder is connected to the AC power or while the battery is attached. If you do not connect the camcorder to AC power or do not attach the battery • for about two months, the built-in battery fully discharges. If this occurs, charge the built-in battery by connecting to the supplied AC adaptor for 24 hours. Turning the date and time display on/off • To switch the date and time display on or off, access the menu and change the Date/Time Display mode. page 84 Simple setting of the clock by time difference • You can easily set the clock to the local time by setting a time difference when using your camcorder abroad. Select "Time Zone" on the menu, then set the time difference. page 82
-
 1
1 -
2
-
3
-
4
-
5
-
6
-
7
-
8
-
9
-
10
-
11
-
12
-
13
-
14
-
15
-
16
-
17
-
18
-
19
-
20
-
21
-
22
-
23
-
24
-
25
-
26
-
27
-
28
-
29
-
30
-
31
-
32
-
 33
33 -
 34
34 -
 35
35 -
 36
36 -
 37
37 -
 38
38 -
 39
39 -
 40
40 -
 41
41 -
 42
42 -
 43
43 -
44
-
45
-
46
-
47
-
48
-
49
-
50
-
51
-
52
-
53
-
54
-
55
-
56
-
57
-
58
-
59
-
60
-
61
-
62
-
63
-
64
-
65
-
66
-
67
-
68
-
69
-
70
-
71
-
72
-
73
-
74
-
75
-
76
-
77
-
78
-
79
-
80
-
81
-
82
-
83
-
84
-
85
-
86
-
87
-
88
-
89
-
90
-
91
-
92
-
93
-
94
-
95
-
96
-
97
-
98
-
99
-
100
-
101
-
102
-
103
-
104
-
105
-
106
-
107
-
108
-
109
-
110
-
111
-
112
-
113
-
114
-
115
-
116
-
117
-
118
-
119
-
120
-
121
-
122
-
123
-
124
-
125
-
126
-
127
 |
 |