Samsung UN65H6350AF User Manual Ver.1.0 (English) - Page 124
Analog Channel Schedule Viewing
 |
View all Samsung UN65H6350AF manuals
Add to My Manuals
Save this manual to your list of manuals |
Page 124 highlights
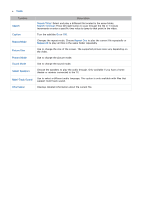
The Program Info Screen Recording is not supported in the U.S.A and Canada. To set up a Schedule Viewing or Schedule Recording on the INFO screen, follow these steps: 111 Change the channel to the channel that will be broadcasting the program you want to schedule. 222 Press INFO on the standard remote. On the Samsung Smart Control, press the KEYPAD button, and then select the INFO button on the On-Screen Remote. 333 Move right to see program information for later broadcasts. The program information for the programs that will be broadcast later on that channel is displayed on the screen. 444 Highlight and then select the program you want to schedule or record. The Information screen appears. 555 Select Schedule Viewing or Schedule Recording. The program is scheduled for viewing or recording. Press the RETURN button on your remote. Analog Channel Schedule Viewing MENU > Broadcasting > Schedule Manager Try Now When you set up a scheduled viewing for an analog channel, you need to know the channel, day or days of the week the program is airing, and the time the program is airing. To set up a schedule viewing for an analog station, follow theses steps: 111 Press the MENU button, and then select Broadcasting > Schedule Manager. 222 On the Schedule Manager screen, select Schedule. The Schedule Viewing screen appears. 333 On the Schedule Viewing screen, select the Antenna connection (Air or Cable), and then move to the Channel field. "" If you only receive your TV broadcasts through Air or Cable, the Antenna connection field displays only Air or only Cable. 444 Highlight the Channel field, and then select it. Scroll it up or down, find the desired channel, and then select it. Move to the Repeat field. 555 Highlight the Repeat filed, and then select it. Select Once, Manual, Sat~Sun, Mon~Fri, or Everyday. If you select manual, you must also highlight and select the days you want. 666 Move to the Time field, and then select it. Set the hours by using the Up/Down directional buttons to move the numbers up or down. Do the same for the am/pm and minutes fields. 777 When done entering the time, press RETURN. 888 Select OK at the bottom of the Schedule Viewing screen.
-
 1
1 -
2
-
3
-
4
-
5
-
6
-
7
-
8
-
9
-
10
-
11
-
12
-
13
-
14
-
15
-
16
-
17
-
18
-
19
-
20
-
21
-
22
-
23
-
24
-
25
-
26
-
27
-
28
-
29
-
30
-
31
-
32
-
33
-
34
-
35
-
36
-
37
-
38
-
39
-
40
-
41
-
42
-
43
-
44
-
45
-
46
-
47
-
48
-
49
-
50
-
51
-
52
-
53
-
54
-
55
-
56
-
57
-
58
-
59
-
60
-
61
-
62
-
63
-
64
-
65
-
66
-
67
-
68
-
69
-
70
-
71
-
72
-
73
-
74
-
75
-
76
-
77
-
78
-
79
-
80
-
81
-
82
-
83
-
84
-
85
-
86
-
87
-
88
-
89
-
90
-
91
-
92
-
93
-
94
-
95
-
96
-
97
-
98
-
99
-
100
-
101
-
102
-
103
-
104
-
105
-
106
-
107
-
108
-
109
-
110
-
111
-
112
-
113
-
114
-
115
-
116
-
117
-
118
-
 119
119 -
 120
120 -
 121
121 -
 122
122 -
 123
123 -
 124
124 -
 125
125 -
 126
126 -
 127
127 -
 128
128 -
 129
129 -
130
-
131
-
132
-
133
-
134
-
135
-
136
-
137
-
138
-
139
-
140
-
141
-
142
-
143
-
144
-
145
-
146
-
147
-
148
-
149
-
150
-
151
-
152
-
153
-
154
-
155
-
156
-
157
-
158
-
159
-
160
-
161
-
162
-
163
-
164
-
165
-
166
-
167
-
168
-
169
-
170
-
171
-
172
-
173
-
174
-
175
-
176
-
177
-
178
-
179
-
180
-
181
-
182
-
183
-
184
-
185
-
186
-
187
-
188
-
189
-
190
-
191
-
192
-
193
-
194
-
195
-
196
-
197
-
198
-
199
-
200
-
201
-
202
-
203
-
204
-
205
-
206
-
207
-
208
-
209
-
210
-
211
-
212
-
213
-
214
-
215
-
216
-
217
-
218
 |
 |
