Samsung i640 Service Manual - Page 105
Be sure in the guideline, Make sure the screw caps are in position
 |
View all Samsung i640 manuals
Add to My Manuals
Save this manual to your list of manuals |
Page 105 highlights
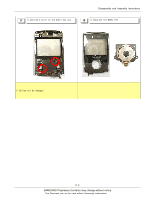
5 1) Attach two insulation tape Disassembly and Assembly Instructions 6 1) Put the lower part of slide 2) Screw 6 points 1) Be sure in the guideline 7 1) Attach 2 screw cap. 1) Make sure no gap between the upper and lower slide 2) Notice the plastics not be damaged or scratched. 8 1) Put the front into the right position 2) Screw 6 points. 1) Make sure the screw caps are in position 1) Notice the plastics not be damaged or scratched 11-7 SAMSUNG Proprietary-Contents may change without notice This Document can not be used without Samsung's authorization
-
 1
1 -
2
-
3
-
4
-
5
-
6
-
7
-
8
-
9
-
10
-
11
-
12
-
13
-
14
-
15
-
16
-
17
-
18
-
19
-
20
-
21
-
22
-
23
-
24
-
25
-
26
-
27
-
28
-
29
-
30
-
31
-
32
-
33
-
34
-
35
-
36
-
37
-
38
-
39
-
40
-
41
-
42
-
43
-
44
-
45
-
46
-
47
-
48
-
49
-
50
-
51
-
52
-
53
-
54
-
55
-
56
-
57
-
58
-
59
-
60
-
61
-
62
-
63
-
64
-
65
-
66
-
67
-
68
-
69
-
70
-
71
-
72
-
73
-
74
-
75
-
76
-
77
-
78
-
79
-
80
-
81
-
82
-
83
-
84
-
85
-
86
-
87
-
88
-
89
-
90
-
91
-
92
-
93
-
94
-
95
-
96
-
97
-
98
-
99
-
 100
100 -
 101
101 -
 102
102 -
 103
103 -
 104
104 -
 105
105 -
 106
106 -
 107
107 -
 108
108
 |
 |

SAMSUNG Proprietary-Contents may change without notice
Disassembly and Assembly Instructions
11-7
This Document can not be used without Samsung's authorization
1)
Be sure in the guideline
1) Make sure no gap between the upper and lower slide
2) Notice the plastics not be damaged or scratched.
7
1) Attach 2 screw cap.
1) Make sure the screw caps are in position
1)
Notice the plastics not be damaged or scratched
1) Attach two insulation tape
5
1) Put the lower part of slide
2) Screw 6 points
6
1) Put the front into the right position
2) Screw 6 points.
8