SanDisk M260 User Manual - Page 14
Customize Your Favorite Play list - rhapsody
 |
UPC - 619659025304
View all SanDisk M260 manuals
Add to My Manuals
Save this manual to your list of manuals |
Page 14 highlights
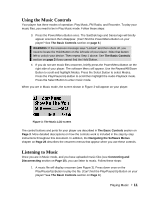
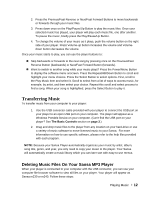
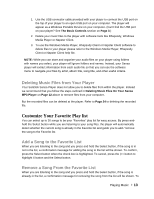
1. Use the USB connector cable provided with your player to connect the USB port on the top of your player to an open USB port on your computer. The player will appear as a Windows Portable Device on your computer. (Can't find the USB port on your player? See The Basic Controls section on Page 3.) 2. Delete your music files to the player with software tools like Rhapsody, Windows Media Player or Napster Client. 3. To use the Windows Media Player, Rhapsody Client or Napster Client software to delete files to your player please refer to the Windows Media Player, Rhapsody Client or Napster Client help file. NOTE: While you can store and organize your audio files on your player using folders with names you select, your player will ignore folders and names. Instead, your Sansa player will extract information from each audio file so that you can use the software menu to navigate your files by artist, album title, song title, and other useful criteria. Deleting Music Files from Your Player Your SanDisk Sansa Player does not allow you to delete files from within the player. Instead we recommend that you follow the steps outlined in Deleting Music Files On Your Sansa MP3 Player on Page 12 above to remove files from your computer. But the recorded files can be deleted at the player. Refer to Page 24 to deleting the recorded file. Customize Your Favorite Play list You can select up to 30 songs to be your "Favorites" play list for easy access. By press-andhold the Select button while you are listening to your song files, the player will automatically detect whether the current song is already in the Favorite list and guide you to add / remove the song to the Favorite list. Add a Song to the Favorite List When you are listening to the song and you press and hold the Select button, if the song is in not in the list, a confirmation message for adding the song to the list will be shown. To confirm, press the Select button when the check box is highlighted. To cancel, press the |
-
 1
1 -
2
-
3
-
4
-
5
-
6
-
7
-
8
-
 9
9 -
 10
10 -
 11
11 -
 12
12 -
 13
13 -
 14
14 -
 15
15 -
 16
16 -
 17
17 -
 18
18 -
 19
19 -
20
-
21
-
22
-
23
-
24
-
25
-
26
-
27
-
28
-
29
-
30
-
31
-
32
-
33
-
34
-
35
-
36
-
37
 |
 |
