SanDisk SD8NB-136G-000000 Quick Installation Guide - Page 3
Clone your data
 |
View all SanDisk SD8NB-136G-000000 manuals
Add to My Manuals
Save this manual to your list of manuals |
Page 3 highlights
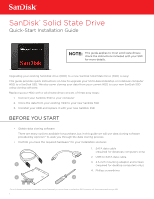
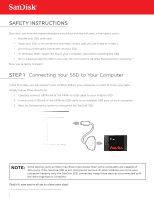
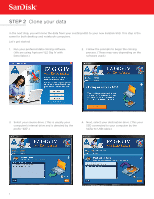
STEP 2 Clone your data In the next step, you will clone the data from your existing HDD to your new SanDisk SSD. This step is the same for both desktop and notebook computers. Let's get started: 1. Run your preferred data cloning software. (We are using Apricorn® EZ Gig IV with Data Select.) 2. Follow the prompts to begin the cloning process. (These may vary depending on the software used.) 3. Select your source drive. (This is usually your computer's internal drive and is denoted by the prefix "IDE".) 4. Next, select your destination drive. (This your SSD connected to your computer by the SATA-to-USB cable.) 3
-
 1
1 -
 2
2 -
 3
3 -
 4
4 -
 5
5 -
 6
6 -
 7
7
 |
 |

3
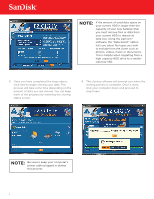
In the next step, you will clone the data from your existing HDD to your new SanDisk SSD. This step is the
same for both desktop and notebook computers.
Let’s get started:
Clone your data
STEP 2
2.
Follow the prompts to begin the cloning
process. (These may vary depending on the
software used.)
1.
Run your preferred data cloning software.
(We are using Apricorn® EZ Gig IV with
Data Select.)
3.
Select your source drive. (This is usually your
computer’s internal drive and is denoted by the
prefix “IDE”.)
4.
Next, select your destination drive. (This your
SSD connected to your computer by the
SATA-to-USB cable.)