Sanyo DP19648 Owners Manual - Page 4

Detaching The Hdtv Tilt Stand, Viewing Angles Brightness - manual

Page 4 highlights

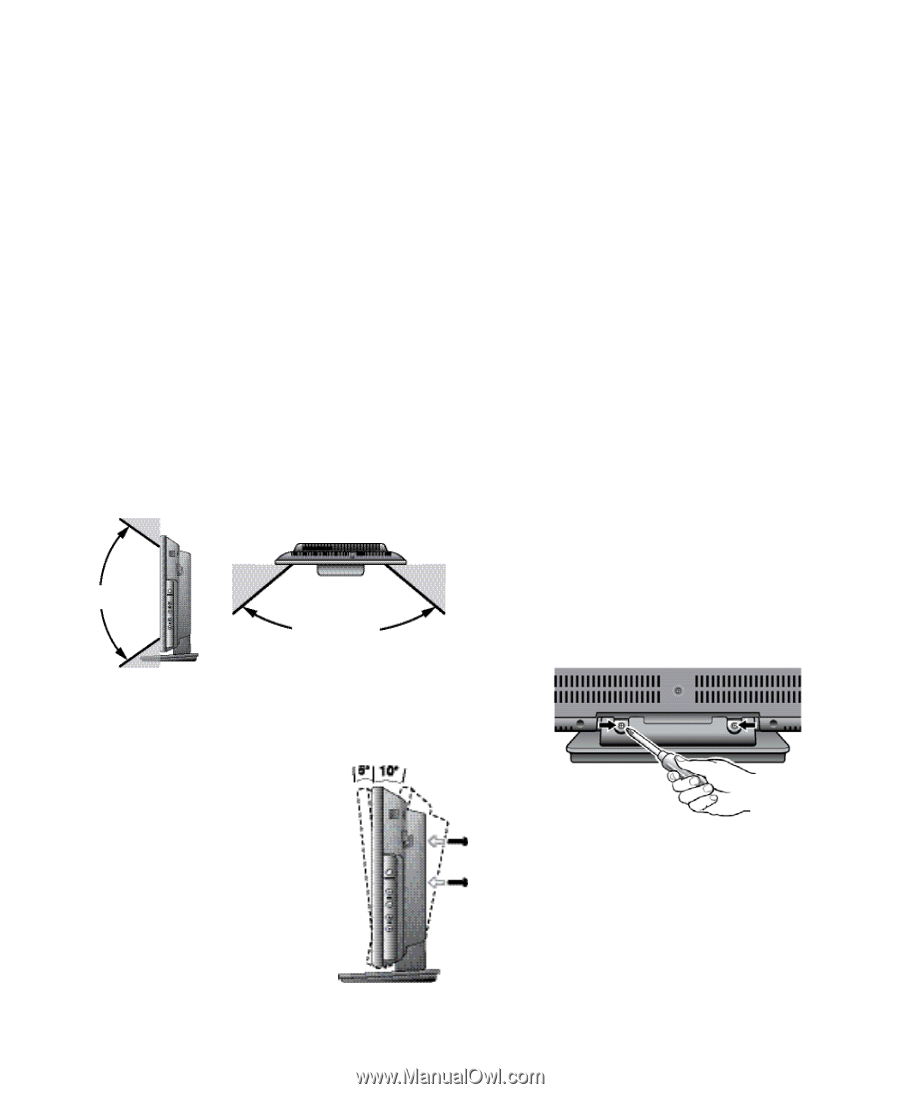
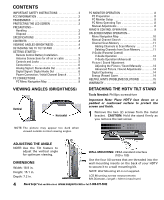
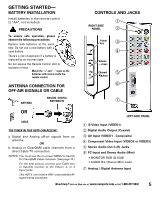
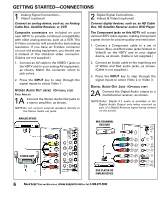
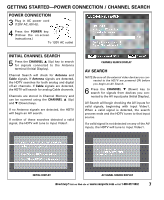
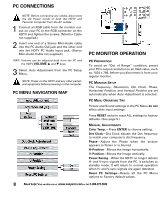
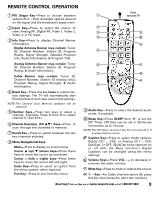
CONTENTS IMPORTANT SAFETY INSTRUCTIONS 2 FCC INFORMATION 3 TRADEMARKS 3 PROTECTING THE LCD SCREEN 3 PRECAUTIONS- Handling 3 Disposal 3 SPECIFICATIONS 3 CONTENTS 4 VIEWING ANGLES (BRIGHTNESS 4 DETACHING THE TV TILT STAND 4 GETTING STARTED- Remote Control Battery Installation 5 Antenna Connections for off-air or cable 5 Controls and Jacks 5 Connections 6 Analog Signal / Stereo Audio Out 6 Digital Signal / Digital Audio Out 6 Power Connection / Initial Channel Search 7 PC CONNECTIONS 8 PC Menu Navigation Map 8 VIEWING ANGLES (BRIGHTNESS) Vertical Horizontal NOTE: The picture may appear too dark when viewed outside normal viewing angles. PC MONITOR OPERATION 8 PC Preparation 8 PC Monitor Setup 8 PC Menu Operating Tips 8 Manual Adjustments 8 REMOTE CONTROL OPERATION 9 ON-SCREEN MENU OPERATION- Menu Navigation Map 10 Manual Channel Search 10 Channel Scan Memory 11 Adding Channels to Scan Memory 11 Deleting Channels from Scan Memory 11 V-Guide (Parental Control) V-Guide Operation 12 V-Guide Operation (Advanced 13 Picture / Sound Adjustment Adjusting the Picture / Sound Manually 14 Advanced Picture / Sound Adjustments 14 Digital Captioning 14 Energy (Power) Saver 14 HELPFUL HINTS (PROBLEMS/SOLUTIONS 15 WARRANTY 16 DETACHING THE HDTV TILT STAND Tools Needed: Phillips screwdriver Important Note: Place HDTV face down on a padded or cushioned surface to protect the screen and finish. 1 Remove the two (2) screws from the metal bracket. CAUTION: Hold the stand firmly as you remove the last screw. ADJUSTING THE ANGLE NOTE: Use the Tilt feature to adjust the vertical angle for optimum viewing. DIMENSIONS Width: 18.9 in. Height: 15.1 in. Depth: 7.2 in. WALL MOUNTING: VESA standard interface (100 x 100) Use the four (4) screws that are threaded into the wall mounting inserts on the back of your HDTV to secure it to a wall mounting kit. NOTE: Wall Mounting kit is not supplied. LCD Mounting screws measurements: M4 Diameter, Length-10mm (maximum) 4 Need help? Visit our Web site at www.sanyoctv.com or Call 1-800-877-5032

  • 1
  • 2
  • 3
  • 4
  • 5
  • 6
  • 7
  • 8
  • 9
  • 10
  • 11
  • 12
  • 13
  • 14
  • 15
  • 16
  • 17
  • 18
  • 19
  • 20
  • 21
  • 22
  • 23
  • 24
  • 25
  • 26
  • 27
  • 28
  • 29
  • 30
  • 31
  • 32
  • 33
  • 34
  • 35
  • 36
  • 37
  • 38
  • 39
  • 40
  • 41
  • 42
  • 43
  • 44
  • 45
  • 46
  • 47
  • 48

4
Need help?
Visit our Web site at
www.sanyoctv.com
or Call
1-800-877-5032
CONTENTS
IMPORTANT SAFETY INSTRUCTIONS
. . . . . . . . . . . . . . . 2
FCC INFORMATION . . . . . . . . . . . . . . . . . . . . . . . . . . . . . . . .3
TRADEMARKS
. . . . . . . . . . . . . . . . . . . . . . . . . . . . . . . . . . . .3
PROTECTING THE LCD SCREEN . . . . . . . . . . . . . . . . . . . . . .3
PRECAUTIONS—
Handling
. . . . . . . . . . . . . . . . . . . . . . . . . . . . . . . . . . . . . . .3
Disposal . . . . . . . . . . . . . . . . . . . . . . . . . . . . . . . . . . . . . . . .3
SPECIFICATIONS . . . . . . . . . . . . . . . . . . . . . . . . . . . . . . . . . .3
CONTENTS
. . . . . . . . . . . . . . . . . . . . . . . . . . . . . . . . . . . . . . .4
VIEWING ANGLES (BRIGHTNESS) . . . . . . . . . . . . . . . . . . .4
DETACHING THE TV TILT STAND . . . . . . . . . . . . . . . . . . . .4
GETTING STARTED—
Remote Control Battery Installation . . . . . . . . . . . . . . . .5
Antenna Connections for off-air or cable . . . . . . . . . . .5
Controls and Jacks . . . . . . . . . . . . . . . . . . . . . . . . . . . . . .5
Connections . . . . . . . . . . . . . . . . . . . . . . . . . . . . . . . . . . . .6
Analog Signal / Stereo Audio Out . . . . . . . . . . . . . . . . .6
Digital Signal / Digital Audio Out
. . . . . . . . . . . . . . . . . .6
Power Connection / Initial Channel Search . . . . . . . . .7
PC CONNECTIONS . . . . . . . . . . . . . . . . . . . . . . . . . . . . . . . . .8
PC Menu Navigation Map . . . . . . . . . . . . . . . . . . . . . . . .8
PC MONITOR OPERATION . . . . . . . . . . . . . . . . . . . . . . . . . .8
PC Preparation . . . . . . . . . . . . . . . . . . . . . . . . . . . . . . . . . .8
PC Monitor Setup
. . . . . . . . . . . . . . . . . . . . . . . . . . . . . . .8
PC Menu Operating Tips
. . . . . . . . . . . . . . . . . . . . . . . . .8
Manual Adjustments . . . . . . . . . . . . . . . . . . . . . . . . . . . . .8
REMOTE CONTROL OPERATION . . . . . . . . . . . . . . . . . . . . .9
ON-SCREEN MENU OPERATION—
Menu Navigation Map . . . . . . . . . . . . . . . . . . . . . . . . . .10
Manual Channel Search
. . . . . . . . . . . . . . . . . . . . . . . .10
Channel Scan Memory . . . . . . . . . . . . . . . . . . . . . . . . . .11
Adding Channels to Scan Memory . . . . . . . . . . . . .11
Deleting Channels from Scan Memory . . . . . . . . . .11
V-Guide (Parental Control)
V-Guide Operation
. . . . . . . . . . . . . . . . . . . . . . . . . . .12
V-Guide Operation (Advanced)
. . . . . . . . . . . . . . . .13
Picture / Sound Adjustment
Adjusting the Picture / Sound Manually . . . . . . . . .14
Advanced Picture / Sound Adjustments . . . . . . . . .14
Digital Captioning
. . . . . . . . . . . . . . . . . . . . . . . . . . . . . .14
Energy (Power) Saver . . . . . . . . . . . . . . . . . . . . . . . . . . .14
HELPFUL HINTS (PROBLEMS/SOLUTIONS)
. . . . . . . . . .15
WARRANTY . . . . . . . . . . . . . . . . . . . . . . . . . . . . . . . . . . . . . .16
DETACHING THE HDTV TILT STAND
Tools Needed:
Phillips screwdriver
Important Note: Place HDTV face down on a
padded or cushioned surface to protect the
screen and finish.
1
Remove the two (2) screws from the metal
bracket.
CAUTION:
Hold the stand firmly as
you remove the last screw.
VIEWING ANGLES (BRIGHTNESS)
ADJUSTING THE ANGLE
NOTE: Use the Tilt feature to
adjust the vertical angle
for optimum viewing.
DIMENSIONS
Width: 18.9 in.
Height: 15.1 in.
Depth: 7.2 in.
Vertical
Horizontal
WALL MOUNTING:
VESA standard interface
(100 x 100)
Use the four (4) screws that are threaded into the
wall mounting inserts on the back of your HDTV
to secure it to a wall mounting kit.
NOTE: Wall Mounting kit is not supplied.
LCD Mounting screws measurements:
M4 Diameter, Length—10mm (maximum)
NOTE: The picture may appear too dark when
viewed outside normal viewing angles.