Sanyo DP19657A Setup Guide - Page 1
Sanyo DP19657A - LCD HDTV With Digital Tuner Manual
 |
UPC - 840356973685
View all Sanyo DP19657A manuals
Add to My Manuals
Save this manual to your list of manuals |
Page 1 highlights
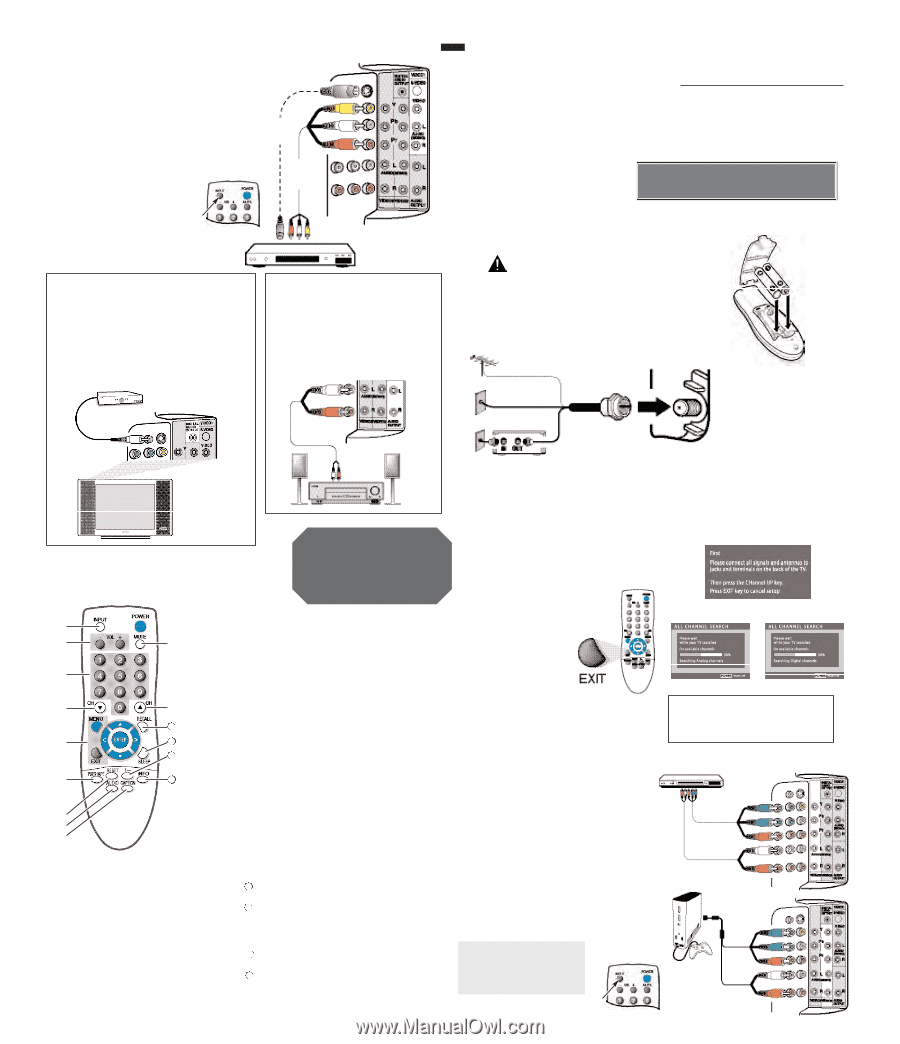
CONNECTING A VCR OR DVD TO THE DTV VIDEO1 (ANALOG) JACKS DTV AV Input Jacks 1 Connect a Composite cable to the VIDEO1 Yellow, White, and Red AV jacks. 2 OPTIONAL Connect DVD to the TV S-Video In Jack, if available on your external equipment. Note: S-Video jack connection overrides Video jack connection (VIDEO1). 2 S-Video Jack (Optional) 3 Press INPUT to select Video1 to view the VCR or DVD program. 1 Composite IMPORTANT FACTS: Remote Control AV Jack Don't be fooled by the phrase "Available in High-Definition." Composite jacks offer only 480i (SDTV) resolution. To view available High-Definition 3 (HD) programs, you must connect VCR or DVD your HD equipment to the Component jacks. CONNECTING A MULTICHANNEL RECEIVER TO THE DTV DIGITAL AUDIO OUT JACK 1 Connect a Multichannel Receiver to the TV Digital Audio Output as shown. Note: Dolby ® Digital 5.1 audio is available at the Digital Audio Output only when received as part of a Digital Antenna signal. Multichannel Receiver Back View of TV 1 Coaxial Cable CONNECTING A STEREO AMPLIFIER TO THE DTV AUDIO OUT (ANALOG) JACKS 1 Connect a Stereo Amplifier to the TV Audio Out jacks as shown. Note: Do not connect external speakers directly to the DTV. 1 Back View of TV Stereo Amplifier DP15657 REMOTE CONTROL OPERATION Point towards TV If you experience problems, please call 1-800-877-5032, We Can Help! « Œ • Ž 11 12 13 ‘ 14 ’ “ ” Œ Input Key-Press to select the program source to watch: TV, Video 1, Video 2, or Video 3. Volume Keys-Press VOL - + to adjust. Ž Number Keys-Press two keys to select a chan- nel. Example: Press 0 then 6 to select channel 6. (See #13.) Channel Scanning (CH L M ) Keys-Press to scan through the channels in memory. Menu Navigational Keys: Menu-Press to display on-screen menu. Cursor L (up) M (down) keys-Press these keys to move the cursor up and down within the menu. Cursor < (left) > (right) keys-Press these keys to move the cursor left and right within the menu. Enter Key-Press to select an option from the menu system, when required. Exit Key-Press to exit from the menu system. ‘ PIX Shape Key-Use to change the video display format. Available options depend on signal received and the broadcast's aspect ratio. Note: Cannot display picture on a full screen. Check Aspect Ratio of broadcast. Then press PIX Shape key to change setting. ’ Reset Key-Press this key twice to restore factory settings. The TV will automatically start Channel Search and clear all customized settings. Note: Channel scan memory database list of digital and analog channels will be replaced. If desired, personal settings can be made again using the menu options. “ Audio Key-Press to select the desired audio mode (if available). ” Caption Key-Captioning is text information transmitted along with the picture and sound so it can be displayed on the TV screen. Press CAPTION to select mode options: Digital CC1 ~ CC6, or Analog CC1 ~ CC4, OFF, or QuikCap. (QuikCap switches captions on and off with the Mute function.) Digital Captions can be changed using the menu settings. • Mute Key-Press once to mute the sound. 11 Recall Key-Press to switch between the last two channels selected. 12 Sleep Key-Press this key then the "0" key to set the Sleep Off Timer. Time can be set in 30-minute increments up to 3 hours. Note:The Sleep Timer cancels when the TV is turned off or if a power failure occurs. 13 1- - Key-For Analog Cable channels above 100, press this key, then press the other two numbers. 14 Info Key-Press to display the Digital and Analog Full Banner information. The banner contains the following: program title, station ID, program rating, signal strength, channel number, tuner ID, and audio information. ENGLISH LCD Owner's Manual Part No.: 1JC6P1P0291 - - Please call us at 1.800.877.5032 if you need assistance with your new HDTV. We can Help! AS Model Nos. DP15657 DP19657 Visit us at www.sanyoctv.com for more information about these models. FIRST-THINGS-FIRST (REQUIRED INITIAL SETUP) 1 Install batteries in remote control (2AA, not included) PRECAUTIONS To ensure safe operation, please observe the following precautions: Replace both batteries at the same time. Do not use a new battery with a used battery. Risk of explosion, if battery is replaced by an incorrect type. Do not expose the Remote Control Unit to moisture or heat. 2 Connect Signal to the TV's Integrated Analog / Digital 75 ohm Antenna Input terminal RF ANTENNA The Tuner in this DTV can receive: OR CABLE OR CABLE BOX or SATELLITE BOX 1. Digital and /or Analog Off-Air Signals from an RF antenna. OR 2. Analog or ClearQAM cable chan- nels. Note: You must search for ClearQAM channels using the "Digital Cable Search" menu option. Analog / Digital OR Antenna In 3. The output from a VCR or cable box. 3 Plug in AC power cord (120V AC, 60 Hz.) Digital signals from a Set-Top Box (STB) should be received through the Component In jacks. 4 Press the POWER key. (Follow on-screen instructions) This DTV can receive ANY unscrambled RF signal being broadcast. 5 Perform "All Channel Search." The All Channel Search will search for off-air digital and analog channels, and analog cable channels. The DTV will receive cable or off-air channels, but not at the same time. If after two searches the DTV still fails to detect any channels, the DTV will tune to Video1. Initial on-screen ALL Channel Search Note: If EXIT is pressed, the DTV will skip Channel Search and tune to Video1 without storing any channels in the Channel Map database. ALL Channel Search [Analog & Digital] « Trademarks Information: Manufactured under license from Dolby Laboratories. "Dolby" is a trademark of Dolby Laboratories. Specifications Power Requirement: Source: AC 120V, 60Hz Power Consumption: DP15657: 40 watts DP19657: 50 watts CONNECTING A DVD OR GAME TO THE DTV DVD Player or similar digital device, such as a Satellite Receiver DTV VIDEO 2 / 3 (COMPONENT VIDEO IN JACKS) 1 Connect a Component cable to the VIDEO2 / 3 Green, Blue, and Red video jacks. 2 Connect an Audio Cable to the VIDEO2 / 3 White and Red audio jacks. 3 Press INPUT to select Video2 or Video3 to view the program. Note: VIDEO2 and VIDEO3 jacks have identical functions. Compatible video devices can be connected to either or both jacks. OPERATING TIP: You DO NOT need to tune the TV to Channel 3 or 4 to view DVD program. Remote Control Y- Pb- Pr Component 1 Jacks 2 Audio L/R Jack Game console Y- Pb- Pr Component Jacks 1 2 Audio L/R 3 Jack
-
 1
1 -
 2
2
 |
 |