Sanyo DP42849 Quik 'N Easy Setup Guide - Page 2
Hdtv Initial Setup, Administrating Your Channels, Protecting Your Hdtv's Lcd Screen - manual
 |
View all Sanyo DP42849 manuals
Add to My Manuals
Save this manual to your list of manuals |
Page 2 highlights
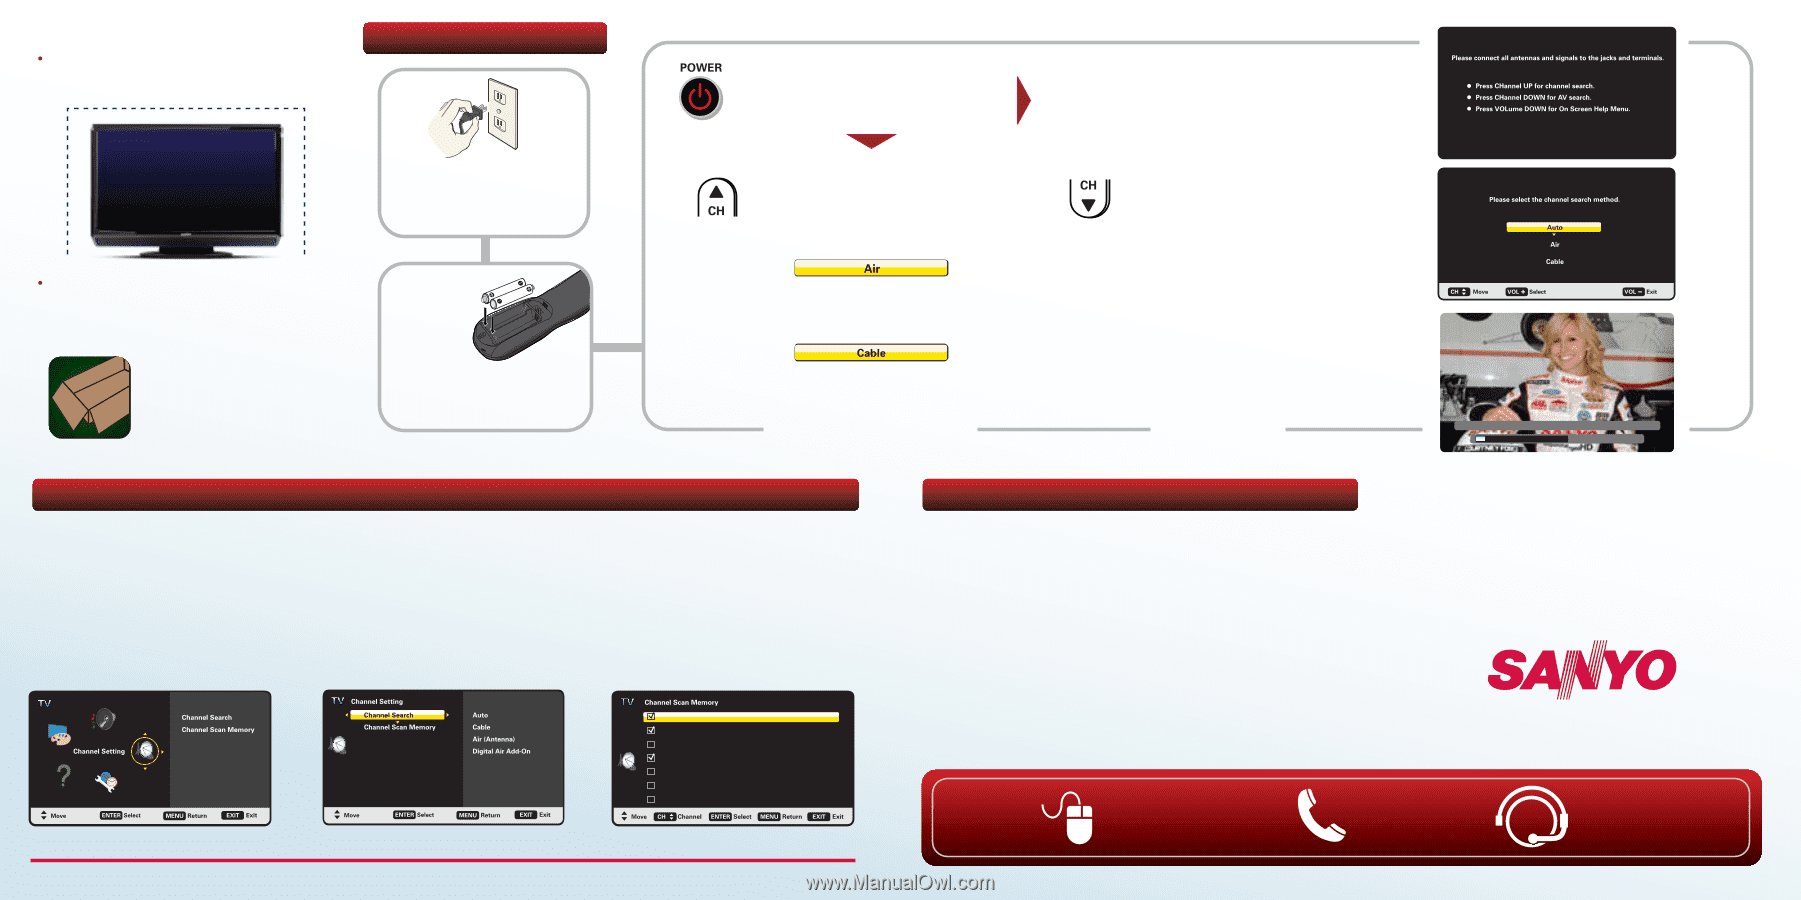
Be sure to: Handle the HDTV by the cabinet only, do not touch the screen HDTV INITIAL SETUP Plug in the HDTV and any other AV equipment hooked up to your HDTV. Place the HDTV on a flat firm surface and allow adequate space on both sides, top, and back. Please save the carton and all packaging material in case return or repair is needed. Place fresh batteries in the remote control. NOTE: To ensure safe operation please follow the Battery Installation precautions in your owner's manual. Turn on your HDTV and all of the AV equipment that is hooked up to it. Press CH▲ to search for Antenna signals or Cable signals connected to the RF antenna terminal. Searches for both Analog transmissions and Digital transmissions in your area. Searches for analog and unscrambled (ClearQAM) digital cable channels. CHANNEL SEARCH If you receive Satellite or Cable service through a Set Top Box (receiver), please hook it up to an appropriate AV Input on your HDTV and power on. Press CH▼ to search for signals from devices hooked up to the AV input jacks. Check that the selected input matches the one that the receiver is hooked up to, if not, select the correct input from the Input List (hold INPUT key on your HDTV's remote) NOTE: Tune to your Satellite or Cable service channels using your receiver and its remote. AV SEARCH High quality pictrue is available with proper HD signal and connection. Analog 0 Digital 0 ADMINISTRATING YOUR CHANNELS Press the MENU key on your remote to display the On Screen menu. Use the cursor keys to select Channel Setting and press ENTER. Channel Search You may perform another channel search or a Digital Air Add-On which searches for digital off-air channels and adds new ones to the channel map database. Channel Scan Memory View a list of all Analog and Digital channels found. You may add (enable) or remove (disable) channels to meet your preferences. Analog Analog Analog Digital Digital Digital Digital 64 65 66 03-1 06-1 06-2 09-1 WREG-DT WCVB WEXT NICK NICK VBCT PROTECTING YOUR HDTV's LCD SCREEN The screen can be damaged if it's not maintained properly. Do not use hard objects such as hard cloth or paper. Do not use excessive pressure when cleaning the screen; excessive pressure can cause permanent discoloration or dark spots. NEVER spray liquids on the screen! HDMI, the HDMI Logo and High-Definition Multimedia Interface are trademarks or registered trademarks of HDMI Licensing LLC. Si necesita ayuda en ESPAÑOL, marque al 1-800-877-5032 y nuestros asesores estarán dispuestos a ofrecerle ayuda con cualquiera de sus dudas. Sanyo Manufacturing Corp. 3333 Sanyo Road, Forrest City, AR 72335 Need help? Visit our website www.sanyoctv.com Call toll free 1.800.877.5032 One of our Service associates will be glad to assist you!
-
 1
1 -
 2
2
 |
 |