Sanyo DP50842 Owners Manual - Page 2
One-year Li, Ited Parts And Labor, Warranty - model number
 |
View all Sanyo DP50842 manuals
Add to My Manuals
Save this manual to your list of manuals |
Page 2 highlights
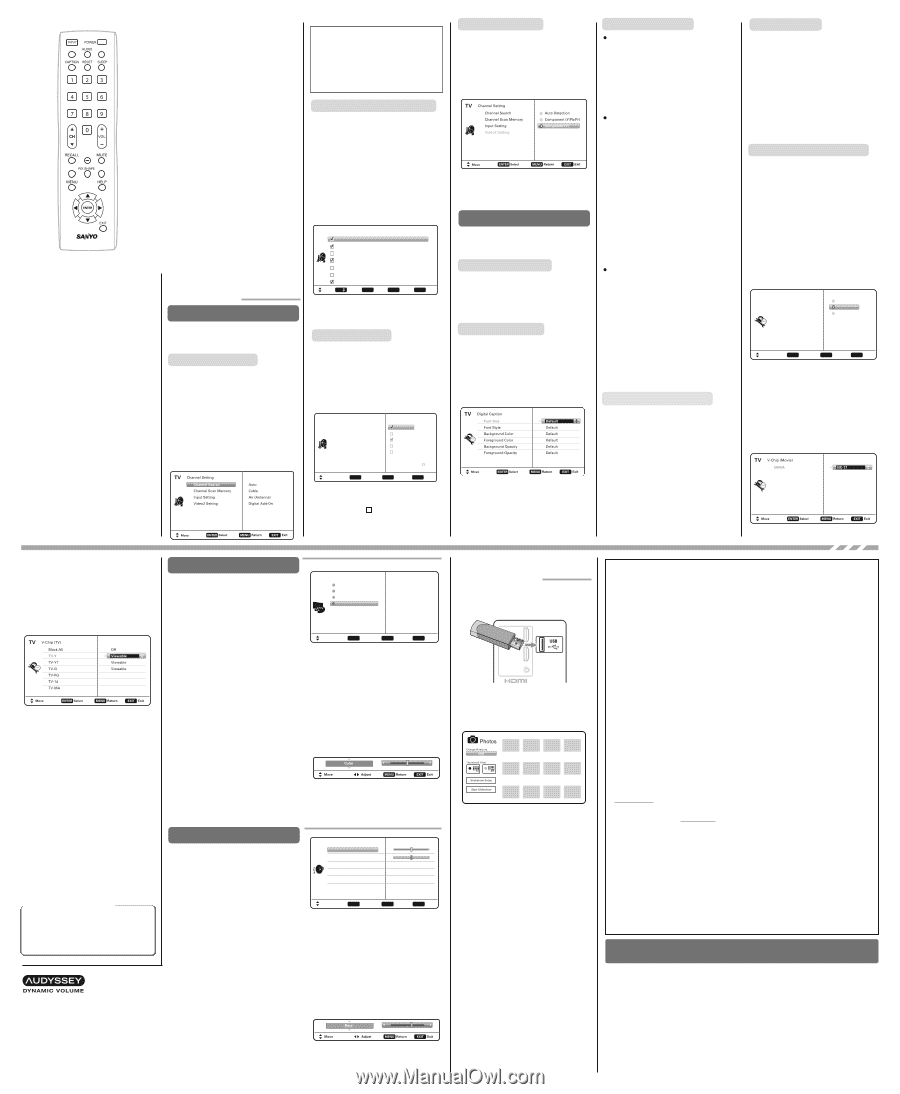
REMOTE CONTROL OPERATION SUB CH. Use for the direct selection of digital subchannels. For example: for ECO ONTIMER channel 39-1 press the 3 and 9 keys, followed by the dash -, and 1 keys. MUTE. Mute or restore the sound. INFO. Displays theChannel Information banner. PIX SHAPE. Cycles through the various aspect ratios. The different settings either stretch, zoom, or fill the image on your screen. Bars may appear on top and bottom of your screen (or on left and right sides) depending on the SUB CH broadcasted signal or program. INFO DYN VOL DYN VOL. Modifies the Dynamic Volume feature settings MENU. Display or hide the on-screen menu. HELP. Displays the on-screen Help menu. CURSORLM . Move the on-screen cursor in the desired direction. POWER. Turns your HDTV On or Off. INPUT. Selects the video source to view. Holding down the key displays the Input List. ECO. Modifies the Energy Saver level. AUDIO. Selects the desired Audio mode. Stereo, Mono, or SAP (when available.) ON TIMER. Displays the current switch on time (if activated.) CAPTION. Cycles through the available Caption modes (when available.) RESET. Pressing it twice restores your HDTV to its factory settings. All user customized settings will be cleared. SLEEP. Displays the "Off" Timer. While Off Timer is on-screen, press the "0" key to Set the amount of time (in 30 minute increments) at which the HDTV will turn off. NUMERIC KEYS. Choose a channel directly. ENTER. Set or select the highlighted option on the screen. EXIT. Exits the on-screen menu. ON-SCREEN MENU OPERATION CHANNEL Display the On Screen menu and use the CURSOR keys to select Channel. Press ENTER. Channel Search Auto - Searches the detected mode, Cable or Air. Cable - Searches for analog and unscrambled (ClearQAM) digital cable channels. Air (Antenna) - Searches for analog and digital off-air channels. Digital Add-On - Searches digital channels adding newly found digital channels to the channel database. CH LM. Scan through the channels in the memory database. VOL + - . Increases or decreases the audio level. RECALL. Switch between current channel and last selected channel or input. IMPORTANT FACT: This HDTV maintains only one database of digital channels. Therefore, when you search for cable channels, the database of antenna digital channels will be deleted. You will only be able to receive those ClearQAM channels your cable company provides. Channel Scan Memory Channel Scan Memory lists all Analog and Digital channels found. It also lists Analog channels that were not found, which can be added. Use the CURSOR LM keys to move the channel select bar through all enabled and disabled channels. NOTE: You can use the CH LM keys to change page. Press ENTER to enable or disable the selected channel. TV Channel Scan Memory Analog 03 WREG-DT Digital 03-1 Digital 03-2 WCVB Analog 04 WEXT Analog 05 NICK Analog 06 NICK Digital 06-1 VBCT Move CH Page ENTER Select MENU Return EXIT Exit NOTE: For information on local digital channels, visit www.antennaweb.org Input Setting Input Setting feature allows the removal of unused inputs from the AV input loop. Use the CURSOR LM keys to select an AV input. Press ENTER to disable (uncheck) or enable (check) the highlighted input. TV Channel Setting Channel Search Channel Scan Memory Input Setting Video2 Setting Video1 Video2 HDMI1 HDMI2 USB :Skip Move ENTER Select MENU Return EXIT Exit NOTE: At least one input must and will remain checked. Unchecked box means the input will be skipped Video2 Setting Use this feature to establish either a Component or Composite connection to the VIDEO INPUT 2 jacks on your HDTV. Use the CURSOR LM keys to select the type of connection you'll use in VIDEO INPUT 2. Press ENTER, a blue mark will appear next to the selected option indicating it as the active option. SETUP Display the On Screen menu and use the CURSOR keys to select Setup. Press ENTER. Menu Language Choose between English, Spanish and French for your On Screen menu's display language. Press ENTER on the desired language. Digital Caption Captioning is textual information transmitted along with the picture and sound. Turning Captioning ON (by pressing the CAPTION key during normal TV viewing) causes the HDTV to open these captions (digital or analog) and superimpose them on the screen. NOTE: Local broadcasters decide which caption signals to transmit. Use the CURSOR LM and keys to modify Font, Background, and Foreground of digital caption text. Energy Solution ECO (ENERGY SAVER) ECO controls the LCD backlight brightness to reduce power consumption. - Level 1: Energy Saver feature is off. - Level 2: Low power consumption. - Level 3: Lowest power consumption. Press ENTER on the desired level. LIGHT SENSOR This feature detects ambient room light brightness and uses that reading to control the panel brightness level and picture parameters to reduce the HDTV's power consumption. NOTE: When room lighting is dark, the panel brightness and/or the picture setting parameters such as brightness and contrast are lowered. When room lighting is bright, parameters are affected opposite. Use the CURSOR LM keys to select On or OFF and press ENTER. AUTO SHUT-OFF When Auto Shut-off feature is set to ON, it will allow the HDTV to automatically turn off when no video and/or audio signals are being received. NOTES: By factory default, this feature is set to ON. The HDTV will automatically turn off if no AV signals are received in a time span of 15 minutes. Use the CURSOR LM keys to select On or OFF and press ENTER. Mode (Home/Store) Use the Mode (Home/Store) option if you would like to change the initial Energy Saving Mode chosen at HDTV's first power on. Home Mode - For saving energy and power consumption reduction. Store Mode - High brightness and contrast for display at retailer store. NOTE: Only Home Mode qualifies for Energy Star. Press ENTER on the desired mode. Clock Timer This feature allows you to set a Current Time for your HDTV and enable a Switch On Time for the HDTV to turn on at a specific time of day. When On Timer Function is set to ON, the TV will automatically turn on at the previously set Switch on Time. Use the CURSOR LM and keys to modify the Current Time and/or Switch On Time. V-Chip (parental control) Use this feature to automatically block programs with content you deem as inappropriate for viewing by your children. NOTE: This feature is designed to comply with the United States of America's FCC V-Chip regulations. Therefore, it may not function with broadcasts that originate in other countries. ADJUSTING THE V-CHIP RATINGS Select ON and press ENTER. Select Adjust (Standard) and press ENTER. TV Setup Menu Language V - Chip Digital Caption Energy Solution Clock Timer Mode (Home/Store) Off On Adjust (standard) Move ENTER Select MENU Return EXIT Exit NOTE: Blocking a rating will automatically block all higher ratings. Unblocking a rating will automatically unblock all lower ratings. For V-Chip (Movie) ratings select Movie and press ENTER, and then select the desired MPAA rating limit. Press the EXIT key to close the V-Chip menu. V-Chip (continued) For V-Chip (TV) ratings select TV and press ENTER. Use the CURSOR L M keys to select a rating and press ENTER. Use the CURSOR L M keys to set the rating's status as Blocked or Viewable. Once ratings are set, press the EXIT key to close the V-Chip menu. NOTE: Some TV ratings offer more detailed settings such as Dialogue, Language, Sexual, and Violence. ADVANCED V-CHIP SYSTEM (RRT5) RRT5 (V-Chip Regional Ratings 5) is an advanced V-Chip ratings system for over the air digital channels. When the HDTV detects compatible RRT5 data, it's downloaded & stored in memory, and the Setup V-Chip screen is then modified to show the Adjust (Advanced) option. Use the CURSOR L M and keys to highlight the different options, and use the ENTER key to block or unblock the selected rating. NOTE: When vertical scroll bars appear, press CURSOR LM to gain access to the additional ratings. MORE INFORMATION Additional information about MPAA (Motion Picture Association of America) and V-Chip rating can be found at: www.mpaa.org and www.v-chip.org, respectively. 1 Audyssey Dynamic Volume solves the problem of large variations in volume level between television programs, commercials, and between the soft and loud passages of movies. Audyssey Dynamic EQ is integrated into Dynamic Volume so that as the playback volume is adjusted automatically, the perceived bass response, tonal balance, surround impression and dialog clarity remain the same. PICTURE Display the On Screen menu and use the CURSOR keys to select Picture. Press ENTER. You may choose between Vivid, Mild, and Standard, which have predetermined fixed picture parameter values, or choose the Manual option for customized personal settings. NOTE: Each AV input can have its own picture mode (pre-determined or manual.) Current input's selected option is indicated by a blue marker. MANUAL PICTURE SETTINGS Manual parameters to adjust include: • Color • Tint • Contrast • Brightness • Sharpness • Color Temperature The Detailed Setting option allows for the adjustment of several additional parameters such as: • Signal Balancer • Noise Reduction • White Balance • Edge Enhancer • H-Size / V-Size • Dynamic Contrast SOUND Display the On Screen menu and use the CURSOR keys to select Sound. Press ENTER. Choose sound setting option: Auto - Sound settings are linked to the current Picture option and parameters are adjusted accordingly. Dynamic, Mild, Standard - Predetermined sound parameters not linked with any Picture option. MANUAL SOUND SETTINGS The Manual option provides different parameters that can be personally adjusted: • Bass & Treble • Bass Extension • Audyssey Dynamic Volume 1 • Detailed Setting - Equalizer: Personalize audio highs and lows. TV Picture Vivid Mild Standard Manual Move ENTER Select Color Tint Contrast Brightness Sharpness Color Temperature Detailed Setting Default MENU Return EXIT Exit ADJUSTING A PICTURE SETTING Use the CURSOR LM keys to highlight the picture parameter you wish to adjust. Press the ENTER key to enter the value adjustment screen. Modify the selected parameter's value by pressing the CURSOR keys. NOTE: CURSOR LM keys select the next/previous parameter without returning to the previous menu screen. Once adjustments are complete, press the EXIT key to return to normal TV viewing. TV Manual Bass Treble Bass Extension Audyssey Dynamic Volume Detailed Setting Default Sound ON Medium Move ENTER Select MENU Return EXIT Exit ADJUSTING A SOUND SETTING Use the CURSOR LM keys to highlight the sound parameter you wish to adjust. Press the ENTER key to enter the value adjustment screen. Modify the selected parameter's value by pressing the CURSOR keys. NOTE: CURSOR LM keys select the next/previous parameter without returning to the previous menu screen. Once adjustments are complete, press the EXIT key to return to normal TV viewing. USB INPUT PHOTO VIEWER View pictures on your HDTV with the use of a USB mass storage device (not included.) HDTV BACK PANEL USB FLASH DRIVE HDMI 2 HDMI INPUT1 AUDIO (DVI) Insert the flash drive into the USB port, the TV will display the Photo Viewer screen, select Shuffle Play or Browse Photos and press ENTER to begin. NOTE: A thumbnail hide icon will appear if a picture cannot be decoded or if no thumbnail data is available. USING THE PHOTO VIEWER Press ENTER on a thumbnail photo to enable the Rotate, Full View and Start Slideshow functions. Once in Full View mode: Use the CURSOR picture. keys to change Press ENTER to show the full view options menu. • Rotate • Pan • Start Slideshow • Zoom In / Out • Slideshow setup • Browse Photo SLIDE SHOW In the Slideshow Setup menu you may turn the Shuffle and Quick Change options ON or OFF. Press ENTER on Start Slideshow either from the Thumbnail View Screen or from the full view options menu to start the slideshow from the current picture. ONE-YEAR LIMITED PARTS AND LABOR WARRANTY THIS LIMITED PARTS AND LABOR WARRANTY IS VALID ONLY ON SANYO TELEVISIONS PURCHASED AND USED IN THE UNITED STATES OF AMERICA, CANADA, AND PUERTO RICO, EXCLUDING ALL OTHER U.S. TERRITORIES AND PROTECTORATES. THIS LIMITED WARRANTY APPLIES ONLY TO THE ORIGINAL RETAIL PURCHASER, AND DOES NOT APPLY TO PRODUCTS USED FOR INDUSTRIAL OR COMMERCIAL PURPOSES. WARRANTY APPLICATION FOR ONE YEAR from the date of original retail purchase Sanyo Manufacturing Corporation (SMC) warrants this TV to be free from manufacturing defects in materials and workmanship under normal use and conditions for parts and labor. For the FIRST 90 DAYS from the date of original retail purchase, Sanyo Manufacturing Corporation will replace any defective TV via exchange at the retailer. To ensure proper warranty application, keep the original-dated-sales receipt for evidence of purchase. Return the defective TV to the retailer along with the receipt and the included accessories, such as the remote control. The defective TV will be exchanged for the same model, or a replacement model of equal value, if necessary. Replacement model will be contingent on availability and at the sole discretion of Sanyo Manufacturing Corporation. THE FOREGOING WARRANTY IS EXCLUSIVE AND IN LIEU OF ALL OTHER WARRANTIES OF MERCHANTABILITY OR FITNESS FOR A PARTICULAR PURPOSE. OBLIGATIONS For one year from the date of purchase, Sanyo Manufacturing Corporation warrants this product to be free from defects in material and workmanship under normal use and conditions. During the first 90 days under this warranty for any manufacturing defect or malfunction Sanyo Manufacturing Corporation will provide a new TV via exchange at the retailer. HOW TO MAKE A CLAIM UNDER THIS WARRANTY Please call 1-800-877-5032. Please be prepared to give us the television's model number and serial number when you call. The model number and serial number are printed on a label attached to the back of the unit. For customer assistance, call toll free 1-800-877-5032. This warranty expresses specific contractual rights; retail purchasers may have additional statutory rights which vary from state to state. (EFFECTIVE: March 1, 2007) Your Sanyo HDTV is registered at the time of purchase, please keep sales receipt for future reference. For your protection in the event of theft or loss of this product, please fill in the information requested below and KEEP IN A SAFE PLACE FOR YOUR OWN PERSONAL RECORDS. Model No Located on back of unit) Purchase date Serial No Located on back of unit) Purchase Price Where Purchased
-
 1
1 -
 2
2
 |
 |