Sanyo SYSZ5LMP PLV-Z5 Owners Manual - Page 21
Menu and its Functions, Image, Image adj., Picture adj., Screen, Input, Setting, Information, Guide
 |
UPC - 017133340781
View all Sanyo SYSZ5LMP PLV-Z5 manuals
Add to My Manuals
Save this manual to your list of manuals |
Page 21 highlights
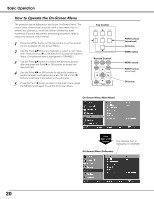
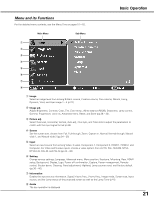
Basic Operation Menu and its Functions For the detailed menu contents, see the Menu Tree on pages 51 - 52. Main Menu Sub-Menu q w e r t y u i q Image Select an image level from among Brilliant cinema, Creative cinema, Pure cinema, Natural, Living, Dynamic, Vivid, and User image 1 - 4 (p.27). w Image adj. Adjust Brightness, Contrast, Color, Tint, Color temp., White balance (R/G/B), Sharpness, Lamp control, Gamma, Progressive, Lens iris, Advanced menu, Reset, and Store (pp.28 - 32). e Picture adj. Select Overscan, Horizontal, Vertical, Auto adj., Fine sync, and Total dots to adjust the parameters to match with the input signal format (p.33). r Screen Set the screen size; choose from Full, Full through, Zoom, Caption in, Normal, Normal through, Natural wide 1, and Natural wide 2 (pp.34 - 35). t Input Select an input source from among Video, S-video, Component 1, Component 2, HDMI 1, HDMI 2, and Computer. For Video and S-video inputs, choose a video system from AUTO, PAL, SECAM, NTSC, NTSC4.43, PAL-M, and PAL-N (pp.24 - 26). y Setting Change various settings; Language, Advanced menu, Menu position, Keystone, Mounting, Rear, HDMI setup, Background, Display, Logo, Power off confirmation, Capture, Power management, Remote control, Shutter demo, Cleaning, Panel adjustment, Highland, Lamp counter reset, and Factory default (pp.36 - 40). u Information Display the input source information: Signal, H-sync freq., V-sync freq., Image mode, Screen size, Input source, and the Lamp status of the projected screen as well as the Lamp Time (p.41). i Guide The key operation is displayed. 21
-
 1
1 -
2
-
3
-
4
-
5
-
6
-
7
-
8
-
9
-
10
-
11
-
12
-
13
-
14
-
15
-
 16
16 -
 17
17 -
 18
18 -
 19
19 -
 20
20 -
 21
21 -
 22
22 -
 23
23 -
 24
24 -
 25
25 -
 26
26 -
27
-
28
-
29
-
30
-
31
-
32
-
33
-
34
-
35
-
36
-
37
-
38
-
39
-
40
-
41
-
42
-
43
-
44
-
45
-
46
-
47
-
48
-
49
-
50
-
51
-
52
-
53
-
54
-
55
-
56
-
57
 |
 |
