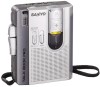
Sanyo TRC-2050C Service Manual - Page 2
Tape adjustments, Adjusting, Azimuth, Replacing the Head, Checking the Mechanism Torques
 |
View all Sanyo TRC-2050C manuals
Add to My Manuals
Save this manual to your list of manuals |
Page 2 highlights
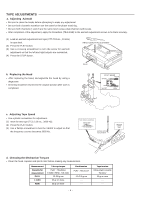
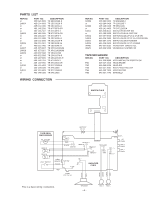
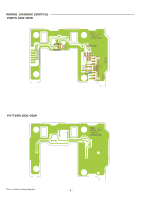
TAPE ADJUSTMENTS a. Adjusting Azimuth • Be sure to clean the heads before attempting to make any adjustment. • Be sure both channel's waveform are the same for the phase matching. • Be sure both channels (1 and 2) are the same level using a dual-channel oscilloscope. • After completion of the adjustment, apply the threadlock (TB-1401B) to the azimuth adjustment screws to fix them securely. (1) Load an azimuth adjustment test tape (VTT-703 etc., 10 kHz) in tape deck. (2) Press the PLAY button. (3) Use a cross-tip screwdriver to turn the screw for azimuth adjustment so that the left and right outputs are maximized. (4) Press the STOP button. HEAD AZIMUTH ADJUSTMENT PLAY b. Replacing the Head • After replacing the head, demagnetize the head by using a degausser. • All wiring should be returned to the original position after work is completed. R / P HEAD BLACK WHITE WHITE GRAY c. Adjusting Tape Speed • Use a plastic screwdriver for adjustment. (1) Inset the test tape (TCC-119 etc., 3000 Hz). TAPE SPEED CONTROL TAPE PLAY SPEED SLOW NOR FAST (2) Press the PLAY button. 2.4 4.8 (3) Use a flat-tip screwdriver to turn the VR403 to adjust so that SPEED the frequency counter becomes 3000 Hz. MOTOR SPEED ADJUSTMENT d. Checking the Mechanism Torques • Clean the head, capstan and pinch roller before making any measurement. Measurement Cassette for measurement PLAY F.FWD REW Take-up torque PLAY : TW-2111A F.FWD / REW : TW-2231 23~50 gr.cm 55 gr.cm more 55 gr.cm more Back tension PLAY : TW-2111A 1.0~5.0 gr.cm ----- Tape tension Drive-power cassette TW-2412 30 gr or more ----- - 1 -
-
 1
1 -
 2
2 -
 3
3 -
 4
4 -
 5
5 -
 6
6 -
 7
7 -
 8
8
 |
 |
