Sanyo VPC CG65 Instruction Manual, VPC-CG65EX - Page 122
Press shutter to save
 |
UPC - 086483067853
View all Sanyo VPC CG65 manuals
Add to My Manuals
Save this manual to your list of manuals |
Page 122 highlights
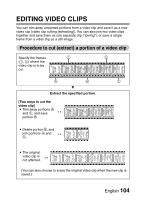
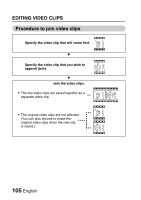
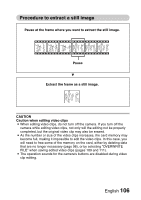
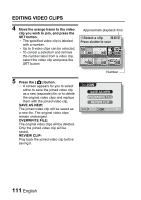
5 Specify the start point of the extract. h Use the procedure below to specify the frame from which the video clip extract will start. h Play the video clip until approximately the desired point, pause the video clip, then play the video clip one frame at a time, stopping at the start point of the extract. This will be the first frame of the extract. h If the start point of the video clip is also the start point of the extract, proceed to step 6. Play: After pausing playback, press and hold the SET button to the right for about 2 seconds for forward playback, or to the left for reverse playback. Pause: During playback, press the SET button. Accelerated playback: During playback, toggle the SET button to the left or right to change the playback speed. Single frame: After pausing playback, toggle the SET button to the right to move forward one frame, or to the left to move back one frame. 6 Toggle the SET button up. h The start point of the video clip extract is set, and the screen to specify the end point appears. h Specify the end point of the extract by following the same procedure as in step 5. 1 Toggle the SET button down. h Each time the SET button is toggled down, the sections to delete and the sections to save are reversed. 2 Specify the end point of the extract. The frame following the end point of the extract will be the start point of the latter portion to be joined. Approximate playback time CUT 00:01:10 Press shutter to save End point Portion to be deleted English 108
-
 1
1 -
2
-
3
-
4
-
5
-
6
-
7
-
8
-
9
-
10
-
11
-
12
-
13
-
14
-
15
-
16
-
17
-
18
-
19
-
20
-
21
-
22
-
23
-
24
-
25
-
26
-
27
-
28
-
29
-
30
-
31
-
32
-
33
-
34
-
35
-
36
-
37
-
38
-
39
-
40
-
41
-
42
-
43
-
44
-
45
-
46
-
47
-
48
-
49
-
50
-
51
-
52
-
53
-
54
-
55
-
56
-
57
-
58
-
59
-
60
-
61
-
62
-
63
-
64
-
65
-
66
-
67
-
68
-
69
-
70
-
71
-
72
-
73
-
74
-
75
-
76
-
77
-
78
-
79
-
80
-
81
-
82
-
83
-
84
-
85
-
86
-
87
-
88
-
89
-
90
-
91
-
92
-
93
-
94
-
95
-
96
-
97
-
98
-
99
-
100
-
101
-
102
-
103
-
104
-
105
-
106
-
107
-
108
-
109
-
110
-
111
-
112
-
113
-
114
-
115
-
116
-
 117
117 -
 118
118 -
 119
119 -
 120
120 -
 121
121 -
 122
122 -
 123
123 -
 124
124 -
 125
125 -
 126
126 -
 127
127 -
128
-
129
-
130
-
131
-
132
-
133
-
134
-
135
-
136
-
137
-
138
-
139
-
140
-
141
-
142
-
143
-
144
-
145
-
146
-
147
-
148
-
149
-
150
-
151
-
152
-
153
-
154
-
155
-
156
-
157
-
158
-
159
-
160
-
161
-
162
-
163
-
164
-
165
-
166
-
167
-
168
-
169
-
170
-
171
-
172
-
173
-
174
-
175
-
176
-
177
-
178
-
179
-
180
-
181
-
182
-
183
-
184
-
185
-
186
-
187
-
188
-
189
-
190
-
191
-
192
-
193
-
194
-
195
-
196
-
197
-
198
-
199
-
200
-
201
-
202
-
203
-
204
-
205
-
206
 |
 |
