Sanyo VPC T700 Owners Manual - Page 55
Connecting To A Pictbridge Compliant Printer - usb
 |
UPC - 877653000240
View all Sanyo VPC T700 manuals
Add to My Manuals
Save this manual to your list of manuals |
Page 55 highlights
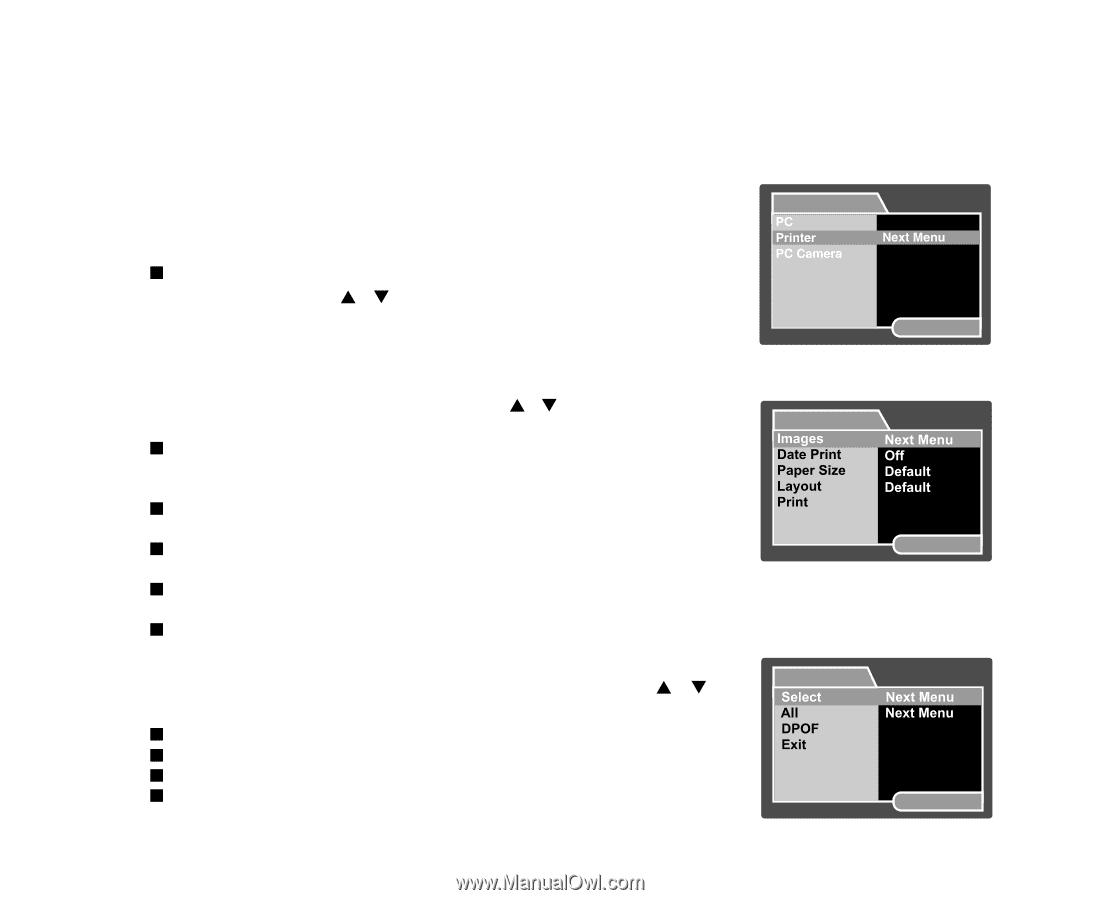
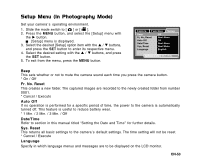
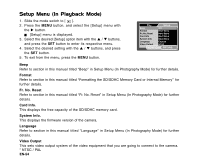
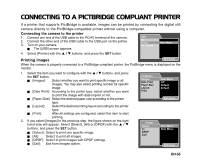
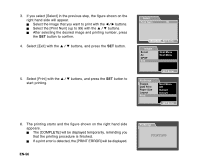
CONNECTING TO A PICTBRIDGE COMPLIANT PRINTER If a printer that supports PictBridge is available, images can be printed by connecting the digital still camera directly to the PictBridge-compatible printer without using a computer. Connecting the camera to the printer 1. Connect one end of the USB cable to the PC/AV terminal of the camera. USB 2. Connect the other end of the USB cable to the USB port on the printer. 3. Turn on your camera. J The [USB] screen appears. 4. Select [Printer] with the S / T buttons, and press the SET button. Printing images SET:Enter When the camera is properly connected to a PictBridge compliant printer, the PictBridge menu is displayed on the monitor. 1. Select the item you want to configure with the S / T buttons, and press the SET button. J [Images]: Select whether you want to print specific image or all images. You may also select printing number for specific image. J [Date Print]: According to the printer type, select whether you want to print the image with date imprint or not. J [Paper Size]: Select the desired paper size according to the printer type. J [Layout]: Select the desired printing layout according to the printer type. J [Print]: After all settings are configured, select this item to start printing. 2. If you select [Images] in the previous step, the figure shown on the right hand side will appear. Select [Select], [All] or [DPOF] with the S / T buttons, and press the SET button. J [Select]: Select to print one specific image. J [All]: Select to print all images. J [DPOF]: Select to print images with DPOF settings. J [Exit]: Exit from Images option. PictBridge SET:Enter Images SET:Enter EN-55
-
 1
1 -
2
-
3
-
4
-
5
-
6
-
7
-
8
-
9
-
10
-
11
-
12
-
13
-
14
-
15
-
16
-
17
-
18
-
19
-
20
-
21
-
22
-
23
-
24
-
25
-
26
-
27
-
28
-
29
-
30
-
31
-
32
-
33
-
34
-
35
-
36
-
37
-
38
-
39
-
40
-
41
-
42
-
43
-
44
-
45
-
46
-
47
-
48
-
49
-
 50
50 -
 51
51 -
 52
52 -
 53
53 -
 54
54 -
 55
55 -
 56
56 -
 57
57 -
 58
58 -
 59
59 -
 60
60 -
61
-
62
-
63
-
64
-
65
-
66
 |
 |