Seagate Mirra Personal Server Setup Guide - Page 5
STEP 3: Set it up - software
 |
View all Seagate Mirra Personal Server manuals
Add to My Manuals
Save this manual to your list of manuals |
Page 5 highlights
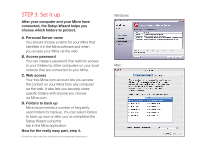
STEP 3: Set it up After your computer and your Mirra have connected, the Setup Wizard helps you choose which folders to protect. A. Personal Server name You should choose a name for your Mirra that identifies it in the Mirra software and when you access your Mirra via the web. B. Access password You can create a password that restricts access to your folders by other computers on your local network that are connected to your Mirra. C. Web access Your free Mirra.com account lets you access the content on your Mirra from any computer via the web. It also lets you securely share specific folders with anyone you choose via Mirra.com. D. Folders to back up Mirra recommends a number of frequently used folders for backup. You can select folders to back up now or after you've completed the Setup Wizard using the tab in the Mirra application. Now for the really easy part, step 4. * (To learn more about each step, click More Info on the appropriate Wizard screen.) Windows: Mac:
-
 1
1 -
 2
2 -
 3
3 -
 4
4 -
 5
5 -
 6
6
 |
 |
