Seagate OneTouch II OneTouch II SBE Quick Start Guide - Page 1
Seagate OneTouch II Manual
 |
View all Seagate OneTouch II manuals
Add to My Manuals
Save this manual to your list of manuals |
Page 1 highlights
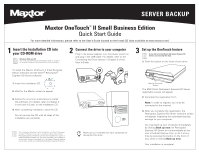
SERVER BACKUP Maxtor OneTouch™ II Small Business Edition Quick Start Guide For more detailed information, please refer to the User's Guide located on the Install CD (also available at www.maxtor.com). 1 Insert the Installation CD into your CD-ROM drive Windows 2000 and XP You must have Administrative Privileges. Refer to chapter 2 of the User's Guide on the Install CD for more information. 2 Connect the drive to your computer Plug in the power adapter, turn the power switch on and plug in the USB cable. For details, refer to the Connecting the Drive section in Chapter 2 of the User's Guide. 3 Set up the OneTouch feature If you did not install Dantz Retrospect Express HD Server, you may skip this step. 1. Push the button on the front of your drive. To install the Maxtor OneTouch II Small Business Edition software and the Dantz® Retrospect® Express HD Server software: 1. Insert the Installation CD. Installation Software Maxtor OneTouch™ II Small Business Edition 2. Wait for the Maxtor screen to appear. 3. Follow the on-screen instructions to install the software. For details, refer to Chapter 2 in the User's Guide, on the Installation CD. 4. After completing installation, eject the CD. Do not remove the CD until all steps of the installation are complete. This Installation describes the Full Installation with Dantz Retrospect Express HD Server. If you wish to install your drive without Dantz Retrospect Express HD Server, choose the 'Install Drivers' option to install the Maxtor software only. For more information, go to Chapter 2 of the User's Guide on the Install CD. The Maxtor OneTouch feature will not work unless you install Dantz Retrospect Express HD Server. Allow up to 2 minutes for your computer to recognize the drive. Maxtor OneTouch Button The EMC Dantz Retrospect Express HD Server registration screen will appear. 2. Complete the registration form. Note: In order to register, you must be connected to the internet. 3. After you complete the registration, the Retrospect Express HD Server welcome screen will appear, displaying the automated backup settings for your computer. You may back up your computer immediately by clicking Back up now, let Retrospect Express HD Server do it automatically at the next scheduled backup time, or do it at any time by pressing the button on the front of your drive or clicking Back up now. Your installation is complete!
-
 1
1 -
 2
2
 |
 |