Seagate Personal Storage 3000DV Style B Installation Guide (Mac) - Page 1
Seagate Personal Storage 3000DV Manual
 |
View all Seagate Personal Storage 3000DV manuals
Add to My Manuals
Save this manual to your list of manuals |
Page 1 highlights
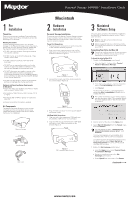
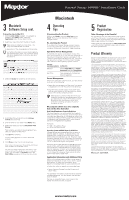
1 Pre Installation Thank You Thank you for selecting a Maxtor Personal Storage product. Please follow these instructions to take full advantage of its features. Handling Precautions If these handling precautions are not followed, damage to the Personal Storage product may result - which may void your product warranty. Please see the Warranty section for additional information. • DO NOT open the product. Opening the product will void the warranty. • DO NOT bump, jar or drop this device as it may result in loss of data. • DO NOT stack this product more than three units high. • DO NOT set or operate the product on its side without an approved cradle from Maxtor. It may fall over and damage the internal hard drive. • DO NOT disconnect any cables or power while copying files without properly unplugging or unmounting the device via your operating system - as this can result in data loss and possible damage to the internal hard drive. • DO NOT set any liquids or drinks on the product as they will damage the internal electronics. Hardware and Operating System Requirements for Macintosh • Power PC: iMac, DV, G3 (Blue and White) or higher with on-board FireWire Ports • Full version of Mac OS 9.x or OS X version 10.1.2 or higher • At least 32 MB of RAM or greater if required by Mac OS • Internet connection (for system updates) Kit Components The Maxtor Personal Storage product comes complete with the components shown here. Please familiarize yourself with each of these items prior to installation. Personal Storage Power Adapter 1394 Cable Personal Storage 3000DV: Installation Guide Macintosh 2 Hardware Installation Personal Storage Installation To connect your new Maxtor Personal Storage product to your computer, please follow these simple steps. If these steps are not performed in order, your product may not function properly. Power Cord Connections 1. Ensure that your computer is on and running one of the required operating systems. 2. Plug the four-pin male connector with the flat side facing up into the back of the product's DC power-in connector (Figure 1). 3 Macintosh Software Setup Once you have completed the Hardware Installation, the Mac OS will display an untitled volume. This is your new drive. Note: It may take a few minutes for your drive to mount. Maxtor suggests that you re-format your drive for optimal performance on the Macintosh (OS 9 and OS X). Formatting Your Drive for Mac OS Formatting the drive destroys all data contained on that drive. Make a backup copy of all your data before formatting your drive. To format the drive for Mac OS 9 1. Disable the File Exchange control panel. a. From the Apple () menu, select Control Panels ➔ Extensions Manager. Figure 1 Power Connector Hook-up 3. Connect the female end of the electric cord into the power adapter (Figure 2). Figure 2 Power Adapter Hook-up 4. Plug the male connector from the power adapter into power outlet. 1394 Data Cable Connections 1. Plug one end of the translucent 1394 cable into any available 1394 port on your computer. 2. Plug the other end of the translucent 1394 cable into either of the 1394 connections on the product (Figure 3). Figure 3 1394 Interface Cable Hook-up b. From the list that appears, clear the check box next to the File Exchange control panel. c. Click Restart. As the computer restarts, a message appears saying the drive is unreadable and asks you to initialize the drive. For further information on your drive's capacity, see the description titled "My computer shows less drive capacity than on the drive box label" in section 4. 2. Enter a name for the drive in the Name field. 3. Select Mac OS Extended from the Format menu and click Initialize. You will receive an Alert: "Initializing will erase all information on your drive." Click Continue. The new drive appears on your desktop as a Macintosh drive with the name you assigned. To confirm the drive is formatted properly, select the drive and then select File ➔ Get Info ➔ General Information. The drive format should read Mac OS Extended. 4. Enable the File Exchange control panel. a. From the Apple menu, select Control Panels ➔ Extensions Manager. b. Select the check box next to the File Exchange control panel. c. Under Special (top menu bar), click Restart. Continued www.maxtor.com
-
 1
1 -
 2
2
 |
 |