Seagate STAU12000100 User Guide - Page 18
Creating User Accounts, Storage, Shares, Recycle Bin Service, Enable, Drag&Sort Service
 |
View all Seagate STAU12000100 manuals
Add to My Manuals
Save this manual to your list of manuals |
Page 18 highlights
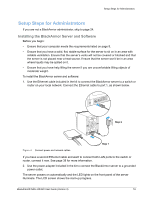
Setup Steps for Administrators To create custom shares: 1. In the menu bar, select Storage, click Shares, then click the Add icon. 2. Enter a name for the new share. To make the share easy to recognize on the server, give it a name that's descriptive and easy to remember. 3. Enter a description of the share. 4. Select the share's owner from the drop-down list of all user accounts. (See Creating User Accounts to create individual user accounts.) 5. Select the types of protocols you want the share to support (see page 34). 6. Select the volume in which to create the share, if there is more than one volume on your server. 7. You can protect files on the share from being accidentally deleted by adding a recycle bin to the share. Deleted files can be recovered from the recycle bin, if necessary. To add a recycle bin, beside Recycle Bin Service, click Enable. 8. You can set the share to download specific types of files into default folders-for instance, all music files into Music. To automatically sort downloaded files, beside Drag&Sort Service, click Enable. See "Special Features of Shares" on page 34 for information about this service. 9. You can use your BlackArmor server to share digital photos, videos and music with people on your local network. To set up this service, beside Media Service, click Enable. 10. Click the check box for Share Access to go to the page on which you set up and customize user and group access to this new share. See the BlackArmor Manager online Help for more information. 11. Click Submit. The share is created. Creating User Accounts Your BlackArmor server comes with one administrator account only. Your next step is to use BlackArmor Manager to create individual user accounts. Part of creating user accounts is assigning each user access to the default shares or the new shares you create. To create a user account: 1. In the menu bar, select Access, then click Users. 2. Click the Add icon. BlackArmor® NAS 440/420 User Guide (Version 3) 19
-
 1
1 -
2
-
3
-
4
-
5
-
6
-
7
-
8
-
9
-
10
-
11
-
12
-
 13
13 -
 14
14 -
 15
15 -
 16
16 -
 17
17 -
 18
18 -
 19
19 -
 20
20 -
 21
21 -
 22
22 -
 23
23 -
24
-
25
-
26
-
27
-
28
-
29
-
30
-
31
-
32
-
33
-
34
-
35
-
36
-
37
-
38
-
39
-
40
-
41
-
42
-
43
-
44
-
45
-
46
-
47
-
48
-
49
-
50
-
51
-
52
-
53
-
54
-
55
-
56
-
57
-
58
-
59
-
60
-
61
-
62
-
63
-
64
 |
 |
